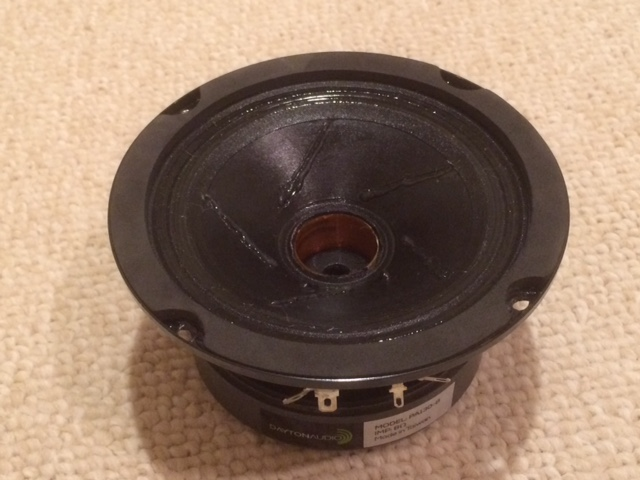
There is an inexpensive but nice full range driver by Dayton called the PA130-8 ( https://www.parts-express.com/pedocs/specs/295-010-dayton-audio-pa130-8-specifications-46131.pdf ) that I think we should all give a try at some point. It is marketed as a "pro audio" full range or mid. It has a rather industrial look to it, but can sound quite wonderful in several different alignments that I have tried. It is about one of the most sensitive drivers in the sub $20 price point, has great mids for vocals, and just enough highs to make it a full range driver. You will hear high hats, rim shots, snares no problem. I have used it in a 0.53x mini Karlsonator, an XKi, and in my Nautaloss sealed tapered TL in a FAST. In the 0.53x Karlsonator it reaches 65Hz and in the XKi, it reaches 55Hz in a compact format. It is currently my preferred driver for both the Karlsonator and XKi for its high sensitivity and ability to reach some nice bass with impact that the little Vifa TC9FD cannot do. More info on those speakers here:
http://www.diyaudio.com/forums/full-range/239338-mini-karlsonator-0-53x-dual-tc9fds.html
http://www.diyaudio.com/forums/full-range/268524-xki-xs-ab-initio-karlson-6th-order-bandpass.html
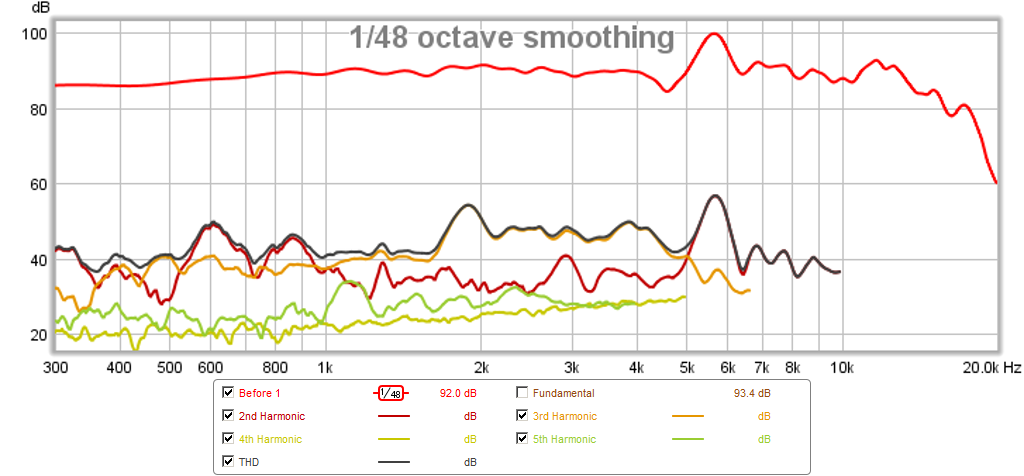
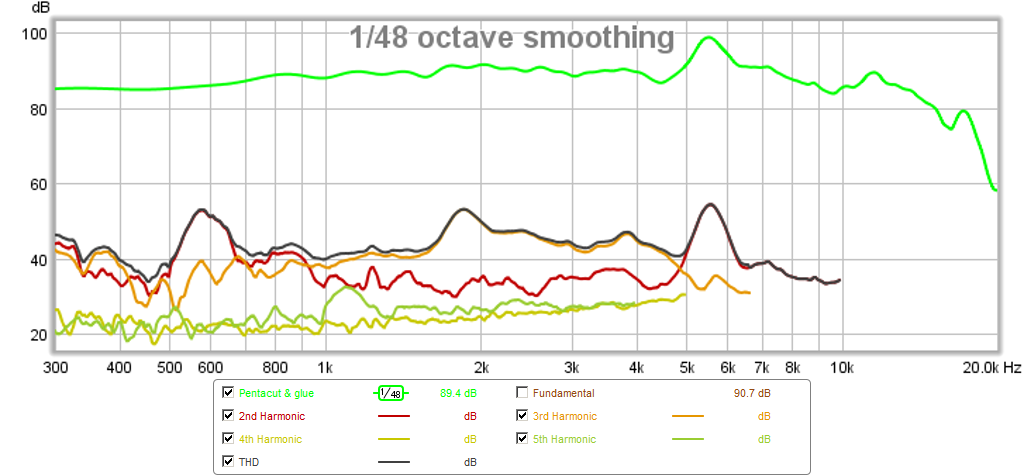
For near field and open-face driver applications, measurements of this driver will reveal that it has a big resonance peak at 5kHz, which is well suppressed when sitting behind a K-aperture. There is also kind of a rough response above 5kHz to the max limit of circa 12kHz to 15kHz. Here is the frequency response and harmonic distortion for a moderate drive level for the baseline (un-modified) driver. This was taken at 0.5m and driver in Nautaloss with trapezoid baffle:
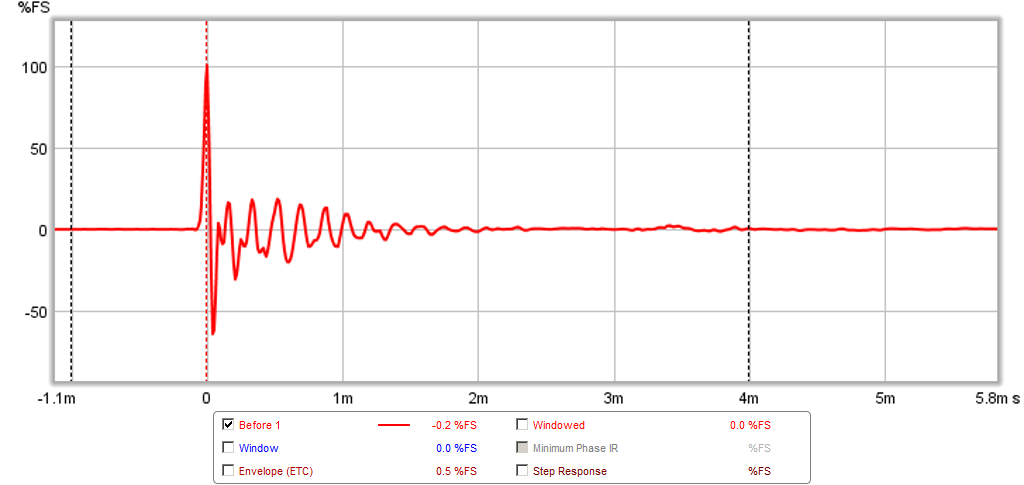
I started wondering if there is anything one can do to improve the response because as we all know, a resonance peak in frequency must be accompanied with significant ringing in the time domain. Sure enough you can see that here with the impulse response. You can see that there are two ring modes at 5kHz (main) and a smaller 10kHz on top of that:
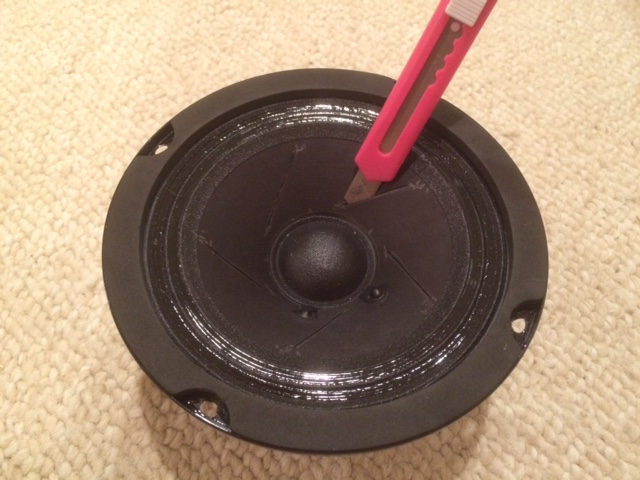
The first thing I tried was to impose pentagonal symmetry like a ScanSpeak Revelator - or a "Daytonator", the PA130-8X. The pentagon prevents reflection symmetry resonance modes from being the dominant cone breakup mode. This took mustering up some courage to take a knife to a brand new PA130-8 (after I measured its baseline response). I cut 5 angled radial spoke slits in the cone from near the voice coil towards the surround - ouch!:
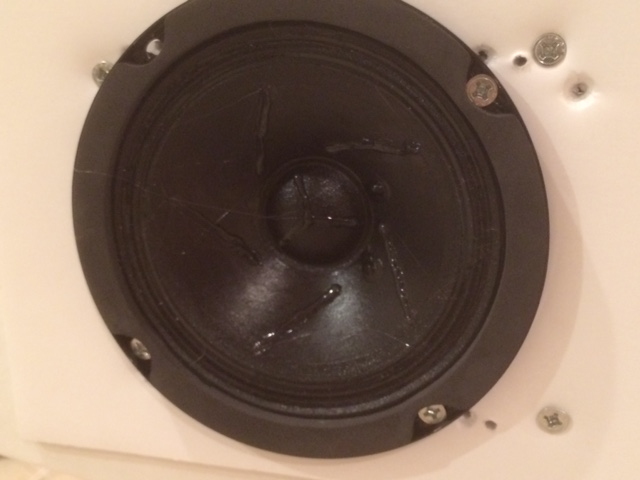
Then I used some PVA-like craft cement that dries semi-soft (waterproof craft textile glue) to reglue the slits - applied with hypo syringe and needle. Once it dried, I brushed a thin coat of same glue on cone to give the whole paper some better damping. I then took a hot melt glue gun and added a bead of hot glue onto the now-reglued slits to give more of a mass impedance discontinuity at the cone in hopes of breaking up any resonance breakup waves:
Here is the result of the above mods in frequency response. Some reduction in the 10kHz peak but not much in 5kHz peak, but the IR showed a reduction in the 10kHz ring (not shown):
My next step was to remove the dustcap, my thinking is that this may be source of resonance as there is a chamber behind the dustcap vented to the back through a small hole that may be causing a resonance mode.
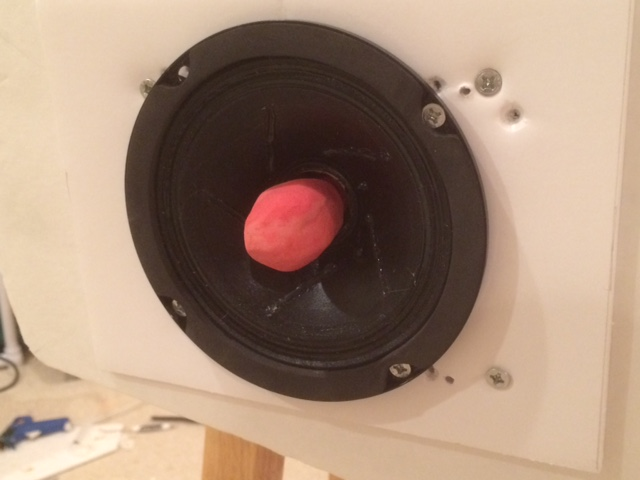
The measurement without the dustcap was just awful - a huge dip formed at 4 kHz due to the empty air column there - I don't have enough room to show the response, but I subsequently added a plastic modeling clay phase plug to that hole in the dustcap as a stationary phase plug:
That improved things a lot, and as we can see, the highs above 5kHz are smoother, and the 5kHz peak is smaller but there is a sharp dip before 5kHz - although very narrow and may not be so audible. The roughness above 5kHz is much smoother now, but a bit depressed:

Looking at the impulse response now, we see that there is indeed a much reduced ringing, and subjectively listening, it sounds better - percussion is more crisp. However, the sensitivity went down a bit probably due to the less stiff cone and a bit of added mass:

So here are the combined measurements of all the mods on one graph. I took all data with speaker cabinet and mic untouched with just removing and reinstalling driver each time so data is very consistent:
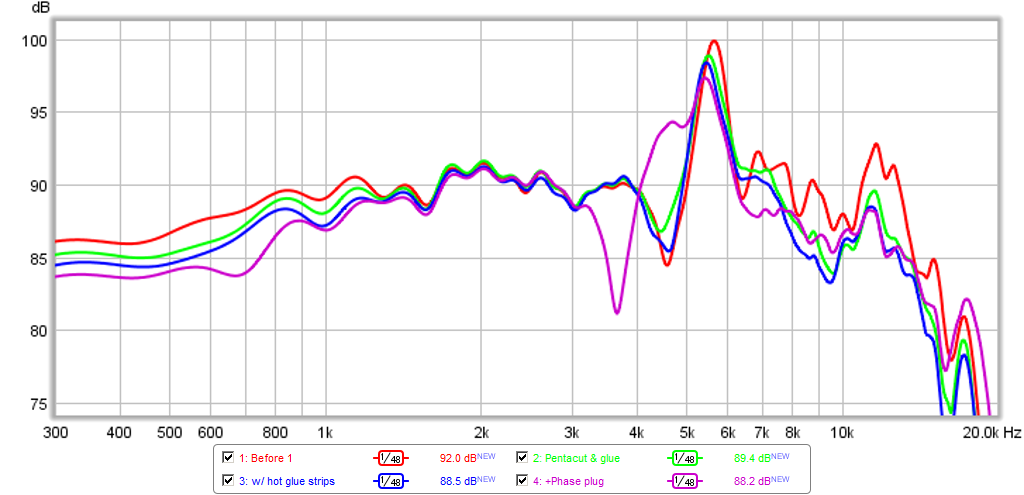
So there is some success and it's a bit of a mixed bag. I think the pentagonal cuts fixed the 10kHz ringing, but the 5kHz ring appears more of a pressure and phase plug air flow issue.
Perhaps not all mods were warranted, but this is exploration stage. There may be some issues with the air flow and reflections in the basket which I will look at next.
More to come...
http://www.diyaudio.com/forums/full-range/239338-mini-karlsonator-0-53x-dual-tc9fds.html
http://www.diyaudio.com/forums/full-range/268524-xki-xs-ab-initio-karlson-6th-order-bandpass.html
For near field and open-face driver applications, measurements of this driver will reveal that it has a big resonance peak at 5kHz, which is well suppressed when sitting behind a K-aperture. There is also kind of a rough response above 5kHz to the max limit of circa 12kHz to 15kHz. Here is the frequency response and harmonic distortion for a moderate drive level for the baseline (un-modified) driver. This was taken at 0.5m and driver in Nautaloss with trapezoid baffle:
I started wondering if there is anything one can do to improve the response because as we all know, a resonance peak in frequency must be accompanied with significant ringing in the time domain. Sure enough you can see that here with the impulse response. You can see that there are two ring modes at 5kHz (main) and a smaller 10kHz on top of that:
The first thing I tried was to impose pentagonal symmetry like a ScanSpeak Revelator - or a "Daytonator", the PA130-8X. The pentagon prevents reflection symmetry resonance modes from being the dominant cone breakup mode. This took mustering up some courage to take a knife to a brand new PA130-8 (after I measured its baseline response). I cut 5 angled radial spoke slits in the cone from near the voice coil towards the surround - ouch!:
Then I used some PVA-like craft cement that dries semi-soft (waterproof craft textile glue) to reglue the slits - applied with hypo syringe and needle. Once it dried, I brushed a thin coat of same glue on cone to give the whole paper some better damping. I then took a hot melt glue gun and added a bead of hot glue onto the now-reglued slits to give more of a mass impedance discontinuity at the cone in hopes of breaking up any resonance breakup waves:
Here is the result of the above mods in frequency response. Some reduction in the 10kHz peak but not much in 5kHz peak, but the IR showed a reduction in the 10kHz ring (not shown):
My next step was to remove the dustcap, my thinking is that this may be source of resonance as there is a chamber behind the dustcap vented to the back through a small hole that may be causing a resonance mode.
The measurement without the dustcap was just awful - a huge dip formed at 4 kHz due to the empty air column there - I don't have enough room to show the response, but I subsequently added a plastic modeling clay phase plug to that hole in the dustcap as a stationary phase plug:
That improved things a lot, and as we can see, the highs above 5kHz are smoother, and the 5kHz peak is smaller but there is a sharp dip before 5kHz - although very narrow and may not be so audible. The roughness above 5kHz is much smoother now, but a bit depressed:
Looking at the impulse response now, we see that there is indeed a much reduced ringing, and subjectively listening, it sounds better - percussion is more crisp. However, the sensitivity went down a bit probably due to the less stiff cone and a bit of added mass:
So here are the combined measurements of all the mods on one graph. I took all data with speaker cabinet and mic untouched with just removing and reinstalling driver each time so data is very consistent:
So there is some success and it's a bit of a mixed bag. I think the pentagonal cuts fixed the 10kHz ringing, but the 5kHz ring appears more of a pressure and phase plug air flow issue.
Perhaps not all mods were warranted, but this is exploration stage. There may be some issues with the air flow and reflections in the basket which I will look at next.
More to come...
Attachments
-
 PA130-mod0.png467.8 KB · Views: 3,715
 -
 PA130-mod2.png302.5 KB · Views: 3,585
 -
 PA130-mod1.png393.6 KB · Views: 4,703
 -
 PA130-mdo3.png313 KB · Views: 3,401
 -
 pa130-before-hd.png110 KB · Views: 3,742
 -
 pa130-before-ir.png47.2 KB · Views: 3,587
 -
 pa130-pentacut-hd.png107.4 KB · Views: 3,580
 -
 pa130-pentacut-glue-strips-phase-plug-hd.png106.9 KB · Views: 3,373
 -
 pa130-pentacut-glue-strips-phase-plug-ir.png46.9 KB · Views: 3,344
 -
 pa130-pentacut-phase-plug.png108.6 KB · Views: 3,358
Last edited:

I think in would have started with the clay in small balls on the cone to find the breakup points though, failing a laser interferometer.
I think in would have started with the clay in small balls on the cone to find the breakup points
Where's the fun in that? No guts, no glory!!!
Actually there was some work done by another person on Parts Express doing just that. He had a polycone which is easier to work with for clay balls. He found an asymmetric pattern helped. I did not want to add too much mass. Given the Revelator and other drivers are already using pentagonal symmetry, I thought to jump head first with that.
😀
Elephant is 5.5kHz region. How about more petite phase plug, and off axis response?
I would have started with polar response and then some EQ.
Cutting didn't do much for HD performance.
How about making it coax with something like this:
Tymphany PMT Series 20N12AL04 1/2" Aluminum Dome Micro Full Range Speaker Driver 4 Ohm
I would have started with polar response and then some EQ.
Cutting didn't do much for HD performance.
How about making it coax with something like this:
Tymphany PMT Series 20N12AL04 1/2" Aluminum Dome Micro Full Range Speaker Driver 4 Ohm
I had similar coax thoughts as that 1in dia empty spot on pole piece just is begging for its own tweeter. Maybe a piezo could work? I happen to have a 1in dia piezo.
Is it a sin to cut up a perfectly good brand new driver ? Yeah, it did not do all that I hoped for. It is smoother on high though.
Is it a sin to cut up a perfectly good brand new driver ? Yeah, it did not do all that I hoped for. It is smoother on high though.
Interesting, and I'd agree a mixed bag of results. It looks like the doping shifted the whole response LP function lower (the dip followed by peak is present in all results)
Suggests the dip peak combo is breakup related (probably the hard paper cone that 'PA' drivers use (the 'reason' id find it hard to accept a PA driver in domestic use)
The suggestion of a coax conversion gets my vote!!!
Go on! You know you wanna!
Suggests the dip peak combo is breakup related (probably the hard paper cone that 'PA' drivers use (the 'reason' id find it hard to accept a PA driver in domestic use)
The suggestion of a coax conversion gets my vote!!!
Go on! You know you wanna!
Nice work again xrk. 😀 It's very useful to see some analysis of these tweaks. Since driver modding is basically part of the the whole full range driver ethos, I wouldn't mind seeing some more before and after type measurements of other common tweaks as well.
The PA130 seems like a good candidate for experimentation. You missed out on the cheap but good radioshack driver era. Those drivers were ideal for modding.
My best guess for that driver would be to leave the dustcap in place, but do the aluminum leaf treatment on it (the dustcap). Coat the rest with secret sauce.
BTW, I tried the revelator style slice and dice once on a cheap old driver, and found that it didn't do too much. That being so, I still think actual revelators are nice sounding drivers, but that's hardly news.
BTW, I tried the revelator style slice and dice once on a cheap old driver, and found that it didn't do too much.
Now you tell me 😱
Actually, I think it may have smoothed the smaller 10k bump...
I think I have to agree with leaving dustcap alone. Hmm, aluminum lead and sauce, does that help to make it stiffer for more HF extension?
But if I hadn't taken dustcap off, I would not be want to put a coax tweeter there.
I wonder if stuffing polyfill into the rear polepiece vent so it sits in the chamber behind the dustcap would help that 5k peak? I am convinced there is something going on there. 5k corresponds to a 3.4cm (half wave) or 1.7cm (quarter wave) resonance distance - about distance from cap to polepiece or length of polepiece vent. Also matches the mean distance from rear side of cone to flat basket arm walls.
Last edited:
I have an old PA130 near the edge of a rough foam baffle and doesn't seem to show much peak - poking `1 inch depth of polyfil in the vent hole had no real effect
I should use the mic near field like a stethoscope while driving with 5kHz sine to figure where source of resonance is. Maybe the cone to surround interface? Glop some caulking on that junction?
yeah - maybe a few layers of tape stacked in a spot on the surround would help trace out the source - I tried that on the edge of the cone to no effect - my decade or older PA130 has one 50/50 thinned dyed coat of Modpodge and about -4dB to +4dB variation on either side of 5KHz - H2 at 5KHz is ~-37dB - pretty clean
Last edited:
Now you tell me 😱
Actually, I think it may have smoothed the smaller 10k bump...
I think I have to agree with leaving dustcap alone. Hmm, aluminum lead and sauce, does that help to make it stiffer for more HF extension?
But if I hadn't taken dustcap off, I would not be want to put a coax tweeter there.
I wonder if stuffing polyfill into the rear polepiece vent so it sits in the chamber behind the dustcap would help that 5k peak? I am convinced there is something going on there. 5k corresponds to a 3.4cm (half wave) or 1.7cm (quarter wave) resonance distance - about distance from cap to polepiece or length of polepiece vent. Also matches the mean distance from rear side of cone to flat basket arm walls.
It's better to hear the results for yourself. These sort of tweaks can be subtle. Besides, I only tried it once.
Yes, aluminum leaf will and special sauce will make the dustcap stiffer. Actually, special sauce will do this on it's own. I like fresh shellac for this, mixed from flakes.
The aluminum leaf should be thought of as its own trick. It makes a constrained layer. You wouldn't think the thin leaf would do much but it does. The effect can be dramatic. I've totally transformed some cheap drivers, and in fact it seems to work best on somewhat cheap and fuzzy paper cones.
Theoretically, going to constrained layer results in the dominance of shear waves over flexural waves. Flexural waves are not linear with frequency WRT speed. This was discussed at length on the old Melhuish forum years ago.
That 3.4cm half wave distance, could it be the same as the distance from the voice coil to the surround?
BTW, surrounds going anti-phase are a common issue in speakers. You won't necessarily pick this up with close micing, since it's a phase issue. Still moving in with a mic can be helpful IME. I'm waiting for home laser interferometry. 🙄😀
Damping under the pole piece can be helpful. I'm sure it depends on the driver. I've done it a couple times with conventional mid bass drivers, gluing the dustcap back on afterwards. You may get a 1 db or so improvement in FR. Subjective clarity improved a bit for me. Might show up on waterfalls.
3.4cm may be voice coil to surround but are we talking wave in the paper cone (much faster speed of sound) vs wave in air? I will try aluminum foil strips on cone next. The whole coax thing sounds really interesting too.
I used to occasionally make laser interferometers as part of my day job. They are good for measuring very small displacements. There is a lot of motion here. Maybe a fiber optic scattering probe can be used to pick up where the various frequencies are located.
Why not just use a simple notch filter?
Surely trying a couple of components is better than chopping up a driver?
Surely trying a couple of components is better than chopping up a driver?
Notch filters may work, but not sure how they well they work on a breakup mode that may be polar angle dependent. Also, the point of this thread is to study what we can do mechanically to smooth out and improve the response of a driver before resorting to electronics. Most simple is of course, to squash it with a simple PEQ in my miniDSP.
Not so appropriate on expensive drivers...
Id say non destructive methods should come before a carpet knife though!
Some purists will argue against passive crossovers/equalisation but a notch has the benefit of being fully reversible and non destructive. Each to their own I guess.
Id say non destructive methods should come before a carpet knife though!
Some purists will argue against passive crossovers/equalisation but a notch has the benefit of being fully reversible and non destructive. Each to their own I guess.
- Status
- Not open for further replies.
- Home
- Loudspeakers
- Full Range
- The Daytonator - PA130-8X