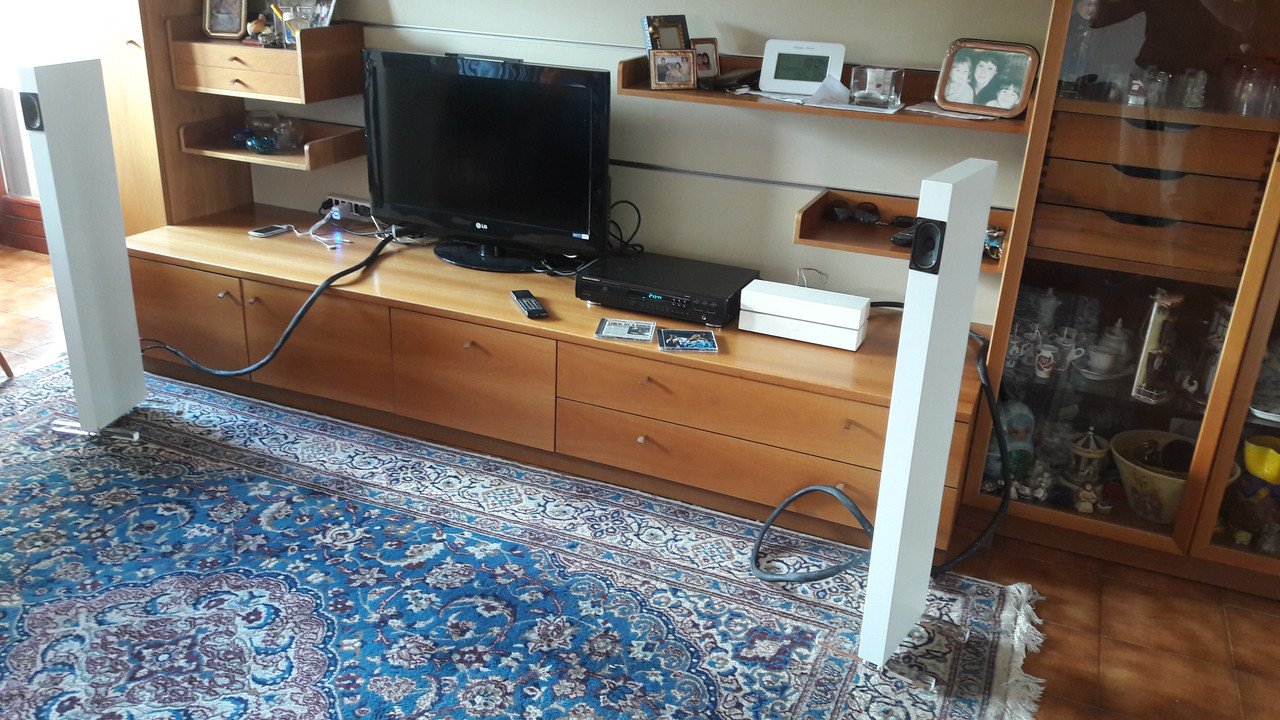
After the fat IKEA Bowls Speakers ( How to build simple, cheap, high WAF, full range speakers - diyAudio ), here are the slim IKEA full range Lack speakers, built using 2 110 cm shelves of the Lack family, with TK2050 amp and Minion power supply( Minion Style Power Supply - diyAudio ).

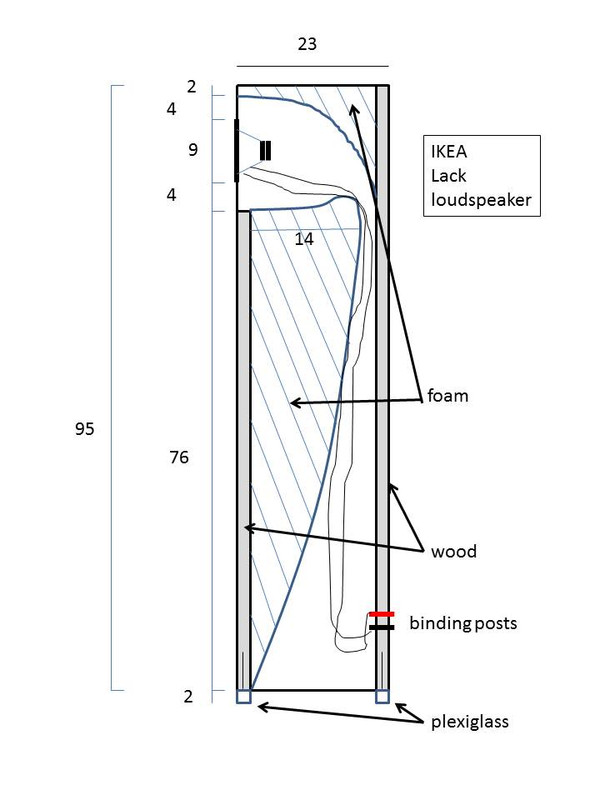
Here is the project drawing:
Like the bowls speakers, they are cheap, quite charming and maybe easier to build. Moreover, they occupy a very small space in “rest” position.
Next posts will show a step by step building manual.
Ciao.
Luca
Here is the project drawing:
Like the bowls speakers, they are cheap, quite charming and maybe easier to build. Moreover, they occupy a very small space in “rest” position.
Next posts will show a step by step building manual.
Ciao.
Luca
Last edited:
")
The ingredients
As indicated in the project drawing, You need:
• 2 IKEA Lack shelves – 110 cm
• 2 small full range speakers, less than 5 cm large
• 4 binding posts
• 4 plexiglass bars – 25 cm each. I used those with squared section, 2 x 2 cm
• 2 woodden bars – 4.5 cm large, 2 m long, 2.5 cm thick
• a foam or polystyrene sheet – 4.5 cm thick ( you can take thicker sheets, then cut a slice )
• copper wires
• 4 long screws for the feet and screws to connect the drivers
• little adhesive bumpers
Next episode: choosing the full range drivers
Ciao
L.
P.S.: to CharlieLaub: yes, all the Lack shelves have corrugated cardboard inside, all over the world. But I’ll show You how to manage.
As indicated in the project drawing, You need:
• 2 IKEA Lack shelves – 110 cm
• 2 small full range speakers, less than 5 cm large
• 4 binding posts
• 4 plexiglass bars – 25 cm each. I used those with squared section, 2 x 2 cm
• 2 woodden bars – 4.5 cm large, 2 m long, 2.5 cm thick
• a foam or polystyrene sheet – 4.5 cm thick ( you can take thicker sheets, then cut a slice )
• copper wires
• 4 long screws for the feet and screws to connect the drivers
• little adhesive bumpers
An externally hosted image should be here but it was not working when we last tested it.
Next episode: choosing the full range drivers
Ciao
L.
P.S.: to CharlieLaub: yes, all the Lack shelves have corrugated cardboard inside, all over the world. But I’ll show You how to manage.
Choosing the drivers
Drivers must be full range, unless You want to use more than one with their crossover filter, and large no more than 5 cm.
Cheapest solution: get them off an old laptop PC.
Almost cheap solution: search Ebay, AliExpress, Amazon etc…, and you’ll find many low price full range speakers. I took 2 pairs, just to try, less than 5 $ each, shipping included.
Tested in open baffle configuration and with different amps, their sound was quite poor, something like plastic box speakers.
But I’m sure that out there some hidden pearls are just waiting to be discovered: look for them !
The best choice would be to hear the drivers with your ears before buying: not always is possible.
So I started looking at the datasheets: here is a list of drivers that might fit
• Tang Band W1-1942S
• Tang Band W1-2121S
• Tang Band W1-1828SA
• Visaton SC 5.9 OM ( my choice )
If used with a subwoofer, these also might fit
• Tang Band W1-1925SB
• Tang Band W1-1931S
• Tang Band W1-1070SH
• Tang Band W1-1815SA
• Tang Band W1-2025SA
• Visaton BF 32
• Visaton FRWS4 ND
• Visaton FRWS 5R
Next episode: how to cut and empty the shelf.
Ciao.
Luca
Drivers must be full range, unless You want to use more than one with their crossover filter, and large no more than 5 cm.
Cheapest solution: get them off an old laptop PC.
Almost cheap solution: search Ebay, AliExpress, Amazon etc…, and you’ll find many low price full range speakers. I took 2 pairs, just to try, less than 5 $ each, shipping included.
Tested in open baffle configuration and with different amps, their sound was quite poor, something like plastic box speakers.
But I’m sure that out there some hidden pearls are just waiting to be discovered: look for them !
An externally hosted image should be here but it was not working when we last tested it.
An externally hosted image should be here but it was not working when we last tested it.
An externally hosted image should be here but it was not working when we last tested it.
The best choice would be to hear the drivers with your ears before buying: not always is possible.
So I started looking at the datasheets: here is a list of drivers that might fit
• Tang Band W1-1942S
• Tang Band W1-2121S
• Tang Band W1-1828SA
• Visaton SC 5.9 OM ( my choice )
If used with a subwoofer, these also might fit
• Tang Band W1-1925SB
• Tang Band W1-1931S
• Tang Band W1-1070SH
• Tang Band W1-1815SA
• Tang Band W1-2025SA
• Visaton BF 32
• Visaton FRWS4 ND
• Visaton FRWS 5R
Next episode: how to cut and empty the shelf.
Ciao.
Luca
How to cut and empty the shelf
First we need to cut the shelf on the rear and on a side. I marked the lines on paper tape, and I kept this tape after cutting, not to ruin the white coat on the cut edges.
Please note, apart the presence of a cat, that I kept the plastic cover of the shelf till possible, for protecting purpose.
The shelf can be easily cut by hand saw, but if You ask a carpenter, he’ll do that with his tools in 20 seconds, most likely asking You no money ( but don’t forget to offer him a coffee, or a beer … ).
This is what You get:
Now we need to take away the cardboard inside. It’s easy using a blade like this:
Two wooden inserts remain. They are glued to the sides of the shelf: just make a first cut on their sides with the same blade
then go deep using a gouge, with the flat part of the blade towards inside
Be very careful and delicate during this operation, as it’s easy to crack the surface of the shelf, especially if You are using the gouge blade by the wrong side.
Finally, this is the emptied shelf that You get:
Next episode: driver hole and cut of the polystyrene sheet.
Ciao.
Luca
First we need to cut the shelf on the rear and on a side. I marked the lines on paper tape, and I kept this tape after cutting, not to ruin the white coat on the cut edges.
An externally hosted image should be here but it was not working when we last tested it.
Please note, apart the presence of a cat, that I kept the plastic cover of the shelf till possible, for protecting purpose.
The shelf can be easily cut by hand saw, but if You ask a carpenter, he’ll do that with his tools in 20 seconds, most likely asking You no money ( but don’t forget to offer him a coffee, or a beer … ).
This is what You get:
An externally hosted image should be here but it was not working when we last tested it.
Now we need to take away the cardboard inside. It’s easy using a blade like this:
An externally hosted image should be here but it was not working when we last tested it.
Two wooden inserts remain. They are glued to the sides of the shelf: just make a first cut on their sides with the same blade
An externally hosted image should be here but it was not working when we last tested it.
then go deep using a gouge, with the flat part of the blade towards inside
An externally hosted image should be here but it was not working when we last tested it.
Be very careful and delicate during this operation, as it’s easy to crack the surface of the shelf, especially if You are using the gouge blade by the wrong side.
An externally hosted image should be here but it was not working when we last tested it.
Finally, this is the emptied shelf that You get:
An externally hosted image should be here but it was not working when we last tested it.
Next episode: driver hole and cut of the polystyrene sheet.
Ciao.
Luca
Driver hole and cut of the polystyrene sheet
To cut the hole for the driver I used a cardboard template, due to its oval shape.
If You are going to use circular drivers, this cut gets easier.
To cut the polystyrene, I used templates too. An ordinary knife is good, but if You don’t want to find little white spheres all over your house and clothes, it’s better to use the hot wire bow.
As the sheet was 5 cm thick, after this cut, it was necessary to cut away a share from the obtained pieces.
Next episode: assembling and finishing
Ciao.
Luca
To cut the hole for the driver I used a cardboard template, due to its oval shape.
If You are going to use circular drivers, this cut gets easier.
An externally hosted image should be here but it was not working when we last tested it.
To cut the polystyrene, I used templates too. An ordinary knife is good, but if You don’t want to find little white spheres all over your house and clothes, it’s better to use the hot wire bow.
An externally hosted image should be here but it was not working when we last tested it.
As the sheet was 5 cm thick, after this cut, it was necessary to cut away a share from the obtained pieces.
Next episode: assembling and finishing
Ciao.
Luca
To cut the polystyrene, I used templates too. An ordinary knife is good, but if You don’t want to find little white spheres all over your house and clothes, it’s better to use the hot wire bow.
A soldering gun with the flat blade tip works great on polystyrene beadboard.
Bob
Assembling and finishing
First glue in the front woodden bar, then the front piece of polystyrene.
Then solder the wires to the driver and screw it to the shelf.
Put the binding posts in the rear wooden bar, solder the wires to them, than glue the rear polystyrene and rear bar
When the glue is dry, fill all the little slots between the rear bar and the shelf, and its side holes too, with stucco or silicone. With the side holes, I used some paper tape to protect the shelf when smoothing the stucco.
Once the stucco is dry, smooth it with sand paper or a sander.
Next episode: plexiglass feet
Ciao.
Luca
First glue in the front woodden bar, then the front piece of polystyrene.
Then solder the wires to the driver and screw it to the shelf.
An externally hosted image should be here but it was not working when we last tested it.
Put the binding posts in the rear wooden bar, solder the wires to them, than glue the rear polystyrene and rear bar
An externally hosted image should be here but it was not working when we last tested it.
When the glue is dry, fill all the little slots between the rear bar and the shelf, and its side holes too, with stucco or silicone. With the side holes, I used some paper tape to protect the shelf when smoothing the stucco.
An externally hosted image should be here but it was not working when we last tested it.
Once the stucco is dry, smooth it with sand paper or a sander.
An externally hosted image should be here but it was not working when we last tested it.
Next episode: plexiglass feet
Ciao.
Luca
Plexiglass feet
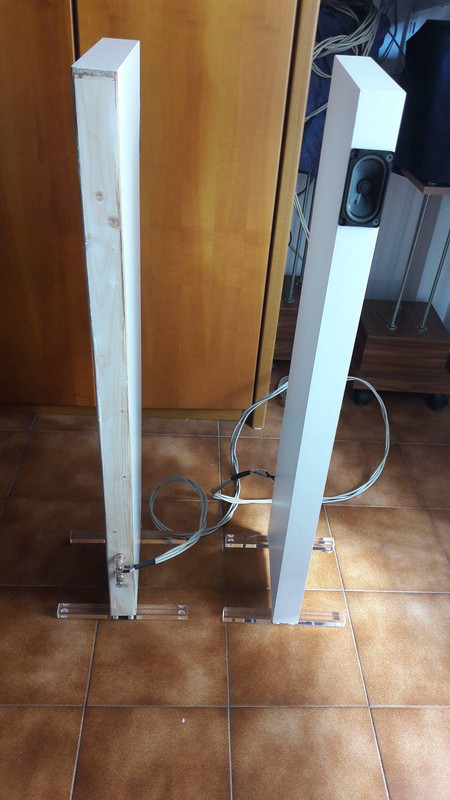
You can use whatever You like as feet for the speakers. I used 4 squared plexiglass bars, 2 x 2 x 25 cm, screwed to the wooden bars.

The paper tape is used to keep the bars parallel while drilling the holes.
Please note that the plexiglass bars don’t touch directly the ground. The speaker stands on three adhesive bumpers: one in the middle of the front bar and the other two at the ends of the rear bar.
That’all folks !

… but it isn’t over till it’s over. Next episode: a tough project for people who fear nothing.
Ciao.
Luca
You can use whatever You like as feet for the speakers. I used 4 squared plexiglass bars, 2 x 2 x 25 cm, screwed to the wooden bars.
The paper tape is used to keep the bars parallel while drilling the holes.
Please note that the plexiglass bars don’t touch directly the ground. The speaker stands on three adhesive bumpers: one in the middle of the front bar and the other two at the ends of the rear bar.
That’all folks !
… but it isn’t over till it’s over. Next episode: a tough project for people who fear nothing.
Ciao.
Luca
Not a bad idea Jerms, but I'm afraid that takes a higher level of practical capabilities ...
Ciao.
Luca
Maybe..... Really needs a hole (for speaker) and a slot (to mount to the pillar, thru which the TL would run.
It's probably built a little on the light side for it to work properly though.
Last edited:
How did you come by the conture of the line / tml / horn?
No particular calculation for the Transmissione Line: there’s only 17 cm useful depth, not a space so large to allow You to test quite different configurations …
Ciao.
Luca
IKEA Lack Voigt pipe: a tough project for people who fear nothing
The drawings of the well known Voigt Pipe project:
And the drawing of the IKEA Lack Voigt Pipe:
Here the 190 cm Lack shelves are needed, all the rest is not different from the previous project.
Due to its height, I suppose it’s easy it gets a little bent or twisted after gluing. To avoid this, It’s better to wait for the glue to dry, putting the shelf between two large boards with weights upon, rather than using clamps.
I’m going to set my mind on this challenge, but with my times ( some years … ).
Now it’s really over, thanks everyone for reading and following.
Ciao.
Luca
The drawings of the well known Voigt Pipe project:
An externally hosted image should be here but it was not working when we last tested it.
And the drawing of the IKEA Lack Voigt Pipe:
An externally hosted image should be here but it was not working when we last tested it.
Here the 190 cm Lack shelves are needed, all the rest is not different from the previous project.
Due to its height, I suppose it’s easy it gets a little bent or twisted after gluing. To avoid this, It’s better to wait for the glue to dry, putting the shelf between two large boards with weights upon, rather than using clamps.
I’m going to set my mind on this challenge, but with my times ( some years … ).
Now it’s really over, thanks everyone for reading and following.
Ciao.
Luca
- Status
- This old topic is closed. If you want to reopen this topic, contact a moderator using the "Report Post" button.
- Home
- Loudspeakers
- Full Range
- IKEA Lack Full Range Speakers