Aegis DIY Tube Headphone Amplifier

Hello,

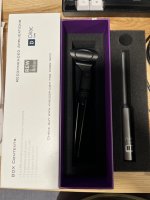
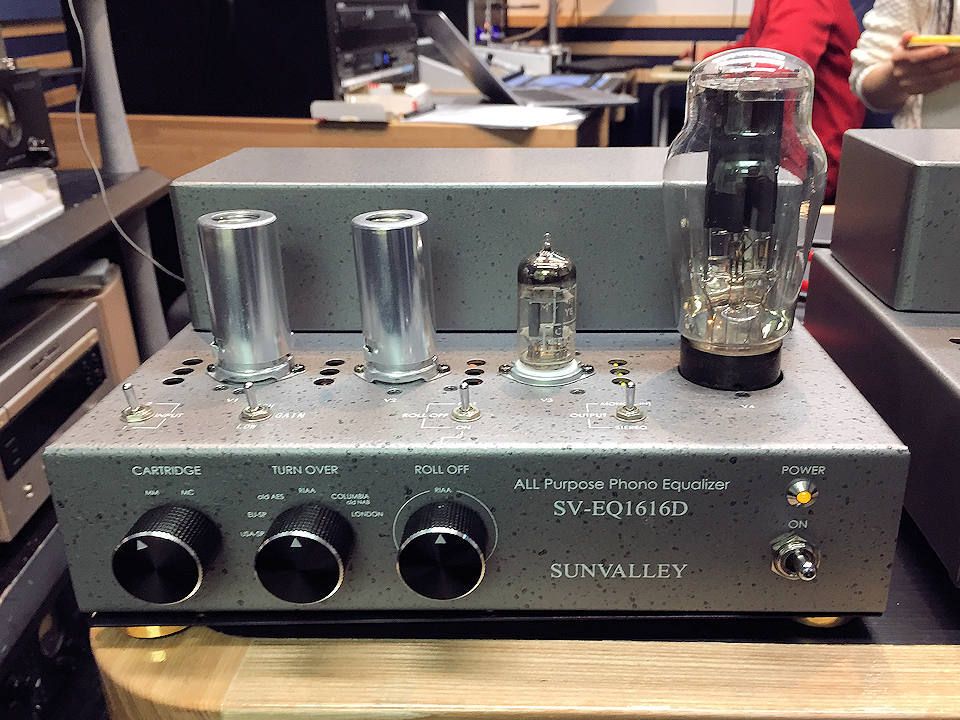
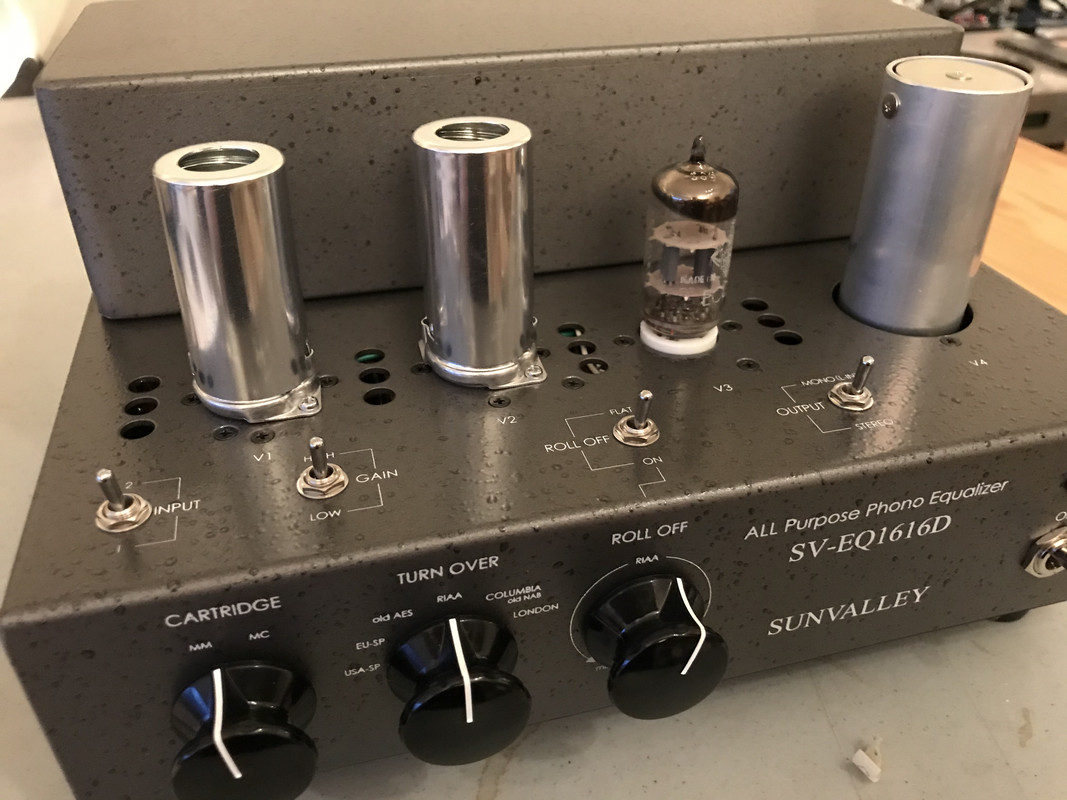
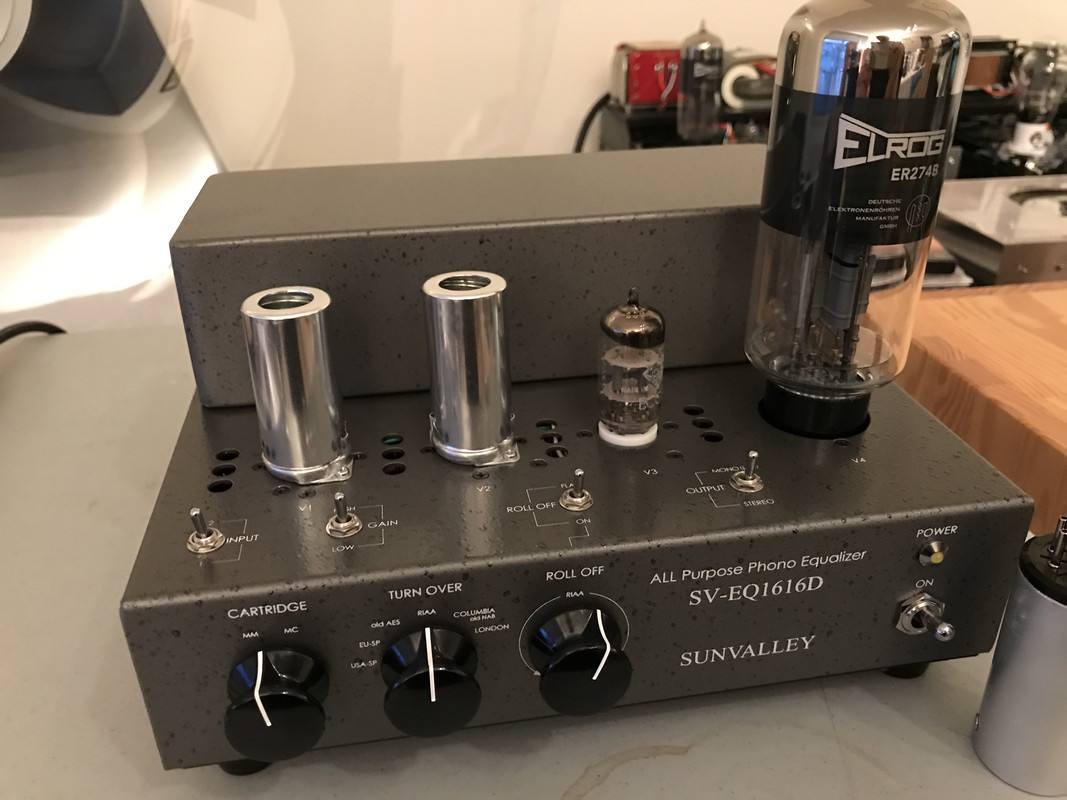
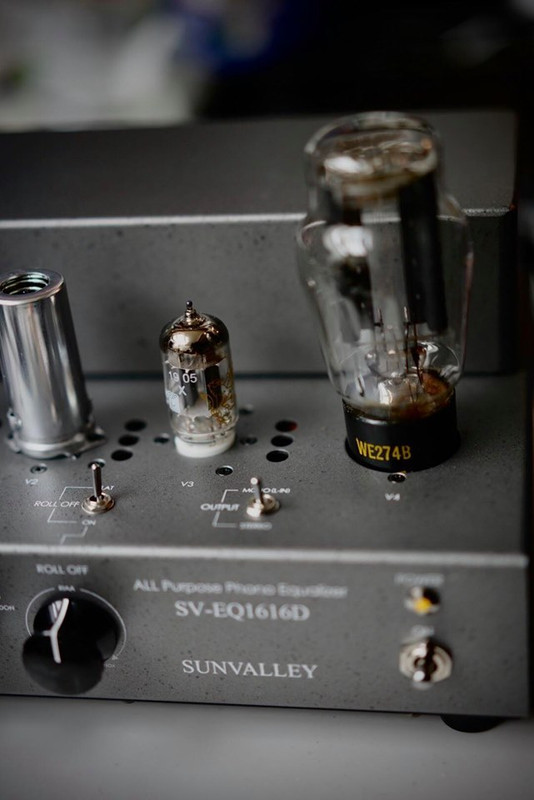
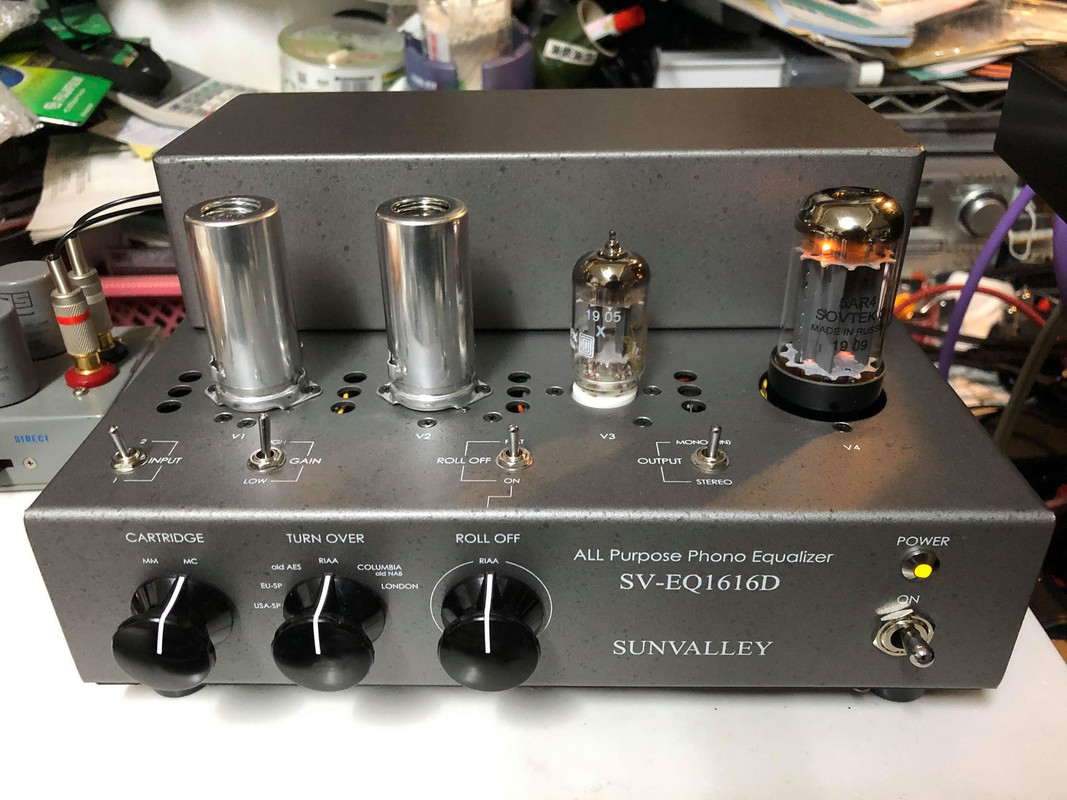
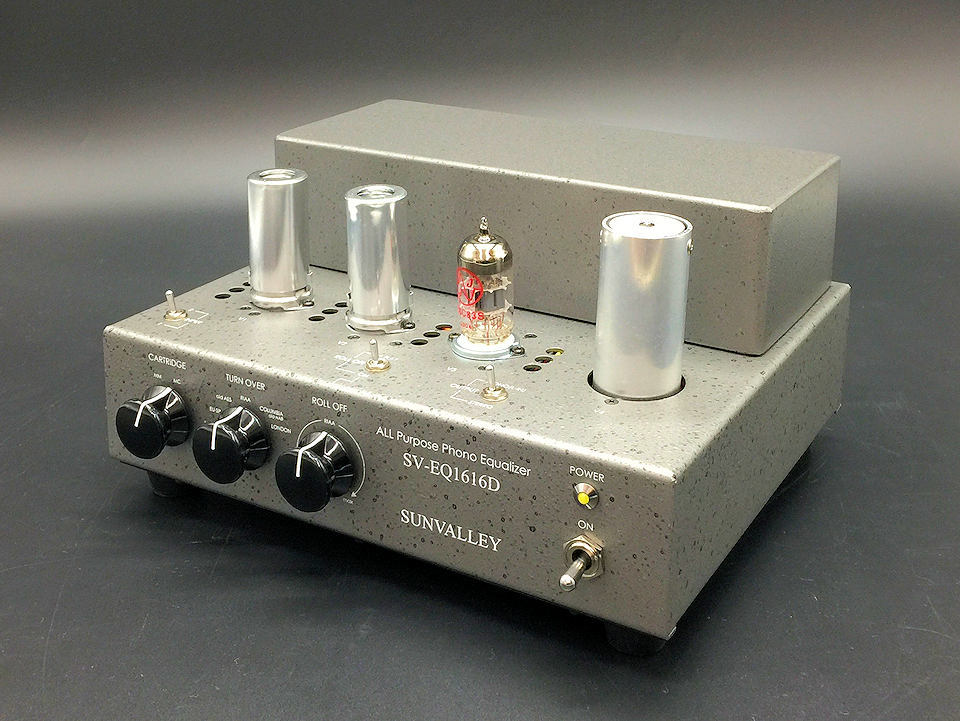
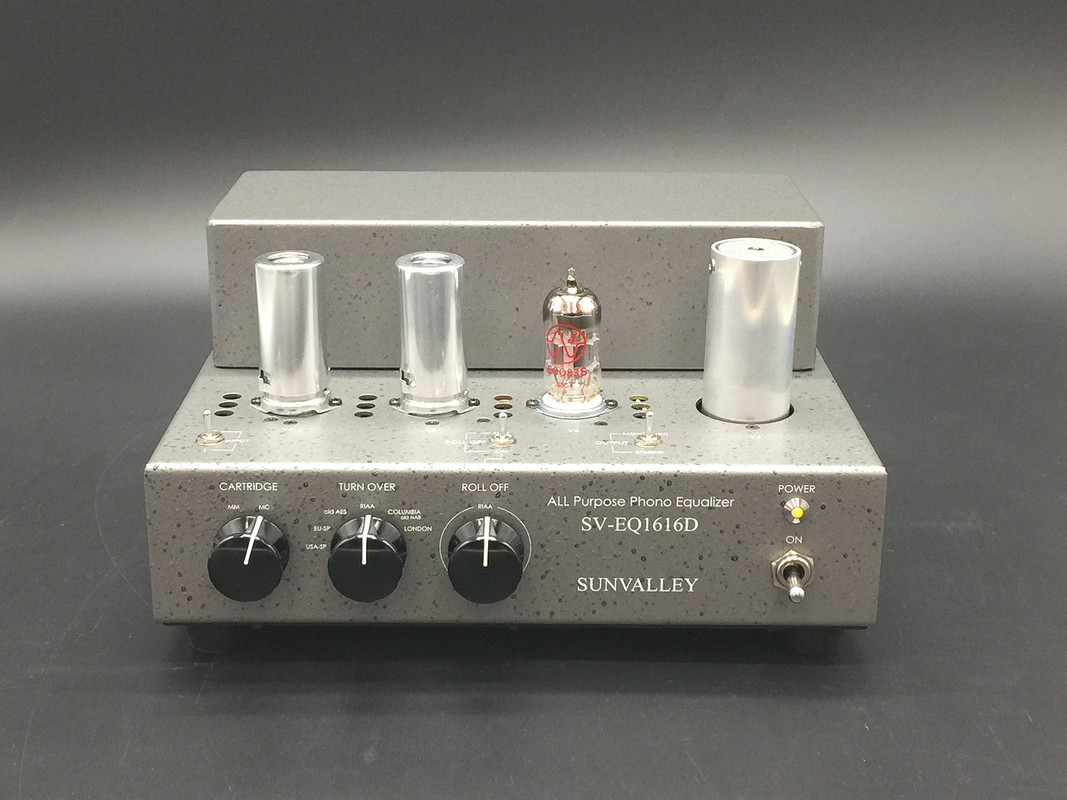
I am releasing a DIY tube amplifier project, the first complete DIY project I've released on this forum. The amplifier is called Aegis.

I started my DIY journey on the headphone forum Head-Fi. I have something of a tube DIY blog there where I catalog all of my ongoing projects. For a short period of time, I was building and selling my designs as a hobby business, but quickly realized I didn't have the time for it working a full time job. I thought I'd work on a DIY amplifier that forum members could build for themselves without my involvement. I've been working on it for the past year or so.

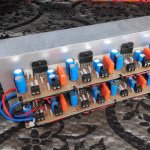
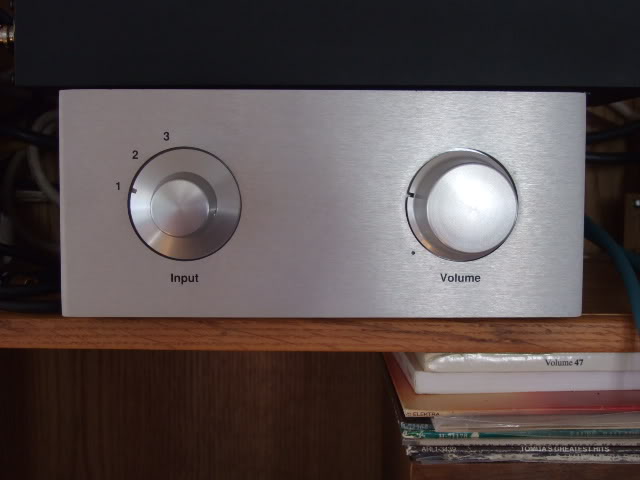
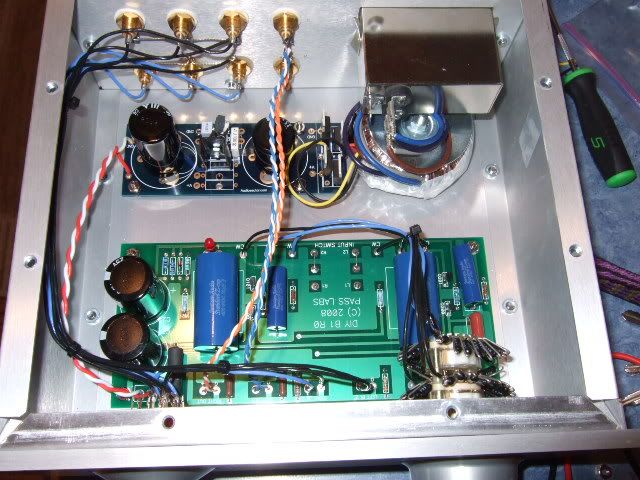
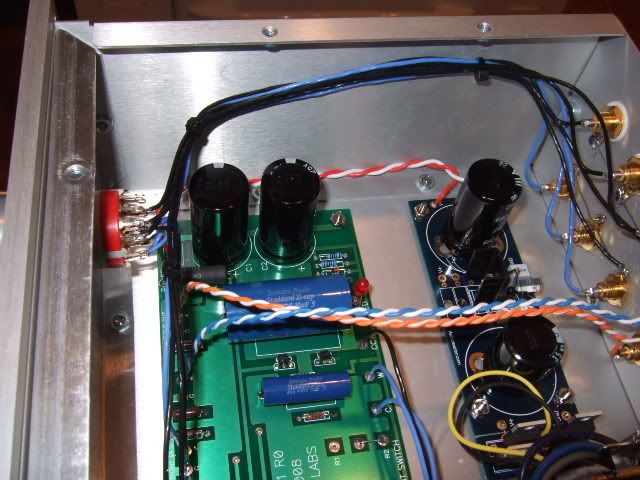
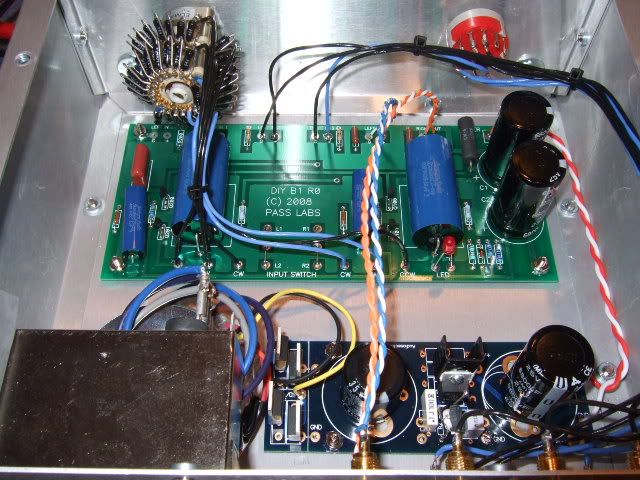
This is a headphone enthusiast's tube amplifier. I say that as I'm sure some will balk at the cost of parts, which is roughly $2,000 USD. Given what some people are willing to pay for commercial tube headphone amplifiers, which are creeping toward five figure prices, it's relatively affordable. I tried to come up with a design that 1) is easy to build, even for a novice DIYer, 2) uses easy to acquire vacuum tubes, 3) is simple and robust with low likelihood of parts failure and easy to troubleshoot, 4) uses a circuit that is not readily available on the commercial market, and 5) sounds good! I do not typically build budget-oriented designs for myself, and I did not do so here. I like to build amplifiers that look like professionally made products. Please abstain from telling me that it is too expensive, a waste of money, etc. You do not have to build it.

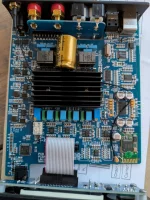
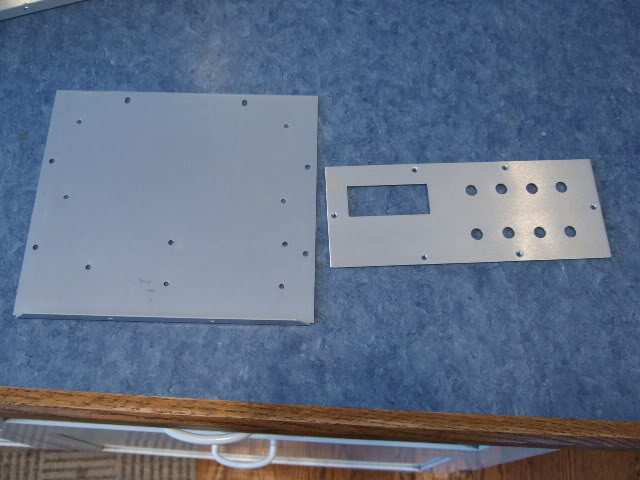
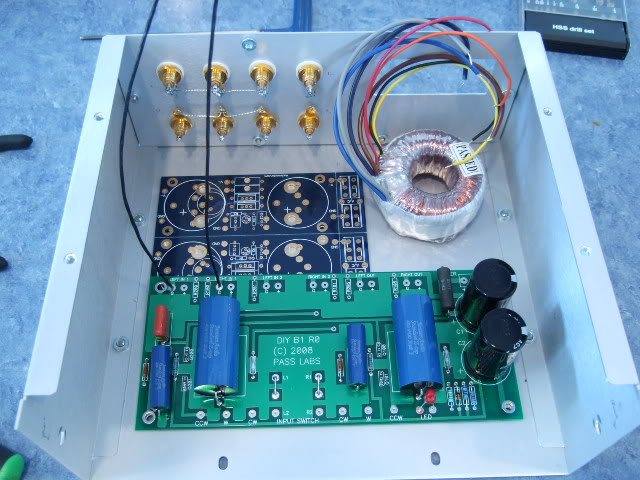
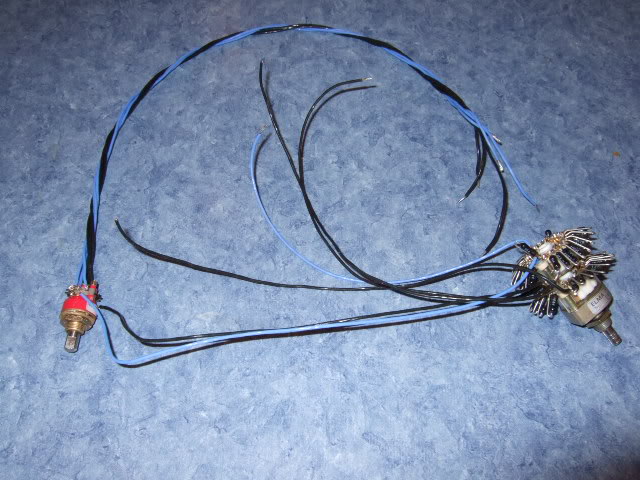
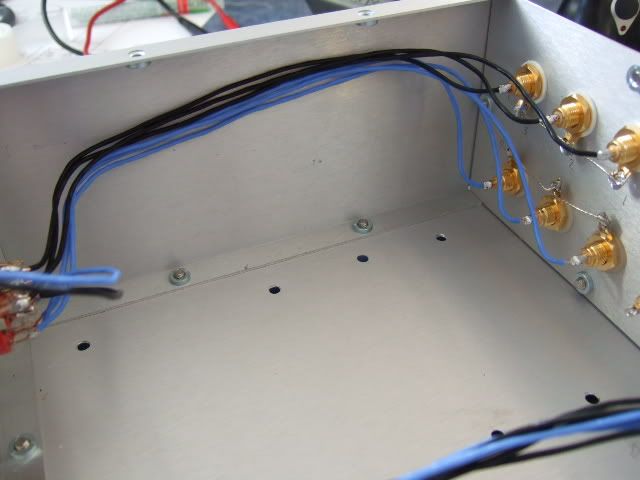
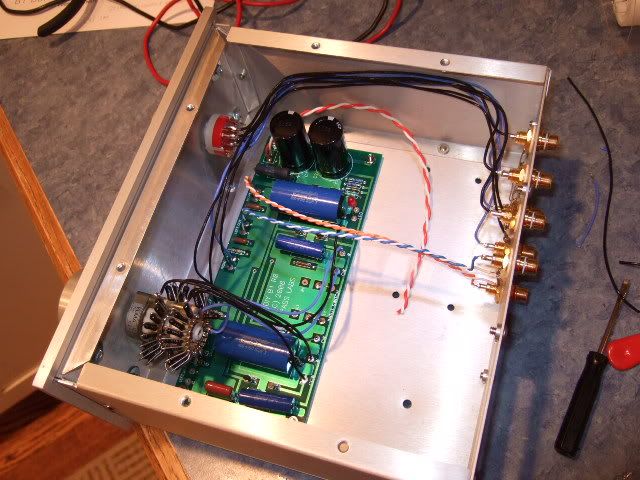
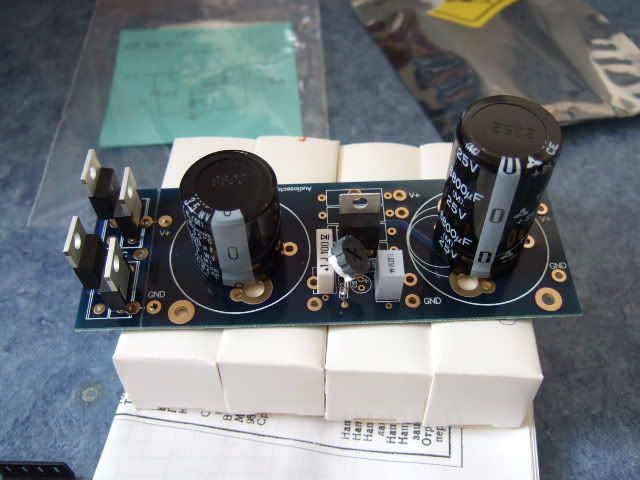
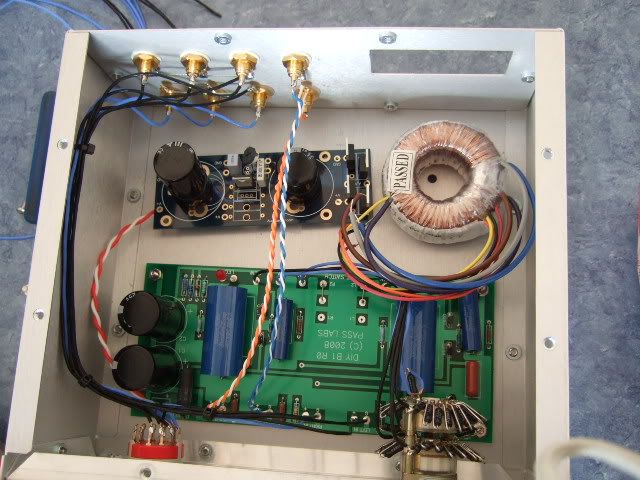
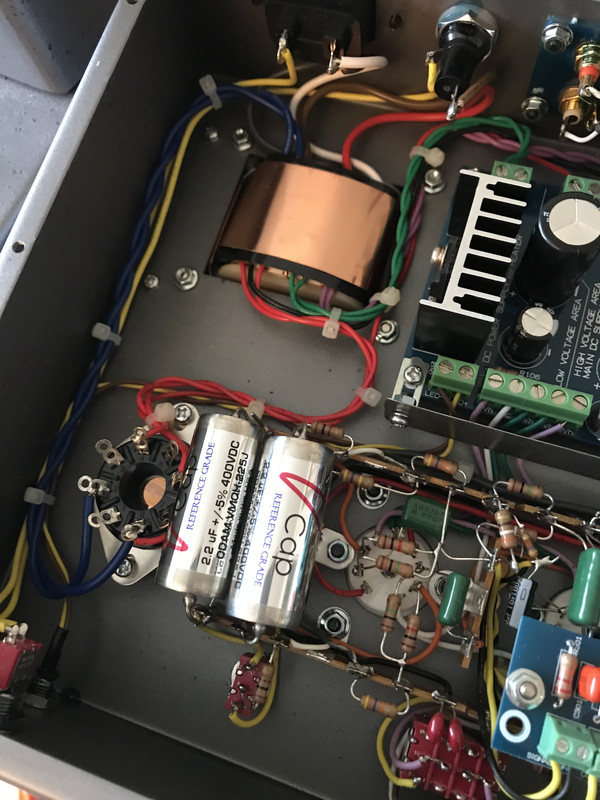
I've included download links to the BOM, chassis CAD files, and an exhaustive project document that includes an explanation of the circuit, schematics, recommended equipment, information on acquiring parts, step-by-step instructions with photos, testing procedures, and some basic measurements. Please note the instructions are written for a new DIYer, not one with experience, so they are very detailed. The gerber files to order the PCBs are attached to this post.

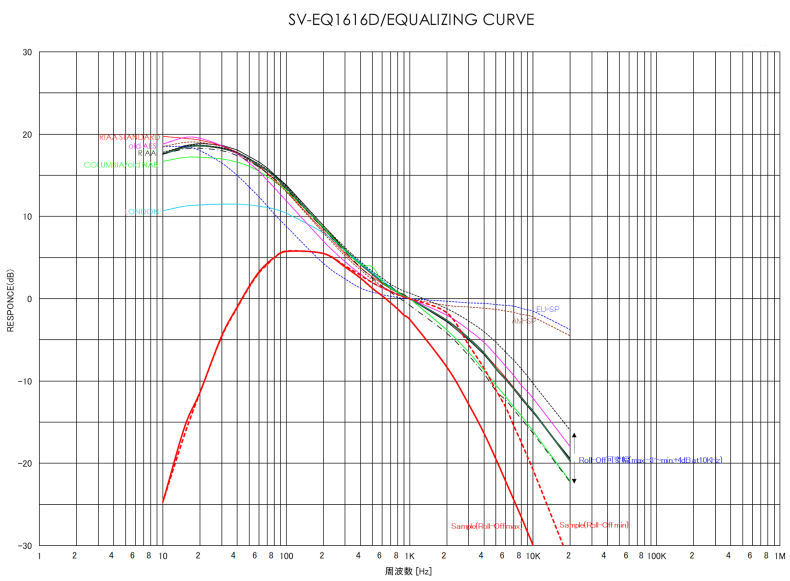
Measurements are in the last section of the build document.

You can find some subjective impressions of the amplifier here:
Login to view embedded media
https://www.head-fi.org/threads/aegis-diy-tube-headphone-amplifier.965530/post-17224730
https://www.head-fi.org/threads/zmf-caldera-new-planar-magnetic-from-zmf.964836/post-17553801

Please let me know if you come across any typos or anything seems out of place and I will try to address it.

Link to build document PDF: https://drive.google.com/file/d/1C2NSRh8DkC1Blr2GMVC_83XAdM0IUFZA/view?usp=sharing
Link to the Excel BOM: https://docs.google.com/spreadsheet...ouid=113213015624875847507&rtpof=true&sd=true
Link to zipped chassis CAD files: https://drive.google.com/file/d/1GXCq11-S97FtTey2lVpv6CgkBul4Uryb/view?usp=sharing

PXL_20230310_231254258.jpg PXL_20230310_233107674.jpg PXL_20230310_233336192.NIGHT.jpg

Attachments

Hello world!

Hi everyone,

I'm a student at Purdue University deeply involved in hands-on engineering projects, especially in the world of rocket propulsion. I help lead an undergraduate lab focused on developing and testing pressure-fed liquid rocket engines, and I’ve also worked on electric GoKarts, UAVs, and more. I'm particularly interested in electronics, data acquisition, and machining—basically anything that blends theory with real-world builds.

I joined DIYAudio because I’m always fascinated by clever audio designs, analog circuits, and the craftsmanship behind great sound. I’m here to learn, share, and maybe get some advice as I explore more audio projects in my (rare) free time... I also love me some good sounds!

Looking forward to being part of this awesome community!

Xiang Sheng 278a

Hi all I have just put on the 728a preamp but sadly it went with a little bang but now only the bottom 2 valves get hot but the top 2 are staying cold. Both small rectifier are working as they should do. Could someone point me into the right direction on the picture where it’s circulated red they are working as they should do. But the black circled ones are stone cold.where should I look first. Many thanks in advance

Attachments

  • IMG_1206.jpeg
    IMG_1206.jpeg
    810.1 KB · Views: 62

Replacing Laser Diode in PWY1011 (Pioneer PD-717, PD-737, PD-7100, PD-7300, PD-8500, PD-9500, PD-71, PD-73, PD-2000LTD)

Hi Community,

following the steps described in this thread by @mauricioabboud (kudos man!) I confirm I've been able to successfully replace the laser diode in Pioneer PWY1011 using a Sony SLD105VL. The PWY1011 is used on many different Pioneer players commercialised between 1989 and 1992 and this replacement is also likely to work on PWY1006 and PWY1004.
This procedure is not as complex as the Sony KSS laser replacement that @ManoloMos masterfully performed and requires, at latest:
  • Laser Diode spare part (Sony SLD105VL)
  • Oscilloscope (2 channel, bandwidth >20MHz )
  • Multimeter
  • Pioneer PD-7* service manual (the calibration procedure described in the different manual are identical)
  • 2mm flat-head screwdriver for diffraction grating adjustment
  • patience and capacity to deal with frustration
  • a few hours (4 - 8) of spare time
Consider having also KSS-213A, KSS-240A pickup in case you need to cannibalise the lens

Assuming the PWY1011 has been already removed from the player, these are my LD replacement steps:

1. Check the power trimmer and adjust it to the maximum resistance
DSCN1596.JPG

2. Shortcut the pads on the laser head flex near the trimmer
3. Desolder the 4 pads responsible for linear motor and linear sensor
DSCN1598.JPG

4. Remove spindle motor and detach the laser head from the rest of the mechanism
5. Loosen the flex around the LD
5. Desolder the 3 pads of the LD
DSCN1600.JPG

6. Unscrew the metal plate holding the LD
DSCN1601.JPG

7. Remove the LD and clean up the flex pads removing welding paste residues
8. Insert the new LD paying attention to orientation
9. Reposition the metal plate
DSCN1603.JPG

10. Reposition the flex and solder the pads
11. Remount the laser head and the spindle motor on the mechanism
12. Re-solder the 4 pads responsible for linear motor and linear sensor
13. Check all connections between the flex connector and the different pads that have been soldered
14. Reposition the PWY1011 assy in the player
15. Reconnect ground screw
16. Reconnect spindle connector
17. Reconnect the flex connector
18. Remove the shortcut added on step 2
19. Check the LD (even with the trimmer set at maximum resistance the light is visible)


After the physical replacement has been accomplished and the LD has been proved to work, execute the adjustment as described in the Service manual.
A few hints when executing the adjustments:
  • the nominal values described in the service manual are correct as long as your lens is in the correct position/orientation
  • if the target had left its seat, make sure to clean the seat and the lens out of any glue residues and check the lens for scratches
  • Diffraction grating adjustment is critical to RF pattern clarity
  • Tracking balance must be checked every time the radial or axial tilt is modified.
After the calibration I ended up with the following state respectively playing 8cm and 12cm discs:
DSCN1607.JPG
DSCN1609.JPG
DSCN1610.JPG
DSCN1612.JPG

Although the replacement procedure opens the door for resurrecting many Pioneer players (I'll try more in the next weeks and I'll also try using Rohm) I still need to fix, in this first exercise, an annoying issue due the the linear motor/sensor constantly fluctuating and causing tracking issues on other tracks (any hint/clue/suggestion is more than welcome)


Enjoy and have fun!
  • Like
Reactions: Uladz and huggygood

Mains transformer spacing from amplifier circuits...How close is too close?

Probably a bit of a silly question, but I'm curious to know other's experience. I'm currently doing amp guts tetris and looking at different layouts, and one of the positions that would work will put the mains transformer pretty close to one of the amp boards, as pictured.

This is way too close, right? Will the copper shielded transformer help at all? What if I put another layer of copper shield between them?
sdrfgsdfgbsdf.jpg

Convert an Acuphase T-1000 from 76-90 to 88-108

Tuner Heads,

Has anyone converted an Acuphase T-1000 from 76-90 to 88-108 MHz?

The service manual details the front panel button combination PLUS the Accuphase part numbers of 15 caps, coils and a resistor that are different in Japan than Europe or North America.

Right now I'm running a Japanese T-1000 at 89.7 (The Classical Station) with an extra 25 usec deemphasis, and it sounds better than any other tuner I've ever heard. I switch to another tuner for the other stations.

Has anyone who is good at this converted one? I don't want to try this unless someone does it and documents it here.

Paul

Energy EPS100 Auto-On Power Supply Issue

Gentlepersons,

I recently acquired a 20-ish year old Energy EPS-100 dual-driver subwoofer with a 100W MOSFET plate amplifier. I opened it up to clean the scratchy potentiometers, and found a rather distressing, clearly long-standing situation in the neighbourhood of the power supply:
1743272123347.png

1743272216340.png


It has to be noted that the unit is still in working condition, and packs quite a punch at that.

Sadly I have no schematics, so I'm left trying to puzzle out what's going on here, and why. I'd be grateful if someone has a better theory than the one I've come up with (below). Near as I can tell, the power supply in the vicinity of the input, where the PCB is baked, looks something like this:

1743272551522.png

  • V1 is line AC
  • Thermal switch an fuse are just there for illustration
  • R1 is the (measured) ~500 ohm resistor baking the PCB
  • Q1 seems to be a 2N6071 triac.
  • An R2 of two ohms stands in for the power transformer and the rest of the amplifier at full draw. No, I haven't run a simulation.
  • The triac's trigger comes from an MOC3023 optoisolator device (ISO1 in the picture, and not shown in the simplification above).

My theory is this:
  • With no audio signal at the inputs, R1 drops input AC voltage so that the transformer powers the amplifier at a lower voltage
  • This lower power supply voltage is enough to run signal autodetection at the line level audio inputs, but not enough to power the main amplifier.
  • When signal is detected, it triggers the isolator to turn on the triac, effectively bypassing R1 and putting all the line voltage across the transformer's input.
This all seems a bit crazy to me, but I can't see any other reason for this arrangement. I suppose the extra complication and the risk of baking the PCB over time was weighed against the expense of another small transformer or a main one with a small spare tap and a relay.

So again, my questions to the wise ones here, are:
  1. Am I crazy?
  2. Does anyone have a service manual or at least a schematic for this old unit?
    And my most pressing question:
  3. Given that I don't particularly care about the unit's ability to automatically power up based on input signal, wouldn't it be safer to replace { R1, C1, Q1 } with a proper AC power switch?
Regards,
The Plumber

Vishay 106PED 22000µf 63V screw terminal capacitors

Hello,

Have 8 very high quality Vishay/ BC components capacitors for sale.
-Type 106 PED-ST
-Very long life
-Extremely low ESR and ESL
-Housing is with screw terminal bolt nut (STB)
-22000µf 63V
-Ripple current: 23,5A
-Diameter 65mm, length 105mm

New price = €55/piece
Sale price = €30/piece when buying all 8.

See below for datasheet and picture of actual capacitors.

Attachments

  • Like
Reactions: Gill.T

Replace Dartzeel NHB-108 clone AC inlet connecter/power connector

I am trying to replace the power connector for something better (at least that is what I think, see picture below) on my clone NHB-108. Seemed like an easy swap, but unfortunately it was not that easy: the existing terminals/spades do not seem to want to be removed. I am probably missing something here, but how do I remove these undamaged from the exisiting connector?
Pasted_Image_30_03_2025__14_19.png


Also, would these fit the new connector anyway?

Pasted_Image_30_03_2025__14_22.png

Zenith 49CZ Vintage Drivers

I recently came across a pair of these DIY enclosures advertised with Zenith drivers. The drivers had a similar look, but were actually not Zenith and sounded ok, not great. I then bought a pair with date code 49CZ860. There are 2 versions with alnico magnets, but I think they sound same. I listened to the bare speakers for 5 hours, and thought they had a lot of potential. Then I placed them in the cabinets, man they sounded amazing. Mids were great, soundstage crazy. Bass was not deep, but present. Everything was more composed. By the way, I'm driving them with a SET 45. If you have a pair of these speakers, you owe it yourself to put them in a cabinet. If anyone is interested, here are the measurements:
Height=19.75 inches
Width=17.75 inches
Depth=9.5 inches
Port= 12 x 3 inches

I don't think these speakers are fuzzy when it comes to the size of the enclosure. I would love to make a taller one so the drivers are at ear level. Maybe with an active sub to help the bottom. I will be a happy camper.


IMG_2623.jpg
IMG_2624.jpg
76013889203__9603FF8C-F0AE-44A3-85F4-A516D8B8DEAD.jpg
76013888458__582F0BAD-DC73-4C70-A44E-7E9EA22B2AD8.jpg
76013886893__78FCE147-0813-4BE3-A7D6-692A796448A8.jpg

PSA: The GRS RT2.0-8 appears to be a drop-in replacement for Fountek NeoX 2.0

Some people had asked me for updates on my Ribbon Unity Horn project here: https://www.diyaudio.com/community/threads/ribbon-unity-horn.328430/

I have a few Fountek NeoX 2.0s in my garage, and I was thinking about making a waveguide for them. I was reluctant to move forward with the project, because I prefer to work on stuff that other people can actually BUILD, and the ribbons in my Ribbon Unity Horn Project are no longer manufactured, AFAIK.

When I Googled the specs, I found that GRS appears to have cloned them. Here are the two spec sheets:

https://www.parts-express.com/pedocs/specs/272-204--grs-rt2.0-8-spec-sheet.pdf

https://www.parts-express.com/pedocs/specs/fountek-neo-x-20-specifications.pdf

As with many of the GRS speakers, the price is basically ridiculous:

I paid $72 for my NeoX on clearance from diysoundgroup, and that price was ridiculously cheap for what you get. This tweeter reminds me of the Raven tweeters from 25 years ago that sold for $300 each.

But you can get the GRS clone for even less - just $48!!! https://www.parts-express.com/GRS-RT2.0-8-Hi-Res-Neo-Ribbon-Tweeter-8-Ohm-272-204

I seriously have no idea how they sell them for this cheap.

Parts Express alluded to the fact that they're clones in a press release a couple of years back, when they wrote "GRS's premium high-end ribbon tweeters take everything you love about Fountek's Neo series and updated it with the latest in materials and motor technology! Easily reach frequencies of 40kHz for incredible detail from your hi-fi system!"

Dual 10" Mini Sub

I need some sub in my life.

Years ago I had borrowed my friend's SVS SB3000 Micro and used it as a nearfield sub. My life was never the same after. Things have changed in the meantime, and now I would like to plan and build something to go with my DIY nearfield monitors (some Speedsters I'd built a while ago). These monitors can go low with correction, but distort at moderate volumes. Or it can play relatively loudly before the port chuffs. Either way, they could do with some relief below 80hz. And with that relief, the system can sound like nothing else for games, music, a quick TV show at the desk. I want that back.
While I believe the SVS will be difficult to beat in value, I believe in the value of high quality drivers, measurements and corrections.

Goals:
Time: A group delay less than 10ms for music (50hz and above)
Range: 30-100hz, with a non-reverberant cabinet to reduce distortion
Amplitude: A high dynamic range for music (~100dB @50hz), a moderate listening volume for deep bass (90dB+ @30Hz)

Constraints:
Size: A relatively small cabinet. A one foot cube is not going to meet my goals, but as small as possible for nearfield listening. In the triangle of size-->amplitude-->depth, I am cutting amplitude most definitely so I can have some sub
Budget: I would like the included parts to cost the equivalent of the SVS with all included equipment, about $1000
Performance: I would like this sub to far outperform the monitors I use, if possible. Port velocity is the constraint without subs, and that is not an issue I would like to repeat. Perhaps I will compensate for the loss of ports by including the addition of a second subwoofer in the future. Eventually I may be replacing these fairly good Speedsters with a monitor design that accompanies subwoofers more directly.


I did a little toying around with the enclosure tool and driver library VituixCAD has to offer. My estimated cabinet volume range was 20-40 liters based on my constraints and vents were looking quite long to keep the extension desirable. The Daytons were clearly happier in a ported box than sealed, so I landed a little unexpectedly on SB Acoustics. The SB29SWNRX-S75-6 has a low Fs and a high excursion, allowing it to handle some of the Linkwitz-Transforms and stock plate amp bass bosts I tested. A pair of them in Series ran 50V, minimum is 9.2 ohms. In parallel it simulated 25V at 2.3 ohms. I suspect the frequency response is optimistic, as the published measurements show -6dB rated sensitivity at 30hz.
Funny, I think I get the "box size doesn't matter" argument. When looking into alignments, I noticed that sealed boxes don't change the power handling at any size, unlike ports. So the only way to raise the dynamic range in a sealed alignment is by increasing the number of drivers. The only limitation is how to handle the back wave, hence bracing/force canceling. This is why the SVS SB3000 Micro is dual opposed, small, and plays so low and loud. It's also why I'm going to copy them.
The pair of these only needs about 250 watts to top out, and there are a plethora of amplifiers which will help me do that. I am leaning towards the Dayton 250W plate amp for it's class AB power, sealed chamber and verified power. No DSP plate amp has a high pass output for crossing to monitors, so I will need a DSP crossover solution, preferably with phase control. I should also get a calibrated omni microphone and stop using my cheap studio mic for EQ.
Mini Sub VCAD.JPG


The Enclosure:
My thoughts on the enclosure are based on reading about high end KEFs and SVS cabinetry with regards to constrained layer damping and magnet bracing. KEF uses cloth as a damper between bracing to prevent vibration between rigid surfaces. These braces cross and lock with foam or cloth between instead of glue to prevent high frequency excitation. SVS braces their magnets to the box, likely to prevent sag, flex or reverb. My idea is to build braces which will relatively closely surround the magnets, and allow them to be coupled to the brace and one another with damping material. Whether this will be a benefit or if coupling the opposed subs will cause a new distortion could be a fun discovery. The planned material is 1/2" and/or 1" MDF. The sides will be one inch thick, with a 1/2" inset panel to reinforce the subwoofer baffles. These will have substantial dado cuts for the bracing to pass through, perhaps wide enough for the cloth damping technique or just wide enough to be glued. It's hard to say if stuffing will help, but let's assume I'll be stapling a thick sheet of damping to the inside walls and stuffing the remainder.
Some basic renderings:
Mini Sub Exterior.JPG
Mini Sub.JPG
Mini Sub Amp Clip.JPG
Mini Sub Bracing.JPG

Yes, the plate amp appears to go straight through the supports. I don't know if I need one or two braces, or if the dimensions of the plate amp are correct. Maybe I can just cut a slot in the brace consequence-free. Maybe I shouldn't use a plate amp. Maybe these drivers are wrong. It's what I'm here to work out.


The Bill:
2x SB29SWNRX-S75-6 $404
1x Dayton SPA250 $190
1x MiniDSP 2x4HD $225 // MiniDSP Flex $495
1x UMIK-2 + Tripod $210
1-2 MDF sheets, stuffing, screws, etc. ~$60-150
Totals: ~$850-1400


None of this is final and I am happy to receive constructive feedback or reports on the quality of any products mentioned. I have a few months before I plan to begin construction. It's been a few years, I can wait a little longer to get it all right.

Ideal summing of two hot and cold signals from mono AK4499EXEQ

In the AK4499EXEQ data sheet, they have a recommended mono external circuit summing the two hot and cold lines together after a passive LPF stage. I am using an active LPF through an FDA and need to sum the signals before the LPF. What is the ideal way to sum two hot and two cold signals? The data sheet is unfortunately very vague when it comes to mono descriptions.
Screenshot 2025-03-18 at 13.16.41.png

Rewiring a Fidelity Research FR-64S

I just received a Fidelity Research FR-64s. I'd like to rewire it. I've done some research on the web but I can't see the way to disassemble it. It appears from photos on the internet that the cap on the dynamic VTF knob must come off but I don't know the trick to remove it without damage. Any guidance will be most appreciated.

EDIT March 2023: I've now rewired several of the FR-64 series (S and fx). I'm attaching a document with quite a few photos to the end of this first post

IMG_0077.jpg

Attachments

Anyone have luck repairing a Proceed Amp5?

I have one with one channel down. I started by removing and testing all the electrolytic caps. Half were out of spec and a couple pegged my ESR meter.
I replaced them all. After, it still off on protection. If I pull the 10 pin ribbon connector off the bad board, the other 4 power up normally. I also swapped positions in the amp and the problem follows the bad board. Funny thing is after sitting on the bench for about 10 months, it powered up with no faults. While it was powered up, I tested for DC on the speaker outs. #1 is the one causing the fault but when tested while running my voltage readings were
#1 -0.975
#2 -0.972
#3 -1.077
#4 -0.962
#5 -0.945

I suspect #3 will be the next one to cause grief but it's not tripping protection now. After leaving it powered up for over 48 hours, It went off on protection again. After, all DC readings were the same but #1 was now
-2.375. Hoping to fine someone that's had luck with these as Harmon won't provide manuals or schematics.😡

Introduction to this Awesome Forum

Hello,

Nice to meet everyone, i have been browsing these forums for a little while. But, I finally decided to start posting and contributing. I mainly focus in loudspeaker design, synthesizer design and amplifiers. I'm a novice in all these aspects, but i love it so much i decided im going to go back to school for EE! I already have a few projects that i'm exicted to share and cultivate some feedback and deisgn advice from the wonderful people here! My end plans is open source and release everything being the CAD Files, buylist and other stuff for other people to build and learn aswell.

Best,
Snubs

First M2M Design and Build Progress

Hello,

This post is to catalouge my first build and at the end i'm going to release all the files as-well. Goals were to design something similar to amphion in regards to thier passive studio monitors. Below Is the project information and photos:

Waveguides:
6.5 inch wave-guide
Credits to somasonus!
https://www.somasonus.net/waveguides

Woofers:
RS-180S
https://www.parts-express.com/Dayto...ence-Shielded-Woofer-8-Ohm-295-364?quantity=1
Tweeter:
SB26CDC
https://www.madisoundspeakerstore.com/tweeters/sb-acoustics-sb26cdc-c000-4-alum-ceram-dome-tweeter/
Passive Radiators:
DSA215
https://www.parts-express.com/Dayto...inum-Cone-Passive-Radiator-295-549?quantity=1
(Couldn't find a 7 inch passive radiator)

When i get the enclosure finished, i will start measuring and post some measurements! I'm still quite a newbie, but this project is turning out good so far! We'll see when the measurements start. Also, i do have a question about damping PR and Ported designs. What materials do you guys like to use and how much dampening do you guy's shoot for in these designs?

Attachments

  • IMG_0430.jpg
    IMG_0430.jpg
    314.9 KB · Views: 20
  • IMG_0439.jpg
    IMG_0439.jpg
    367.8 KB · Views: 18
  • IMG_0440.jpg
    IMG_0440.jpg
    402.8 KB · Views: 18
  • IMG_0441.jpg
    IMG_0441.jpg
    289.5 KB · Views: 19
  • IMG_0475.jpg
    IMG_0475.jpg
    395.1 KB · Views: 21
  • Like
Reactions: kalasbarnet

Questions about crossover filter for a SB Acoustics SB21 on a Somasonus 4" waveguide

Has anyone simulated a filter for the Somasonus 4" waveguide and sb-acoustics-sb21 tweeter?
I will try to mate this combination to a Kef b110.
Thus I'm searching a circuit layout that could lineraise the output from the waveguide, and then I hope to be able to alingn that with the Kef low pass filter.
Any comments?

MiniDSP 2x4 HD with UMIK-1

Barely used MiniDSP 2x4 HD and UMIK-1 signal processor/electronic crossover and measurement microphone. Purchased in 2021 for a speaker project it took much too long to finish.... used for a couple of months in 2024. Works flawlessly, except for the original wall wart that had to be replaced (replacement included; original discarded with extreme bias). All original boxes and parts included. $200 shipped to the USA. You will need a license for the software, which I can transfer to you after purchase (MiniDSP allows transfer).
IMG_4580.jpeg
IMG_4581.jpeg
IMG_4582.jpeg
IMG_4583.jpeg
IMG_4584.jpeg
IMG_4585.jpeg

Attachments

  • IMG_4579.jpeg
    IMG_4579.jpeg
    360.9 KB · Views: 21

ZCA: simple and easy to build class A single MosFET amplifier

I know, I know, we already talked about it here:

Class A Mosfet Amplifier and PS

and here:

ZCA 5 watt mosfet amp .

But I liked to refresh this fine project by Mark Houston ( AUS ) and update it:

DIY Class-A 2SK1058 MOSFET Amplifier Project .

So, on post # 4 the amp circuit ( one channel shown ) and the power supply.

You can easily understand why the author called it ZCA: Zero Components Amplifier.

This is the same philosophy that inspired Nelson Pass's Zen Amplifiers:

( PassDiy )

( and Nelson himself defined this project "all very cool" here:

Class A Mosfet Amplifier and PS )

the less components on the signal path, the less distortion it will go through.

Flawless reasoning, theoretically, but then there's real life: in front of a simple T-Amp, digital amplifier where the signal is compared, chopped, filtered and re-filtered by tenth of components, the ZCA is less brilliant and detailed ( not to speak about output power, consumption, dimensions and weight ! ), but achieves more musicality, in my opinion.

Anyway don't ask me to describe a sound by words, please. Frank Zappa used to say that is like dancing the architecture ! If you are interested, please build it and listen by yourself.

Some other good points:

- it's quite simple, so everyone can build it, beginners too

- there's no need to use printed boards, it can be soldered directly or using tag stripes

- it can be bunched together with components that generally are already in your drawers

- it can be easily customized, changing Mosfet or power supply and voltages and currents, and this is the most fun !

and less good points:

- like all class A amplifiers, the power consumption is huge, with an output power of few watts. So no difficult loudspeakers: it can't manage them

- don't try to put it in a cigarette packet size case: mosfets and load resistors get quite hot, they need generously dimensioned heatsinks

This is not necessarily a drawback, it can be a good reason to build cases as such, at last ( post # 4 ).


As for me, I choosed a less traditional configuration, but more stylish, maybe, with separate power supply, less traditional too, a little less stylish ...

In the next episodes I'll give you more details ( if someone is interested ... ), starting from the mosfet choice, as the original Hitachi 2SK1058 are out of production.

Ciao.

P.S.: for those people who can't wait, they can spoiler how the story ends here ( in italian, sorry ... )

https://melius.club/topic/315705-zc...e-da-realizzare/?tab=comments#comment-7142851

Transnova anyone?

A few days ago, I posted some questions about the Transnova amplifier design in the “acoustat-answer-man-is-here” discussion group in case he could share any insights from his time at Acoustat, where the design originated. I know he focuses on speakers and didn’t have much he could share. So, I mentioned I would bring up the topic on the solid-state group.

Over the years, I’ve read through a number of Jim Strickland's notes & schematics on the early Acoustat TNT Transnova amps (TNT-200, TNT-120) while comparing to the later Hafler Transnova versions (9500/9300, 9505/9303 – Hafler made other Transnova models; I just care about the Hafler Transnova designs that use Lateral MOSFETs). Some of Jim's earlier Transnova papers describe something called "complementary" feedback, which looks to be essentially positive feedback being applied to perform some error correction/cancellation. It looks like that aspect of the unique feedback arrangement was phased out of the Hafler designs. It is R26 in the TNT schematic snippet (blue) attached and Rc in the (attached) patent writeup. I don’t see a similarly located resistor is not present in the Hafler version (yellow attached schematic snippet).

Although both driver circuits are able to pump quite a bit of current into the MOSFETs (at least 40mA), I have read that Hafler front-end improved on the linearity vs. the Acoustat front-end. So, I’m curious if the complementary feedback was dropped because it was viewed as unnecessary with the “new & improved” driver circuit or were there other reasons?

I've heard the Hafler version model 9500 played through some nice electrostatics and my old Kef 104.2 speakers and liked what I heard but have never heard the Acoustat TNT models...

I know a few others around here have commented that they didn’t care for the sound of the Transnova design (anatech, djk, etc.); I couldn’t tell if they referred to the earlier Acoustat version or later Hafler version (or both).

While roaming around through the discussions, from time to time, I see some people around here post about experimental designs they have built that are somewhat similar (low voltage front-end driving grounded source Lateral MOSFET output stage that has voltage gain and floating, higher voltage rails), for example, Juma’s nice “Transnova-Schade OS/Amp. I’ve also seen the AES paper and Linear Audio article written by John Vanderkoy (and others) that uses a high performance op amp as the front-end driver for the same output stage instead (image from abstract attched). One of the key differences is Acoustat’s Tranova approach configure the discrete design front-end as a transconductor with local negative feedback around the output stage (Juma does also), while Vanderkooy’s approach uses the op amp as just a voltage gain block and the output stage has no local negative feedback.


Anybody else out there playing with this design? Any of you even happily cloned either the Acoustat or Hafler Transnova amps?

I attached some reading material that was available freely. Some of this seems harder to find now.

mlloyd1

1742238531291.png


1742238560764.png

Attachments

For Sale Aleph Jzm kit, SLB PCBs, Reflektor D kit

Not going ahead with these projects, so looking to sell the following:

1. Aleph Jzm kit. Bought directly from the diyAudio store. Looking for 135AUD (~85USD) + shipping.

2. Reflektor D full kit with PCB. Looking for 80AUD (~50USD) + shipping.

3. 2x SLB PSU PCBs. Looking for 30AUD each (~20USD) + shipping

Attachments

  • PXL_20250307_101746786.jpg
    PXL_20250307_101746786.jpg
    582.6 KB · Views: 157
  • PXL_20250307_101953576.MP~2.jpg
    PXL_20250307_101953576.MP~2.jpg
    497.2 KB · Views: 152
  • PXL_20250307_101452919.MP~2.jpg
    PXL_20250307_101452919.MP~2.jpg
    516.4 KB · Views: 157

Interest in Siemens KS capacitors

Hello.
Im sending out a probe to check if theres interest in a lot of Siemens KS capacitors.
I have $0.40 per piece in mind, and discount on larger portions. Or all.. i will require a minimum sale .
Perfect for riaa and filters.
Datasheet added..
EU prefered.

402 pF – 160 V – B31521-B1401-K200 – 125 pcs
760 pF – 160 V – B31521-B1761-F000 – 25 pcs
2150 pF – 100 V – B31531-A1212-F500 – 125 pcs
24300 pF – 160 V – B31521-B1262-F300 – 25 pcs
1580 pF – 160 V – B31521-B1152-G800 – 125 pcs
4640 pF – 63 V – B31531-85462-F400 – 125 pcs
249 pF – 630 V – B31861-F6247-F900 – 58 pcs
1890 pF – 160 V – B31861-A1182-F900 – 150 pcs
37400 pF – 63 V – B31521-C5373-F400 – 25 pcs
1270 pF – 100 V – B31531-A1122-F700 – 125 pcs
3830 pF – 100 V – B31531-A1382-F300 – 125 pcs
4750 pF – 100 V – B31531-A1472-F500 – 125 pcs
402 pF – 63 V – B32531-A5601-H200 – 35 pcs

Attachments

  • Locked
Food for thought

Abstract​

This document presents a budget-friendly 3-way bookshelf speaker pair designed to rival popular models like the Polk ES15 and ELAC B6.2, which retail for $250–$300 per pair. The design achieves a frequency response of 34 Hz to 20 kHz (±3 dB), sensitivity of 86.5–87 dB, and power handling of 200 W, using off-the-shelf components and a slanted baffle for improved time alignment. The total cost is approximately $371.64 per pair. This publication details the design process, VituixCAD simulations, performance metrics, and a comparison to five well-regarded speakers in the $200–$1000 range, including horizontal and vertical dispersion analysis.

Introduction​

Bookshelf speakers are compact audio systems designed to deliver high-quality sound in small to medium-sized rooms. This project aims to create a pair of 3-way bookshelf speakers that offer superior performance to commercial models like the Polk ES15 and ELAC B6.2 at a similar price point. Unlike typical 2-way speakers, which use one driver for bass and midrange and another for treble, this 3-way design dedicates separate drivers to bass, midrange, and treble, enhancing clarity and detail. Key features include a slanted baffle for time alignment, a 4 Ω woofer to compensate for bass loss, and a carefully tuned crossover. The design was optimized using VituixCAD simulations and is ideal for DIY enthusiasts seeking professional-grade sound on a budget.

Design Overview​

1. Driver Selection and Specifications​

  • Woofer: Dayton Audio DCS205-4 (8", 4 Ω)
    • Handles bass up to 450 Hz with 100 W RMS power handling and ~91 dB sensitivity (boosted by 4 Ω impedance).
    • Chosen for its ability to compensate for baffle step loss, where bass weakens as sound diffracts around the enclosure.
  • Midrange: Dayton Audio RS100-8 (4", 8 Ω)
    • Covers 450 Hz to 3 kHz with 60 W RMS power handling and 86.5 dB sensitivity.
    • Selected for its clarity in critical midrange frequencies.
  • Tweeter: Dayton Audio DC25T-8 (1" Titanium, 8 Ω)
    • Handles frequencies from 3 kHz to 20 kHz with 80 W RMS power handling and sensitivity padded to ~87.5 dB.
    • Chosen for its smooth high-frequency response and affordability.

2. Enclosure Design​

  • Dimensions: 10" W × 16" D (base) × 22" H, slanting to 14" D at the top (10° angle).
  • Woofer Chamber: 1.0 ft³, ported, tuned to 34 Hz with a 2" × 4" flared port for extended bass.
  • Midrange Chamber: 0.06 ft³, sealed to isolate midrange frequencies.
  • The slanted baffle ensures sound from all drivers reaches the listener simultaneously, improving phase coherence.

3. Crossover Design​

  • Type: Dayton Audio XO3W-450/3K (8 Ω) with crossover points at 450 Hz and 3 kHz.
  • Adjustment: A 4 Ω resistor pads the tweeter’s sensitivity to match the system average.
  • The crossover ensures smooth transitions between drivers with minimal power loss.

4. Bill of Materials (BOM)​

  • Total cost: $371.64 per pair, including drivers, crossover components, MDF, and miscellaneous parts.

Simulation and Performance Analysis​

1. VituixCAD Simulation Setup​

  • Software: VituixCAD modeled the drivers, enclosure, and crossover.
  • Driver Positions: Woofer at the bottom, midrange at mid-baffle, tweeter at the top (slanted).
  • The simulation confirmed frequency response, impedance, and directivity.

2. Frequency Response​

  • Range: 34 Hz–20 kHz (±3 dB), with an average sensitivity of 86.5–87 dB.
  • Bass: -3 dB at 34 Hz, flat from 100 Hz to 10 kHz.
  • Highs: Smooth roll-off above 10 kHz, reaching 70 dB at 20 kHz.

3. Directivity​

  • Horizontal Dispersion: Wide below 500 Hz, narrowing to ~60° at 20 kHz.
  • Vertical Dispersion: Narrower, with significant attenuation at ±30° above 2 kHz.
  • The slanted baffle mitigates some vertical phase issues but remains sensitive to listener height.

4. Impedance​

  • Below 450 Hz: 4 Ω (woofer range).
  • Above 450 Hz: 8 Ω (midrange and tweeter).
  • Compatible with most amplifiers, though the 4 Ω bass may require good current delivery.

Comparison to Popular Bookshelf Speakers in the $200–$1000 Range​

To assess the competitiveness of this custom 3-way speaker, we compare it to five popular bookshelf speakers: the Polk Audio Signature Elite ES15, ELAC Debut B6.2, Klipsch R-51M, KEF Q150, and Triangle Borea BR03. These models are well-regarded for their balance of sound quality and value. The comparison includes frequency response, sensitivity, power handling, impedance, configuration, price, and—crucially—horizontal and vertical dispersion to evaluate sound distribution.

Comparison Table​


Speaker ModelFrequency ResponseSensitivityPower HandlingImpedanceConfigurationHorizontal DispersionVertical DispersionPrice (approx.)
Designed Speaker34 Hz – 20 kHz (±3 dB)86.5–87 dB100W RMS4Ω (<450 Hz), 8Ω (>450 Hz)3-way~90° at 1 kHz, ~60° at 10 kHz~40° at 1 kHz, ~30° at 10 kHz$372
Polk Audio Signature Elite ES15~50 Hz – 20 kHz*~88 dB*N/A8Ω*2-way~90° at 1 kHz, ~60° at 10 kHz*~40° at 1 kHz, ~30° at 10 kHz*$250–$300
ELAC Debut B6.244 Hz – 20 kHz87 dB30–120W2-way~90° at 1 kHz, ~60° at 10 kHz*~40° at 1 kHz, ~30° at 10 kHz*$300
Klipsch R-51M62 Hz – 21 kHz93 dB85W RMS2-way~90° at 1 kHz, ~60° at 10 kHz (horn-loaded)~40° at 1 kHz, ~30° at 10 kHz$250
KEF Q15051 Hz – 28 kHz86 dB10–100W2-way (Uni-Q)~90° at 1 kHz, ~90° at 10 kHz (coaxial)~90° at 1 kHz, ~90° at 10 kHz (coaxial)$500
Triangle Borea BR03~45 Hz – 20 kHz*87.3 dB30–120W8Ω*2-way~90° at 1 kHz, ~60° at 10 kHz*~40° at 1 kHz, ~30° at 10 kHz*$500–$600


*Estimated based on typical specifications w

Performance Analysis​

Bass Extension (Frequency Response)

The designed speaker’s 34 Hz bass extension outperforms all comparison models. The ELAC B6.2 (44 Hz) and Triangle BR03 (~45 Hz) are closest, while the Polk ES15 (~50 Hz), KEF Q150 (51 Hz), and Klipsch R-51M (62 Hz) have higher roll-off points, making the designed speaker better for deep bass without a subwoofer.

Sensitivity

The Klipsch R-51M leads with 93 dB, ideal for louder output with less power. The designed speaker’s 86.5–87 dB aligns with the ELAC B6.2 (87 dB), KEF Q150 (86 dB), and Triangle BR03 (87.3 dB), while the Polk ES15 is estimated at ~88 dB. It’s sufficient for most home setups.

Power Handling

The designed speaker’s 100W RMS matches or exceeds most competitors. The Klipsch R-51M is rated at 85W RMS, and the KEF Q150 handles up to 100W, while the ELAC B6.2 and Triangle BR03 support up to 120W amplifiers.

Impedance

The designed speaker’s hybrid impedance (4 Ω below 450 Hz, 8 Ω above) may demand an amplifier capable of handling 4 Ω loads, unlike the 8 Ω or 6 Ω ratings of the comparison models, which are easier to drive.

Configuration

The 3-way design provides dedicated drivers for bass, midrange, and treble, potentially offering better frequency separation than the 2-way configurations of the comparison speakers.

Dispersion (Horizontal and Vertical)

  • Horizontal Dispersion: The designed speaker offers ~90° at 1 kHz, narrowing to ~60° at 10 kHz, similar to most 2-way speakers like the Polk ES15, ELAC B6.2, and Triangle BR03. The Klipsch R-51M’s horn-loaded tweeter may enhance high-frequency dispersion slightly. The KEF Q150, with its coaxial Uni-Q driver, maintains ~90° across frequencies, offering a wider sweet spot.
  • Vertical Dispersion: The designed speaker’s vertical dispersion is ~40° at 1 kHz and ~30° at 10 kHz, typical for vertically aligned drivers. The KEF Q150 excels with ~90° vertical dispersion due to its coaxial design, making it less sensitive to listener height. The other models align with the designed speaker’s narrower vertical spread. The slanted baffle in the designed speaker reduces some vertical phase issues, but listener height remains a factor.

Price

At $372 per pair, the designed speaker competes with the Polk ES15 ($250–$300), ELAC B6.2 ($300), and Klipsch R-51M ($250), while undercutting the KEF Q150 ($500) and Triangle BR03 ($500–$600). Its DIY cost excludes labor, enhancing its value.

Conclusion​

This custom 3-way bookshelf speaker pair delivers exceptional performance for its price, with superior bass extension (34 Hz), a flat frequency response, and a 3-way design enhancing midrange clarity. Its horizontal dispersion matches most competitors, while its narrower vertical dispersion requires careful positioning, unlike the KEF Q150’s coaxial advantage. Compared to models like the Polk ES15, ELAC B6.2, and Klipsch R-51M, it offers better low-end performance and detail, and its price undercuts higher-end options like the KEF Q150 and Triangle BR03. For DIY enthusiasts seeking high-fidelity sound on a budget, this design is a standout choice.
box.png

crossover.png

frequency.png

frequency axis.png

directivity horizontal.png

directivity vertical.png

How to repair/refresh this wood finish?

As part of my conversion, I want to refresh the finish on the original cabinet (the cherry part in this pic). There is no major damage, the only issues are:
  • minor scratches and tiny dents in the finish
  • large areas of sort of cloudy tint resulting from stupidly wiping the cabinet with a wet cloth that had a little PVA in it

The original finish is kind of satin laquer, with wood grain/texture slightly visible.

What is the best way to deal with these two issues? I want to completely remove the clouding and make the small scratches/dents disappear as far as possible.


1743072104595.png

Passionate about high-end, electronic and DIY

Salve. Mi presento. Sono un appassionato di HiFi ed elettroniche di fascia alta. Da sempre mi cimento nel campo, avendo acquisito una buona conoscenza nel campo della progettazione di diffusori di qualità elevata. La mia esperienza abbraccia sia il campo delle tecniche di registrazione e di incisione che quelle relative alla modifica e strutturazione (a livello superficiale) di circuitazione

Xmas Amp - Dibya's TDA7293 by Jhofland

Hi Folks,
Members Dibya and Jhofland have designed a new amp using the TDA7293 chip amp. I have not heard it myself, but I trust Dibya's ears when he says it sounds exceptional.

Dibya said that despite this chipamp sounding so womderful, it was surprising that there is not already an existing design on DIYA. So we teamed up with Jhofland who did the design and layout of a mono amp. Jhofland added a DC servo to control the offset and provided some regulated power for the opamp. The board is pretty compact and I am sure easy to build. The best part is that it's inexpensive. The full BOM from Mouser (shopping cart below) is only $26 per channel (not including the home made inductor using 18ga magnet wire wrapped 12 times around a AA battery as a mandrel).

Some of the notable mods developed by Dibya and perfected with Jhofland's help include:

  • Reduced gain of 28db for improved sound quality (default is 32dB)
  • Improved feedback optimizations for better LF & HF sound quality
  • DC offset servo for improved LF performance
  • Addition of Thiel Network for improved stability
  • Tweaks for improved HF response
  • Bootstrap mod for improved bass response
  • Optimized values of decoupling caps for best midrange sound quality

The optimizations for the gain, bootstrap, and PSU decoupling were found using a CRO by Dibya. The lower gain setting was found by extensive listening tests.

Recommended PSU would be a 150VA 25v 0v 25v trafo with 15,000uF per rail for mono, or 300VA 25v 0v 25v with 20,000uF per rail for stereo. Note that if on-board DC servo is not used, then up to 35v 0v 35v trafo's can be used for +/-50v rails for the full 100w output power. However, that will require some really big heatsinks. It is much better to run no higher than +/-40v per Dibya's recommendation. Some recommendations for affordable trafos and heatsinks here.

Note that if populating the DC servo, C17 and C2 should be replaced with jumpers. The on-board voltage regulators are +/-40v max rails so please keep that in mind when choosing the PSU.

The design is free for your personal use and the Gerbers, BOM and schematics are below. Jhofland's designs are superb and I have enjoyed many of his creations. I have not yet built the verification board yet (still waiting for PCBs to arrive) so at this point, you would be building it at your own risk as a beta tester. However, it is quite a simple design and mostly follows the factory datasheet except for the DC offset servo.

If you don't want to order boards for yourself, I can provide them for cost of shipping. First come first serve 25 pairs of boards maximum. Please add your name to the free board interest list below and once we verify they work, I can order boards and get them out to you. This is a holiday special offer that will end by Jan 31, 2021. Boards will be 2oz copper HASL finish with green solder mask.

Special thanks to Jhofland for the wonerful design and layout, and to Dibya for the inspiration and for putting us on this path to inexpensive yet great sound.

Happy holidays and enjoy!
:santa:

Closeup of pdf schematic, main amp portion (note that R15 should be replaced by 47k or as low as 10k to get better zero DC offset tracking and C1 should be closer to 4.7uF to get the deepest bass extension):
904725d1608921278-xmas-amp-dibyas-tda7293-jhofland-tda7293-amp-rev1-1-schematic-main-amp-jpg


Closeup of pdf schematic, opamp PSU portion:
904726d1608921278-xmas-amp-dibyas-tda7293-jhofland-tda7293-amp-rev1-1-schematic-opamp-psu-jpg


Output stage topology from datasheet. Note that it looks like a quasi-complementary topology, could this be the secret to the great sound?:
904727d1608921278-xmas-amp-dibyas-tda7293-jhofland-tda7293-datasheet-output-stage-detail-jpg


PCB renders:
904728d1608921278-xmas-amp-dibyas-tda7293-jhofland-tda7293-rev2-render-top-png


904732d1608921829-xmas-amp-dibyas-tda7293-jhofland-tda7293-rev2-render-bottom-png


Mouser Shopping Cart:
Mouser Electronics

#### TDA7293 Xmas Amp Free PCB Interest List (maximum 2 boards please) ####

for example:

Name / Country
-----------------------------
xrk971 / USA

Here is the thread for handling the logistics of the giveaway.
https://www.diyaudio.com/forums/swa...3-xmas-amp-jhofland-giveaway.html#post6487628


Edit Jan. 13, 2021: Final design files (Gerbers, Schematic, BOM) are here.

Edit Feb 13, 2021 - cleaned up the grounding on the measurement and here is 10W case, THD is 0.0014%:
922086d1613269769-xmas-amp-dibyas-tda7293-jhofland-tda7293-10-0vrms-crc-10ohms-fft-jpg


Here is 40W case, THD is 0.005%:
922087d1613270322-xmas-amp-dibyas-tda7293-jhofland-tda7293-20-0vrms-10ohms-fft-jpg


My implementation using surplus Dell CPU coolers:
919834d1612715079-ready-run-rtr-ssr-dc-speaker-protection-delay-gb-b37b96fb-d787-48c7-b1cd-b2618eb956e0-jpeg

Attachments

  • TDA7293_ Schematic_12_06_20.pdf
    TDA7293_ Schematic_12_06_20.pdf
    69.3 KB · Views: 1,074
  • TDA7293-Amp-Rev1.1-Schematic-main-amp.jpg
    TDA7293-Amp-Rev1.1-Schematic-main-amp.jpg
    139.5 KB · Views: 18,133
  • TDA7293-Amp-Rev1.1-Schematic-opamp-psu.jpg
    TDA7293-Amp-Rev1.1-Schematic-opamp-psu.jpg
    110.8 KB · Views: 12,269
  • TDA7293-datasheet-output-stage-detail.jpg
    TDA7293-datasheet-output-stage-detail.jpg
    92.3 KB · Views: 11,923
  • TDA7293-Rev2-Render-Top.png
    TDA7293-Rev2-Render-Top.png
    547.6 KB · Views: 14,101
  • TDA7293_amp_BOM_Dec6_2020.zip
    TDA7293_amp_BOM_Dec6_2020.zip
    5.8 KB · Views: 685
  • Gerbers_TDA7293_ver1_12_06_20.zip
    Gerbers_TDA7293_ver1_12_06_20.zip
    207.5 KB · Views: 689
  • TDA7293-Rev2-Render-Bottom.png
    TDA7293-Rev2-Render-Bottom.png
    323.3 KB · Views: 11,583
  • Dibya-8ch-TDA7293.jpg
    Dibya-8ch-TDA7293.jpg
    193.3 KB · Views: 2,599

Left speaker channel is dead, Topping MX3

Hello everyone! I thought you might be able to help me to do a DIY repair 🙂

So, i have a Topping Mx3 that has been lovely in my garden house. Didn't think of bring it indoor during winter. The problem is most certain caused by condensation or too cold temperatures. Have opened the amp and had it indoor for more than a month. Cleaned the circuit board with Isopropanol, but the problem persists

Where do I start to troubleshoot the board? All tips a welcome!

Symptom when I connect the speakers:
  • Left + and Left -. Dead silent.
  • Right + and Right -, Sound
  • Left + Right -, Sound.
  • Right + Left -, Sound
When I meassure:
Left + and -, around 10 k ohm.

Right + and -, around 10 k ohm.

Attachments

  • left-speaker-channel-is-dead-v0-vikmxub5d2me1.webp
    left-speaker-channel-is-dead-v0-vikmxub5d2me1.webp
    214.2 KB · Views: 43
  • left-speaker-channel-is-dead-v0-n9ojxvb5d2me1.webp
    left-speaker-channel-is-dead-v0-n9ojxvb5d2me1.webp
    57.6 KB · Views: 36
  • left-speaker-channel-is-dead-v0-6h7h1vb5d2me1.webp
    left-speaker-channel-is-dead-v0-6h7h1vb5d2me1.webp
    304.8 KB · Views: 37
  • PXL_20250326_193426655.LONG_EXPOSURE-01.COVER.jpg
    PXL_20250326_193426655.LONG_EXPOSURE-01.COVER.jpg
    576.5 KB · Views: 39

TH-18 Flat to 35hz! (Xoc1's design)

I just got my 18sound drivers from loudspeakersplus.com....ordered tuesday morning had them by friday evening! They are beasts!
photo15nh.jpg


(2) 18lw2400's which will be used in two TH-18 tapped horns, design courtesy of Xoc1 (Thanks again for all the info/effort you put into this!!) Also thanks to Djim for his help and patience through my questions with the design/corner bracing etc etc.

This thread is for anyone who builds his box. I figured I would start because I think I am one of the first to do so!

I will go pick up some good high quality 3/4" Birch tomorrow and get started on this. Pictures to follow asap!!

Here is the Sketch plus a nice cut list...
View attachment TH18 + CUT LIST.PDF

223205d1305579189-c-e-x-pa-flat-30-ft30-pa-th-awesomeness-th18-additional-corners.jpg


Extra bracing which Djim suggested...
An externally hosted image should be here but it was not working when we last tested it.


Now I am pretty sure that the point of this design was for 4 cabinets to be Flat to 35hz. I am starting with only two because of cost, not just for drivers/wood but amp power needed to drive them as well. These are some powerful cabinets and depending on which driver you choose to load them with, they can take a serious amount of wattage!

There are a ton of different drivers which have been simmed for this design, I think most have been simmed for the cabinet without the corner reflectors, but still the same external volume cabinet.

Here is a sim for 4 cabs at xmax + with the 18 sound 2400 drivers...
spl418lw2400vs18sw115.jpg
  • Like
Reactions: stewin

Power amp measurement system

I decided to upgrade my poweramp measurement system.

The devices:

1/ ultra low distortion sine wave oscillator - I bought Victor's 1k and 10k
2/ dummy load - designed and made by me
3/ passive voltage divider - under development
4/ passive notch filter- schematic Victor, made by me
5/ post notch buffer - under development - powered by two 9V battery
6/ PC sound cards I have
- ESI Juli@ PCI
- Asus Xonar STX II
- X-Fi USB HD modded Improving A/D perfromance of Sound Balster X-fi Music (SB1240) - and a Puzzle!!! - diyAudio

attachment.php


the dummy load

Attachments

  • DUMMY LOAD LKA.JPG
    DUMMY LOAD LKA.JPG
    51.2 KB · Views: 430
  • dummy_load_1.jpg
    dummy_load_1.jpg
    324.3 KB · Views: 483
  • dummy_load_2.jpg
    dummy_load_2.jpg
    253.4 KB · Views: 392
  • dummy_load_3.jpg
    dummy_load_3.jpg
    134.8 KB · Views: 280
  • dummy_load_4.jpg
    dummy_load_4.jpg
    264.1 KB · Views: 289

Suggestion for bass assisting woofer

I have a pair of 4" phillips full rangers (will be replaced in future) that distort anytime any heavy bass is played . So I have been looking to build a either a pair of speakers that specifically play the lower end or a dedicated subwoofer. Moderate spl about 85-95 db not looking to go too low ; room is 270 sq ft and my budget is $150 usd. Wavecor, SB audience/acoustics, some Dayton and faital woofers are available in local market.
Any suggestions would be helpful and btw it is meant for a home theatre.

I will sell various sockets for radio tubes ceramics - carbolite

I will sell various sockets for radio tubes ceramics - carbolite

payment paypal
possible exchange for radio tubes

1) 11pin relay panels 24 pieces used for $1 each

2) Magnovall panels for EL509\E55L
2 not used 19 pieces used for $20 all

3) LOCTAL panels (4P1L\7N7\EBL21)
ceramics in a cage with metal ears 4 pieces used for $2 each
carbolite in a cage with metal ears 1 used 2 new $6 all
carbolite with metal bracket Germany new 2 pieces $3 all
ceramics lamellas 8 new 2 used $15 all

4) EF86\12ax7\6n2p\EL84 open new
30 pieces with long legs $30 all

5) Panels ceramics GU50\GU15
5 pieces ceramics 1carbolite $7 all

6)
Caps 8 pieces from TVS
Caps 5 pieces closed 6f5\ef37\6j7
Caps 36 pieces open various 6f5\ef37\6j7
12$ all


7)
Caps 807 tube carbolite\plastic 6 pieces 6$ all
Caps 811 tube open 6 pieces 8$ all


8)
panel 845\211 lamp ceramics 15$
Panels ceramics for 813\4E27\6A6\gu13
RCA UT-104 new 12$
JOHNSON 237 used 10$
6с33с panels thick crimping 2 closed one open 16$piece
good quality


9)
octal 8pin panels ceramics
round panels with good contacts 23pieces used -110$ all


10)
octal 8pin panels made of textolite
22 panels new and used 30$ all


11)
LOCTAL 9pin panels (EF50\EF54)
thick ceramics with British ears 2pieces used
ceramics with ears 3 pieces 160 UAH used
solid ceramics 1 piece used
30$ all

panels 5pin AKORN (957\955\954)
ceramics 8 pieces 15$ all


12)
Panels for RV12P2000 used 3 pieces -10$ piece
panel for RV12D60 1 piece -10$

Panels for Y8 EL11\EL12\EF12 carbolite
7 pieces round Germany -8$ piece
3 pieces oval Germany -8$ piece one glu


13)
panels g807\56 UX5
used textolite panels использованные 3 pieces $2 piece
carbolite panels used 1 piece $2
solid ceramic panels with ears used 1 piece $8
ceramic panels without rings used 3 pieces $6 all

panels 2A3 carbolite UX4 without rings 2 pieces $4 all

panels 6A6\53\310A carbolite UX6 without rings 2 pieces $6 all


14)
panels for GK-71
carbolite collet 3 pieces $15 all
textolite paired panel with holders $8


15)
panel 12s3s\LD1 one with screen $10 pair

Panels for spider AL4\EL3\AF7 carbolite
new 8 pieces -40$ all
soldered 1pc -3$
soldered 1pc adapter EL3\EL6-> 6L6 -3$
Germany original for 3 ears used 2pcs 20$ pair


16)
octal 8pin panels made of carbolite with a nut
black panels mount nut 10pcs - 2$ each

octal 8pin panels made of carbolite with ears Germany
12pcs B\U and new -50$ all


17)
octal 8pin panels made of carbolite with ears
23 panels used - 2$ each


18)
octal 8pin panels made of black carbolite
with metal clip and ears used - 19pcs 2$ each
with metal clip and ears used collet 1pc -10$
mounting panel USA used 1 piece 5$


19)
Octal 8-pin panels made of brown carbolite with metal ears
in a metal clip 20 pieces used 4$ each


20)
Octal 8pin panels made of carbolite
under a bracket with two screws - without a bracket used
good quality contacts 12 pieces 6$ all
collet carbolite panel with crimping 1 piece 10$

collet ceramic panel with crimping 1 piece 10$
2A3 panel ceramic new gold 30$ pair

20250319_160544.jpg
20250319_161257.jpg
20250319_171047.jpg
20250319_172037.jpg
20250319_172552.jpg
20250319_195538.jpg
20250319_200508.jpg
20250319_203056.jpg
20250319_205334.jpg
20250320_111347.jpg
20250320_112313.jpg
20250320_133437.jpg
20250320_134534.jpg
20250320_150713.jpg
20250320_162852.jpg
20250320_180500.jpg
20250320_185417.jpg
20250319_145311.jpg
20250319_153147.jpg
20250319_154648.jpg

B1 preamp build thread

Hello!

I recently inherited a bunch of stuff from a fellow DIYer, and one of the things was a nice chassis suitable for a preamp or perhaps Chipamp with an outboard PSU. Discussions with other members, as well as a healthy dose of curiosity led me to choose the B1. It went together very easily and quickly. Here is the log of that build.

The finished product. It sounds fantastic!
244962d1318790367-b1-preamp-build-thread-dscf3556.jpg


But how did I get there? well...

When doing a project like this, the easiest place to begin (for me, anyway...) is the mechanical. Drilling, hardware, things that touch the chassis. Not a lot of drilling was involved, the power inlet module was pre-cut, so I added the holes for the RCA jacks and the screws for the circuit boards and transformer.
244960d1318790367-b1-preamp-build-thread-dscf3528.jpg


This is just placing the various boards and transformer in place to see how things will fit. The blue board shown in this photo is actually a dual-rail PSU PSB from Peter Daniel, the single rail is exactly half of it.
244961d1318790367-b1-preamp-build-thread-dscf3532.jpg


This is a really nice Goldpoint switch and series stepped attenuator made from a Elna 24 pole switch and a bunch of Holco resistors. It's all wired up because it was salvaged from a different project.
244966d1318790688-b1-preamp-build-thread-dscf3529.jpg


You will notice in this photo that the grounds of the inputs are wired together. This is for two reasons... firstly, the RCA jacks all float on the chassis - the shoulder washers isolate the jack from the chassis. Also, the PassDIY circuit board has a pad for ground on both left and right... so there will be wire connected to one of these negative tabs to the PCB pad.
244967d1318790688-b1-preamp-build-thread-dscf3531.jpg


A well-stocked junk box to the rescue!! This switch is the one I had to use in the end... the Goldpoint that was on the harness with the attenuator had a shaft that was just too short to use with the knobs on the chassis. This switch was bought only a few weeks ago as I was perusing through the local surplus store and saw this switch perfect for a preamp. Luck favors the prepared!
244968d1318790688-b1-preamp-build-thread-dscf3535.jpg


DSCF3536.jpg

So here are the selector and the attenuator mounted, and the PCB with some of the wires soldered in place. In order to keep the wires as short as comfortable, it is prudent to solder all of one edge in place, and then you only have to do the other edge in place. if you do this, make sure that your wires are at least a couple of inches longer than you know you will need. Too long you can trim, but too short is a pain in the backside!

DSCF3537.jpg

The wiring continues.

DSCF3540.jpg

I originally envisioned the preamp board turned the other way, to keep the leads from the RCA jacks shorter. The size of the attenuator happened to get in the way of the black electrolytic caps, so it got turned 180deg.

DSCF3548.jpg

Here is the single-rail universal power supply PCB from Peter Daniel. It's a very nice board, with the ability to choose 2- or 3- pin diodes (or none at all), many different lead spacings on the filter capacitors, and either a LT1085 or LM317 regulator. Shown here are MUR860 diodes and a LM317 regulator.

When I first fired this up I couldn't adjust it to get more than about 7.5-8 volts on the outputs... I was slightly confused, and knowing that just thinking about it wouldn't fix anything, decided to measure the components... It turned out that I grabbed a 240K ohm resistor when I need a 240R... 😀 Anyway, I didn't have anything close to 240, but I happened to have two 150R that are now placed in series in that position, and it works very well now! The range of adjustment is about 17-25 volts, and have it set at 19.5v

DSCF3549.jpg

This is the last check of the wiring to see where the power supply wires will place.

Just to recap, the black and blue are signal input, switching and attenuation, the red/white is from psu board to preamp board, and the blue/blue-white, orange/orange-white is the output.

DSCF3550.jpg


And here it is complete - the power inlet module is installed and above the transformer, the yellow/black leads are the secondary of the transformer.

DSCF3553.jpg


DSCF3552.jpg


This was a very easy and rewarding project. I cannot express enough gratitude to both Nelson Pass (you rock!) and Peter Daniels (you also rock!) for making the circuit and and the PSU board. Although something like this could be very easily made on perfboard (and I thought quite seriously about it) any project is greatly simplified by good circuit boards!

Attachments

  • DSCF3528.jpg
    DSCF3528.jpg
    47.5 KB · Views: 24,456
  • DSCF3532.jpg
    DSCF3532.jpg
    70.1 KB · Views: 24,942
  • DSCF3556.jpg
    DSCF3556.jpg
    29.7 KB · Views: 24,751
  • DSCF3529.jpg
    DSCF3529.jpg
    70.8 KB · Views: 24,548
  • DSCF3531.jpg
    DSCF3531.jpg
    61.6 KB · Views: 24,398
  • DSCF3535.jpg
    DSCF3535.jpg
    69.8 KB · Views: 22,214
  • Like
Reactions: audiosteve

  • Locked
For Sale 2pcs UNI-T 61E+ with hFE adapter for TH and SMD

Here i have new UNI-T UT61E+, 22000 Counts with high DC and AC precision and large display backlight. It comes with adapter that you plug in into multimeter socket and then you can meausure and match transistors, diodes, led in throught hole and smd package.

It is uniqe design because todays multimeters does not have hfe function.

With this multimeter you can match transistors for any amplifier and preamplifier project.

Comes with nice original uni-t silicon leads that are flexibile and high current (20A max).

Price is €110,00 plus shipping for 1pcs. Payment via IBAN or paypal.

I have 2pcs in original box for sale.

Here is pictures of this nice multimeter.

Attachments

  • IMG_20240915_192406.jpg
    IMG_20240915_192406.jpg
    400.3 KB · Views: 176
  • IMG_20240915_192442.jpg
    IMG_20240915_192442.jpg
    368.5 KB · Views: 163
  • IMG_20240915_192558.jpg
    IMG_20240915_192558.jpg
    303.2 KB · Views: 162
  • IMG_20240915_192614.jpg
    IMG_20240915_192614.jpg
    251.1 KB · Views: 169
  • 1670535120084-min.jpg
    1670535120084-min.jpg
    374.2 KB · Views: 172

For Sale Revox B790

I have a Revox B790 turntable with Ortofon cartridge for sale. It was working when I put it in storage in the original box 20 years ago when I moved onto a boat, but I'm sure by now it has some dried up capacitors that need to be changed. I'm in NY and want $500 + shipping, but I'm sure it would sell for much more after a refurb. Anyone interested?

Discussion: Padding Down Mid/Tweeter VS Multiple Woofer/Mid to match Tweeter

I do not see this discussed to any extent so I'd like to open this up.

As we all know, different drivers have different sensitivities. As far as I can tell there are two solutions to this issue if you plan to design an accurate loudspeaker:

1. Pad down the higher sensitivity drivers to match your lowest sensitivity driver
2. Increase the number of lower sensitivity drivers until they match the higher sensitivity drivers
I see the pro/cons of these options as thus:

Option 1
Pros
1. Cheaper: Less drivers means lower cost
2. Smaller: More compact for space savings
3. Simplicity: Less drivers means the design and the response is simpler. It is easier to take measurements.
Cons
1. Loss of sensitivity: Your system sensitivity will only be as high as your lowest driver
2. Potential cost of amplifier: You will need so spend more on your amplifier as your system will be harder to drive
3. Less amplifier options: Depending on your final sensitivity, you selection of amplifier may be cut down significantly
4. Less woofer/mid options if you need a higher sensitivity system

Option 2
Pros
1. Higher sensitivity: you would be able to use whatever amplifier you wanted with a high sensitivity system
2. Driver work: The amount of work the lower drivers will have to perform will but significantly cut down. Your woofers will handle much more power before hitting XMAX
3. Power threshold: The system should be able to handle a lot more power before distortion
4. Less amplifier distortion, less woofer distortion
5. With more driver in vertical axis you should be able to significantly reduce vertical cancellations which should better fill a room
6. It will look super impressive: No doubt, a loudspeaker using redundant drivers that goes up to the ceiling looks far more impressive.
7. You can use any woofers you want as sensitivity can be accounted for using multiple drivers.

Cons
1. Much more expensive: You will need multiple drivers, however, your crossover costs should remain the same
2. More complex build: The enclosure will be much more complex to design and build
3. More complex measurements: I have not personally ever measured redundant drivers but I imagine it isn't as cut and dry as measuring just one.
4. It will take up more space: It is going to be much larger. Geometry is geometry.

I'd like to hear all of your thoughts on these two different approaches as I am considering using multiple drivers to up my sensitivity on my next build. I have an example below that is really a hybrid of the two

I will also throw into this mix a discussion of low frequency sensitivity. Most of us are trying to boost the low frequencies using multiple drivers. Tweeters play loudly, woofers do not. I have heard that what matters most for the low end is cone area and power. The driver sensitivity doesn't matter below 150 hz or so. I do not know if this is true. It does not seem like it is true. Then again, I do not know exactly how sensitivity is measured. I hear it is playing a 1000hz tone with 1 watt then measuring the decibels. Due to peaks, cone resonances, and driver frequency response I would think this would not be a perfectly accurate measurement for all drivers. If someone knows, please post that information as I feel it is critical to this discussion.

Please ignore any errors on this XO and design. It is just an example for flare that I tossed together in a hurry.
1743174258309.png

Help with repairing a Memphis Audio PR1x1000? How to check the transformer, is it shorted?

Hello, I am currently trying to repair a Memphis Audio Pr1x1000 amp. I think I have narrowed down the problem to a short somewhere near the transformer, (I think). And I am trying to rule out the transformer as the problem, but I dont exactly know how to test the transformer, I am getting a couple of shorts on the transformer, but I dont know if that is normal or not, I can leave a photo of what is shorted together. Can someone help me figure out what should, and shouldnt be "shorted" on the transformer?

Some things I have done:
I thought it might be a mosfet/transistor, but I pulled all the transistors, and the short was still there, and all the transistors seem to be in working condition, (from what I can tell)

I used some IPA around the board to check for hot spots, and two diodes and a small capacitor were getting hot when the amp was powered on, so I pulled them, and the transformer seems to be shorted still, unless what Im seeing continuity on is normal. (You should be able to see the diodes in the photo, they are the ones slightly askew as I put them back on the board)

I also found an IC that was getting warm, a IRS2092S (op amp?) but when I pulled it, the transformer still has those "shorts"

I tried hooking my multimeter in continuity mode to the "shorts" on the transformer, and wiggling wires to see if it would stop or change, but it didnt

Idk, but at this point im lost, and just wondering how to make sure my transformer is good, or what else I should be checking.

Any help is much appreciated.

Transformer1.png

Repair of burned Voice Coils for Vintage Loudspeaker Chassis/Driver - which Companies ? - Overview wanted

There are a lot of companies, which replace surround foam or rubber. But companies for remake voice coils are rare,. because this is much more difficult.
An overview of such guys around the world would be helpful in any cases.
E. g. for Foval's kevlar drivers under
Thank you for posting addresses of such companies.

Noisy NAD 7240PE - how to diagnose issue?

Hi everyone - So I have this NAD 7240PE. It's an absolute beast of a receiver that I bought sight unseen from the other side of the country and it arrived pretty beat up. It was super dirty and dusty inside and noisy as hell and the seller proceeded to never return any of my messages 😅. Several of the largest caps had burst at some point and spilled their goop on the PCB, which itself has turned brown from heat in the amp section, it must have been run HOT a lot. The radio tuner side meanwhile is still green as a normal PCB and works pretty well even just using the built in FM antenna.

I switched out the busted caps and cleaned it up and it's working a lot better but there must still be some component(s) fried or something since the amp has a ca. 10 sec period at startup and turn off where it plays this kind of ground saw wave noise through the speakers similar to touching an input jack your finger. After that stops, there is still this random, intermittent popping sound in both channels underneath the audio signal but it decreases slowly until - when the amp is warmed up perhaps - the noise is gone. At this point, the amp works almost noiselessly and sounds absolutely superb.

I'm telling you, the combination of buttons called “Bass EQ” and “Loudness” really make this amp drive way more nice low-end from my two Artcoustic wall mounted speakers than my other, newer NAD C316BEE ever could. It also sounds much more dynamic and enjoyable, no doubt partly due to the pretty complex BJT-based Class G topology in which separate higher voltage power rails are switched to momentarily when triggered by a powerful enough input signal, ultimately resulting in higher efficiency and dynamic range I believe.

Anyway, in my search for knowledge that could help in diagnosing and fixing the issue, I came upon some 7240PE repair threads on here and some people (e.g. Mooley) seem to have the skillset and experience needed to diagnose this kind of stuff so here I am, asking for some tips on what to look into on this amp 🙂

I can record the noises in question if it helps, as well as measure anything with a multimeter. I also have a power supply and even an old analog Agilent Oscilloscope that I bought cheap from my old student job employer (ICEPower) as they had stopped using it in favor of the new digital ones. It has been sitting in a cabinet unused since because I have yet to buy some probes for it - which I will if it will help fix this amp!

P.S. Here's the service manual which includes the amp schematic on page 13 and here's also some technical info on how the Class G voltage switching works for those interested:

Screenshot 2021-09-22 105305.jpg

Rega P8 or P10

Hi everyone, I have recently bought an old banged up Rega P2 and was hoping to try a new build.

I thought it might be good to try a P8 (P10) clone, with the new shape base and a rewired / silver RB250 arm.

I have details of how to remove the black paint from the arm and a template to drill holes in the arm and rewire. What I don't have is a detailed size / cutting shape for the base.

Is there anyone who could help me with this please?

Thanks

Geordie

Do LED bulbs cause interference on audio circuits?

I am in the process of setting up an amateur recording studio in my workshop which has overhead fluorescent light fixtures. I am changing the fluorescent lights to incandescent fixtures due to the tendency of fluorescents to cause interference noise in audio circuits, which in my case will be both line-level and microphone-level.


I had not shopped for incandescent light bulbs for some time, so when I went to the home improvement store to buy both the fixtures and the light bulbs I was somewhat dismayed to discover that LED bulbs had almost completely supplanted incandescents on the store shelves. I asked the sales clerk about them and he said that each LED bulb has a transformer integrated in the bulb chassis. Having no experience with LEDs I don't know if they can cause noise in audio circuits, so I am hoping that some members with more knowledge than I have can clue me in.


For now, I have stocked up on some halogen incandescent bulbs, but for future reference I would like to know the story on LEDs. The sales clerk told me that the store will stock incandescents for the forseeable future, but having witnessed the rise and apparent fall of CFLs and the vagaries of the relevant governmental agencies I am without faith in such pronouncements.


So, what's the real story? Has anyone experienced LED-induced noise in their audio circuits, and is there any reason to expect that they could cause such interference?

ES9039Q2M output stage?

This is the (v2 = improved) output stage from the ESS data sheet:
1721936262265.png
I understand that thevalues of the components around the op amp are no longer critical to avoid the hump, and no published data of 9039 DACs that I have seen exhibit the hump.

Does anyone know what the three op-amp version with slightly improved THD+N looks like? I the third op-amp maybe just for buffering the reference voltage, as a symmetrical output should have an even number of amps?

Is there a simpler way to get unbalanced output? Just using one side of the symmetrical output signal seems odd. The Chinese 9039 board seems to use only one op-amp per channel.

Steve Benchs no C RIAA

Has anyone an idea how to calculate the R9 adjustment for using an LL1660 instead of the LL1623?

Steve says:
"Note that ther are no capacitors in the signal path. In the early phase of design I had intended the LL1623 (a large output transformer) to be used as the interstage transformer. Unfortunately, there was too much variation in inductance with signal level, and the frequency response varied with level. Placing the 1660 as IT cured that. The reason for the 1623 at all was to take advantage of the low winding resistance. O well. I suspect 1660s can be used for both transformers, but R9 will probably need to be adjusted for proper RIAA compensation (due to the added transformer resistance). "

Attachments

  • LR 1660.jpg
    LR 1660.jpg
    60.5 KB · Views: 179

EQ1616D Phono Amp

Stereophile Class A recommended components..

Class A
Best attainable sound for a component of its kind, almost without practical considerations; "the least musical compromise."


Recommended Components 2021 Edition Phono Preamplifiers | Stereophile.com

EQ1616D were nearly old out. The next production will be in July 2021. --> April Production was SOLD OUT.
The Next Production is July 2021.
If you want to reserve a unit of EQ1616D, please let me know.
Thank you for your support!!

Price $985.00 Kit
Assembled Version $1,645 with 2 VCAP ODAM 2.2 (assembled by Sunvalley Japan)


Stereophile Review - November 2020 edition
Gramophone Dreams #42: Sunvalley Audio SV-EQ1616D phono equalizer | Stereophile.com

Sunvalley SV- -EQ1616D 115/230V version (Point to Point Phono amp Kit)
Made in Japan

Price $985 KIT Version
Price $2,050 ASSEMBLED Version ( Assembled by SunValley Japan with tube set (Gold Lion ECC83/B759 X 2 + Brimar ECC82 X 1 + LINLAI/COSSOR WE 274B) + VCAP ODAM 2.2 X 2 (output Cap)
Price $1,585 (assembled version w/o tube set . VCAP ODAM 2.2 X 2 included) + shipping
Assembled Version

This kit does not come with tube set. The following 3 combinations are recommended.

(Plum set)
Gold Lion ECC83 / B759 x 3 + LINLAI 274B
Standard combination. Natural charm

(Bamboo set)
Gold Lion ECC83 / B759  x 3
WE 274B
Powerful midrange

(Pine set)
Gold Lion ECC83 / 12AX7  x 2
Brimar 12AU7 x 1
Cossor/Linlai WE274B x 1
Vcap ODAM 2.2uF [2 pieces] x 1
Superb harmonics


● Phono equalizer that emphasizes sound quality
● 2 input systems that are ideal for using 2 turntables
● Output: 1 system (MONO (L) / STEREO switchable) * MONO: L channel Input → L / R dual output
● Compatible with MM / MC cartridges (MC input: head amplifier) * MM: 47kΩ, MC: 20Ω to 50Ω
● Gain: MM35dB, MC + 22dB
* Gain can be selected according to the output voltage of the cartridge ( When HIGH / LOW) or LOW is selected -4dB (MM) /-2.5dB (MC)
● Vacuum tube: Amplification stage (V1 / V2): 12AX7, 2nd stage (V3): 12AX7, 12AU7, 12AT7 can be selected arbitrarily (according to your taste)
* The standard is all 12AX7, and if you want the smooth texture of high frequencies with a high output cartridge, 12AU7 is recommended only for V3 ( I have RCA clear TOP or Brimar to pick)
● Rectifier: Standard / diode module, option / various rectifier tubes (5AR4, 274B, 5R4 etc. can be used) ( I have LinLai 274B, WE274B, ACME 274B or ELROG 274B)
● Turnover frequency adjustment: Switchable
  → Compatible with RIAA, old AES, COLUMBIA / old NAB, LONDON, EU SP , US SP
  * Not only turnover frequency but also low frequency characteristics can be changed simultaneously according to each EQ curve.
● High-frequency roll-off adjustment: ON / OFF selection type
* When ON: Continuously variable (corresponding to all EQ curves), When OFF: No attenuation (for SP LP)
● Detail assembly guide included
● Assembly difficulty: ★★ ★★ ☆ (for intermediate to advanced)


Size mm (including protrusions): W250 x D225 x H135
Weight: 3.8 kg

UPgrade options:
Gold Lion (ECC83/B759 X 2 + Brimar ECC82 X 1) = 215

LinLai/Cossor WE274B $265

VCAP ODAM 2.2 X 2 $85 each


Sunvalley SV-Pre1616D Point to Point Prject

Lundahl MC Transformer will be available Soon... 3 versions with Amorphous core - Standard, OFC, or Silver .
TUBE RECTIFIER


VCAP 2.2uf ODAM

YOU can use sold state RECTIFIER


VCAP 2.2uf ODAM

Operation Manual 2 & 3

Circuit type: CR type phono equalizer
・ Input: 2 lines
・ Output: 1 system (STEREO / MONO switchable)
・ Corresponding cartridge: MM (47kΩ), MC (50Ω)
MC boost: FET head amplifier
・ Gain: MM36dB ~ 40dB, MC + 25 ~ 32dB (determined by prototype)
・ Vacuum tube: amplification stage: 12AX7 (2), follower stage: 12AX7, 12AU7, 12AT7 can be selected arbitrarily
・ Rectifier: Standard / diode module, option / various rectifiers (5AR4, 274B, 5R4, etc. can be used)
・ Turnover frequency adjustment: Switchable (supports RIAA, EU system SP panel, US system SP panel, AES, NAB, COLUMBIA, etc.)

・ High-frequency roll-off adjustment: ON / OFF selectable (When ON: Continuously variable RIAA and other curves are supported)
(Specifications are subject to change without notice)

Specification :
https://www.kit-ya.jp/user_data/SV-EQ1616D.pdf

Phono + Line stage Amp (Filter - solid state diode or optional 5AR4)

Miles Davis "Someday My Prince Will Come" (Columbia / old NAB curve) 1961


"Art Blakey And The Jazz Messengers" (AES curve) 1958


Miles Davis "Kind Of Blue" (Columbia / old NAB curve) 1959


Sonny Rollins: A Night At The "Village Vanguard" (AES Curve) 1957


Playing LP with the proper curve will make a big difference in the strength of the sound to anyone listening, especially the freshness of the mid-high range,

Since the sound quality of the LP differs depending on the label and recording , the SV-EQ1616D cannot only turn on / off the roll-off (high frequency level attenuation
characteristic) of 1 kHz or more, but also can make fine adjustments when the roll-off is ON. Since it is also possible to control the tone, you can enjoy each LP with the
optimum sound quality.

  • Like
Reactions: zettelsm

Modulus-86 build thread

Thought it might be interesting to start a thread on a build I am just starting. I'm converting my apogee Centaur Minors to open baffle with active amplification and needed 4 channels of the best I could afford of 20-40W per channel. After looking at a number of alternatives I decided to go with the Modulus-86 developed by TomChr, webpage here Modulus-86: Composite amplifier achieving 0.00018 % THD. and DIYaudio thread here Modulus-86: Composite amplifier achieving <0.0004 % THD+N. - diyAudio. My main reason for chosing this was the fact it provides some of the best measured performance I have ever seen from a power amp (comfortably lower distortion than my source or pre-amp), is unfussy about power supply, working to spec with a basic setup and has a balanced input that gives nearly 90dB CMRR even from single ended sources. Basically reference grade for pocket money and perfect for me as I want to play in other areas with my system at the moment.

A few people are thinking of building this so thought I would start a thread on my build and allow people to answer any questions that they have and share their builds.

What I am afraid I cannot do is offer comparisons with xyz. I've been out of DIY for 20 years and getting back in now so I don't have an array of different DIY boards. Also I am not going to claim that this sounds better than any other LM3886 based amp. It will however measure better, much better and certainly well below any sane levels at which transparency is defined. It should have no sound its own.

I'll take some initial pics and start soldering in the morning.

Disclaimer: I have no financial or other interest in the work Tom does. I'm just a customer.

IanCanada or??

Hi,

I currently don't have any DAC in my system and all the streaming goes via the PS5 console. Pulling the audio signal off of the HDMI out cable via splitter and feeding it into the preamp. Most of you will agree it's very far from the ideal setup lol.

As I'm always leaning towards DIY solutions, I came accross IanCanada stuff, and ofcourse, the million dollar question pops. Is it worth it?

For the flagship DAC with all the transport and needed bits and bobs, it adds up to about $800 USD. Then the PSU, chassis, raspberry pi board and we're arround $1500.

The cool thing I see with the whole thing is the "platform flexibility", as everything is running on the raspberry pi and me being an IT guy (linux prefered), everything looks even more apealing.

The part I'm strugling to find more info about is how does it compare to other DACs in the same price range, around $1.5k?

Is it worth the money, from the audio perspective?

Or should I go with some brand name DAC, or even a Wiim Ultra which apparently everyone love so much, and just call it a day?

It would be a fun project to build something like that, but not sure if it's worth the money. I plan to use it mostly as a streamer, as it's main purpose is anyway.

Please let me know your thoughts and comments, and please suggest some alternatives if possible. As allways, much appreciated and thank you!

Cheers!

Speakers (Altec 604?) inside built-in cabinets?

Hey everyone,

I moved back into my childhood home recently and I'm also getting back into audio after being away from it for a few years. My late father made some built-in cabinets with a fireplace in the living room as seen in the attached photo. Since my old man built them I don't want to alter them too much, but the cabinets and the position of the couch, which really can't go anywhere else, make speaker placement difficult.

As you can see in the photo, there are two large cupboards on both ends of the built-ins. The space inside is about 38" wide, 35" high, and 20" deep. So I've been wondering if I could put some speakers inside those cabinets, rather than on the floor in front like I'm doing now. I have a pair of JBL L166s now that I may experiment with, but I'm wondering if something even bigger might make better use of the space available.

I have a chance to buy some Altec Lansing 604-8k speakers in 620 cabinets at a reasonable price and I'm wondering if they might work. The 620 cabinets are too tall, but they would fit if I remove some trim around the cupboard doors. I'm also a pretty good woodworker and could easily build some smaller cabinets that would slide into the space available. I could replace the doors with custom grills too.

Does this sound like a good idea, or am I crazy for even thinking about it?

Any feedback would be much appreciated.

Thanks,

Andy

living-room-cabinets.jpeg

A

How to connect QUAD 33 to 2×303s (Vintage)

Hello everyone, I've recently bought the quad 33 and 2 of the 303 power amplifiers. Since the 303 do not have an on/off switch do thay permanently stay on?

Thay are connected via a 4pin din into 33 which is then split into 2 4pin din for each 303. Power is a 3pin din into the 33. One 303 has a 3pin din power and the other has a kettle lead 3pin power cable. Is this correct.

Advice needed on how to connect/use as mono blocks.

Tube preamplifier diodes replacement

Hello guys

I have a tube pre witch is i think an mu stage cathode follower. It uses 1 x 12au7 and 1x 12at7 each channel. Its a complete dual mono design with 2 independent PSU in a separate box. In the psu for EACH CHANNEL we have 2 separate toroidal one for high voltages and one for the low voltages. The voltages are a b+ 217v at 120 mA , a 12v at 1A all DC regulated and 6.3v AC. The b+ is regulated by an ECL82 tube thats why we have the 6.3v ac for the heaters of ECL82 to operate.

My question is...

At the b+ we have 4 diodes IN4007 and then the ecl82 for regulation with the caps resistors an all the needed parts for the application.

At the filaments section we have 4 diodes IN4004 then a 7812 regulator and all again the needed parts as above. The filaments are in series 12v dc

The 6.3 is ac direct to the ECL82

Can i safely replace all the 8 diodes in each channel psu with the VISAY uf4007 or i am going to start a nuclear disaster 💣here?

Value of old paper capacitor by color codes?

I'd like to replace this old capacitor, but before clipping it out to measure it, could anyone help me figure out the value by the color code?
One problem is that I don't know which end of the capacitor has the 'first' color band. Does it start with green? Or does it start with blue?

1727091348485.png


Is the thicker green band the voltage indicator? If so, I guess that means 600V (DC).
After that, I get:

Grey = 8
Orange = 3
White = 9

And for tolerance,
Blue = 6%

That doesn't make sense to me. I must be reading this wrong. Can anyone help me understand how the manufacturers color coded these old capacitors? Thanks...

Fully balanced MC phono preamplifier thoughts

Dears,
This is sub-thread of my turntable post: https://www.diyaudio.com/community/...eded-with-motor-and-drive.412984/post-7687982
It seems appropriate to open new one just for the preamplifier.
Since I'm waiting for motor parts to start significant upgrade of this 22 y.o. thing, I will revisit the preamp too.

So far I was using this design with 2 x SSM2017 in first stage and 2 different second stages, description is here: https://www.diyaudio.com/community/...eded-with-motor-and-drive.412984/post-7688045

For the new version, I have 3 personal preferences that I would like to respect:
  • Fully differential, I see great benefit and improvement from dropping ground of the signal path. Even still I'm using GND for referencing output voltage, but in new design I'm considering bootstrapping that with very low noise amplifier.
  • Passive RIAA EQ
  • As high as possible first gain stage, 60db (1000 V/V) seems just fine with my 0,34 mV nominal output cartridge. I do use higher PS voltage to allow for more output possibility; now +-18, next +-20V. This leaves second stage to deal with only about 20db gain.
Right now I'm making upgraded PCB with same concept, SSM2017 remain as input, second stage upgraded to OPA828.
SSm2017 specifies 0.012% THD+N at gain of 1000, I probably get it bit better as 2 amps in differential configuration will cancel some distortion. However not the best in class THD, nevertheless doubt if it is hear-able. Nevertheless SSM2017 as ancient as it is, is still unbeatable on noise performance.
Here is PCB work in progress:
1720256678366.png


Alternatives (in my thoughts) for the first stage :

2nd option is to keep configuration but to upgrade SSM2017 with better INA like AD8429 for instance, as used here https://www.diyaudio.com/community/threads/chipomatic-balanced-input-riaa.331009/post-5627780 (but this is single ended output)

3rd option is classic differential receiver (same as my second stage now) , but that would call for 4 x AD797 and cost of over 70 Euro, I see no other opamp that would fit this purpose.
1720257443572.jpeg


4th option is to use this ancient schematics and replace each AD797 with it in above schematics. Probably that is as far as low noise is possible.
Matched low noise dual transistors are rare today, but there are many dual JFET's that would do just fine here. Of course some more modern opamp would be used instead of OP27. However, this design for stereo would call for 12 dual matched low noise transistors, quite heavy on wallet.

1720258101394.jpeg


Or, 5th idea, this very fine simple circuit from John Broskie's site. Looks very tempting even the gain will be max 40db (x100), so second stage will need to deal with another 40db, but that is not major issue if below circuit is quiet enough.
1720258822196.png


I'm sure that each of these options will work just nicely (when fully developed), but what would be the best?
Any comments, thoughts, ideas?

Polk PSW10 drawing inward on hits

Hello thread goers, i need some help figuring out why my subwoofer is drawing inwards during and after hits of bass. If there is a part where the sub hits and holds a frequency between 30-60hz, the sub kinda recedes into the enclosure. not sure if it’s an optical illusion or if it’s supposed to happen but i just wanted an answer. thanks
video of it happening

How to calculate heating of Diodes

Hello everyone,

I have 4 diodes creating a full wave bridge, and am replacing some old diodes that I have been told look they are getting a little hot.

They work for a DC heater on 211 valves. The heater is at 10.5AC and 10V, 3.25A after rectification.

Is there any way to look at Diode specification sheets and determine temp performance, they are DO-247 format.

Rich
Projects by fanatics, for fanatics
Get answers and advice for everyone wanting to learn the art of audio.
Join the Community
507,422
Members
7,870,435
Messages

Filter

Forum Statistics

Threads
405,386
Messages
7,870,435
Members
507,422
Latest member
zer0t0her0