I may have just missed it but am kind of surprised there's not a step by step HK Citation II Build. Is one on audiokarma but it's missing all of the pics. Yes, very aware of McShaneDesign and while great info, I'd so like to find where someone documented every step as if building it.
I have one that someone started to restore and then became an unfinished project. They stripped everything off of it and repainted the chassis, installed new sockets and that's about as far as they went. I have the build manual and pics that go with it but while I can solder well, am very ignorant on tube gear so if someone took the time to do a build tutorial on one of these, man I'd love to find it. Plan on doing Mcshane upgrades but sure a step by step would help me tremendously.
I need to get started on it soon or will end up having to sell it
Have you communicated with Jim McShane and Mike Samra? While the "paint by numbers" guide you want may not be available, helpful hints to get and keep you going will forthcoming.
I'd avoid double work and assemble the PSU bracket with Jim's stuff, from the outset.
Definitely read, with great care, the "sticky" safety threads at the top of the page.
I'd avoid double work and assemble the PSU bracket with Jim's stuff, from the outset.
Definitely read, with great care, the "sticky" safety threads at the top of the page.
I agree and do plan on going with Jim's "kits" from the get go.
While I can solder well and read a schematic, where I get lost is the terminology and at times translating a schematic into the physical part, plus am about as ignorant as can be with tubes. I know they will help me if I ask but I'm sure they have enough on their plates without having to babysit me and hold my hand thru the process. I hoped to find a step by step to pour over more to simply familiarize myself where everything goes and hopefully a small idea of what's doing what, so then if I asked him a question and the reply was check the voltage on ....... I'd actually at least be familiar with what he was talking about and he wouldn't have to explain it to me like a 2 year old.
It's awesome how much they help so many and it's that very reason I don't want to come at this and to him totally ignorant. After all they've given back, I think the least I could do is educate myself as much as I can before asking idiotic questions 🙂
The original instruction manual shiild have step by step assembly instructions. No there's not a photo of every single connection but that really shouldn't be necessary. The manual is quite clear on what to connect where and in what order. But he has some hard to find replacements for meters and a solid rep for tube sales.
Mcshane mods are just oversized ps caps that don't really fit the amp properly in some cases. I bought a cit v ps kit from him 10 years ago and his instructions have you mount caps in the brackets using foam tape as a spacer which seemed sloppy. He even supplied the foam tape. But he has good rep as tube seller.
Mcshane mods are just oversized ps caps that don't really fit the amp properly in some cases. I bought a cit v ps kit from him 10 years ago and his instructions have you mount caps in the brackets using foam tape as a spacer which seemed sloppy. He even supplied the foam tape. But he has good rep as tube seller.
Last edited:
Foam tape on the doubler caps. is a good idea. Neither terminal of 1 of those parts is at ground potential. Insulation beyond the manufacturer's heat shrink film makes sense.
assembly owners manual
assembly owners manual
HARMAN KARDON CITATION II ASSEMBLY AND OPERATION MANUAL Pdf Download.
assembly owners manual
HARMAN KARDON CITATION II ASSEMBLY AND OPERATION MANUAL Pdf Download.
Attachments
Getting into tube technology by building something of this caliber, even as »painting by numbers«, means a very, very steep learning curve for an unexperienced. Maybe well too steep. I'd start, and I think most of us here have started with a simple and unexpensive design.
Best regards!
Best regards!
Mcshane mods are just oversized ps caps that don't really fit the amp properly in some cases. I bought a cit v ps kit from him 10 years ago and his instructions have you mount caps in the brackets using foam tape as a spacer which seemed sloppy. He even supplied the foam tape. But he has good rep as tube seller.
Oh really? I NEVER recommended foam tape for mounting with one exception - the large filter cap used with regulated DC heater supplies for the 12BY7As. And I also mentioned that where that cap mounts was the ONLY place there was room and I didn't want to drill holes in the amp chassis. I also suggested some silicon adhesive for mounting as an alternative.
In the VERY early kits I recommended using a foam insulating tape between the cap and the cap clamp to ensure a snug fit on the caps which were a hair smaller diameter than the clamp. It worked VERY well and the cap was very securely mounted.
As well, there is far more involved with the kits than just larger caps. You kind of neglected to mention the diode changes, the choke upgrade, the bias supply changes, and a bunch of other stuff.
If you want to criticize my kits that's up to you. But you do not have the right to "inaccurately" describe them.
And if you still have the Cit V I'll send you two new voltage doubler caps at no charge to replace those "sloppy" mounted caps you didn't like. The new caps fit the 1.375" mounting clamps I supplied perfectly.Just tell me where to send them.
I agree and do plan on going with Jim's "kits" from the get go.
While I can solder well and read a schematic, where I get lost is the terminology and at times translating a schematic into the physical part, plus am about as ignorant as can be with tubes. I know they will help me if I ask but I'm sure they have enough on their plates without having to babysit me and hold my hand thru the process. I hoped to find a step by step to pour over more to simply familiarize myself where everything goes and hopefully a small idea of what's doing what, so then if I asked him a question and the reply was check the voltage on ....... I'd actually at least be familiar with what he was talking about and he wouldn't have to explain it to me like a 2 year old.
It's awesome how much they help so many and it's that very reason I don't want to come at this and to him totally ignorant. After all they've given back, I think the least I could do is educate myself as much as I can before asking idiotic questions 🙂
I agree with Kay Pirinha...
Here is the warning I send to all prospective kit purchasers:
IMPORTANT!! While these kits are (IMHO) the best out there they are not for the beginner. They require schematic reading skills and the ability to recognize parts shown on the schematic inside the unit. They require soldering and some mechanical skill. And they require the ability to install/replace parts that look different from the originals and may be located in a different spot in the chassis. There are no step-by-step instructions for some operations. As much as I wish I could, lack of time prevents me from providing extensive step-by-step help. I can answer some questions, but you need to be able to work through them without counting on me for detailed guidance.
Again IMHO - the Citation II is not a good place to "cut your teeth" on tube gear. It's crowded inside and uses a non-conventional circuit. As well, most of the ones out there were originally kits - so there is some variance from unit to unit based on the kit builders' skills. And many have been worked on before now which can confuse things even more.
Finally also keep in mind that many of the original parts will have to be replaced with more modern ones that are different than stock. So even if you have the factory step-by-step manual you'll often have to use different parts than are described/shown in the original assembly instructions.
That's my $0.02 worth anyway.
Oh really? I NEVER recommended foam tape for mounting with one exception - the large filter cap used with regulated DC heater supplies for the 12BY7As. And I also mentioned that where that cap mounts was the ONLY place there was room and I didn't want to drill holes in the amp chassis. I also suggested some silicon adhesive for mounting as an alternative.
In the VERY early kits I recommended using a foam insulating tape between the cap and the cap clamp to ensure a snug fit on the caps which were a hair smaller diameter than the clamp. It worked VERY well and the cap was very securely mounted.
As well, there is far more involved with the kits than just larger caps. You kind of neglected to mention the diode changes, the choke upgrade, the bias supply changes, and a bunch of other stuff.
If you want to criticize my kits that's up to you. But you do not have the right to "inaccurately" describe them.
And if you still have the Cit V I'll send you two new voltage doubler caps at no charge to replace those "sloppy" mounted caps you didn't like. The new caps fit the 1.375" mounting clamps I supplied perfectly.Just tell me where to send them.
Guess I have a "very early kit" then Jim. It was probably purchased around 99-01 now that I think about it, and the foam tape was indeed used, per your instructions, to take up a small gap between cap and clamp. Sorry to ruffle your feathers but I'm not inaccurately describing what you sold me many years ago and you seem to be both calling me a liar and then later admitting you did sell kits like that. Which is it? Do I need to post photos and scan the install guide this weekend? I know I'm not making this up. I still have the amp but you can keep your caps. I won't be conducting any more business with you.
Last edited:
I guess I have to jump in here. Jim is probably the leading person for the Citation. I'd tread a little easy when asking for help and in the same breath raising heck. I'm sure your going to find a lot of help here on the forum. I've never tackeled a citation but its nothing I wouldn't take a shot at. Arm yourself with a schematic and simply put it back together. If you can read a schematic and own a VOM meter it can't be hard.
http://quadesl.com/pdf/cit2_pfacts.pdf
The also have a nice cap board.
http://quadesl.com/refurbishment/pdf/cit2_capboard.pdf
If it were me I would purchase some bare PC board material and some turret terminals and produce my own replacement board if there are none available. Most of the older boards on some of these amplifiers can have some heat damage associated with years of usage. Proper/better component placement can add to less and fewer maintenance stops in the years ahead.
Last edited:
I guess I have to jump in here. Jim is probably the leading person for the Citation. I'd tread a little easy when asking for help and in the same breath raising heck. I'm sure your going to find a lot of help here on the forum. I've never tackeled a citation but its nothing I wouldn't take a shot at. Arm yourself with a schematic and simply put it back together. If you can read a schematic and own a VOM meter it can't be hard.
Sorry this was a really rude reply on my part. I wasn't asking for help only pointing out that "I" didn't like having to mount caps with foam or rubber tape around them so they fit the clamps properly in the kits Jim sold 18 years ago. Sorry again to op and Jim. Just trying to give some honest feedback but I should have kept my mouth shut or explained better. The parts kits I'm sure are different now as I think Jim alluded to having 1.3" diameter caps.
hence my hoping someone documented a build. I don't claim to be an expert but I repair and upgrade my own ss gear and a long long time ago before retiring for disability, I used to repair inertial guidance systems for the minuteman missile and various aircraft so I do know my way around a soldering iron and troubleshooting using schematics.Finally also keep in mind that many of the original parts will have to be replaced with more modern ones that are different than stock. So even if you have the factory step-by-step manual you'll often have to use different parts than are described/shown in the original assembly instructions.
I've read through the assembly manual probably close to a dozen times and feel pretty comfortable giving this a shot.
Time is a consideration as far as cutting my teeth on not as involved projects 1st so basically have 3 choices
1. pay someone to build it for me - not economically feasible at this time
2. sell it for a pittance - what's one worth that has been stripped down, $400-$500 maybe.
3. Build it myself - I used to have a Mingda MC34ab that I loved, lost it when divorced and think of this as my opportunity to replace an amp I figured could never be replaced
I'm jumping in with both feet and choose 3
hence my hoping someone documented a build. I don't claim to be an expert but I repair and upgrade my own ss gear and a long long time ago before retiring for disability, I used to repair inertial guidance systems for the minuteman missile and various aircraft so I do know my way around a soldering iron and troubleshooting using schematics.
I've read through the assembly manual probably close to a dozen times and feel pretty comfortable giving this a shot.
Time is a consideration as far as cutting my teeth on not as involved projects 1st so basically have 3 choices
1. pay someone to build it for me - not economically feasible at this time
2. sell it for a pittance - what's one worth that has been stripped down, $400-$500 maybe.
3. Build it myself - I used to have a Mingda MC34ab that I loved, lost it when divorced and think of this as my opportunity to replace an amp I figured could never be replaced
I'm jumping in with both feet and choose 3
Since you worked on sophisticated electronic systems, I don't think you're giving yourself enough credit. Work slowly and carefully. Things should work out just fine.
A Cit. 2 in good repair is a leading contender for "best" amp. The "iron" is stupendous. While I don't know the Mingda, I do know the Cit. 2. I think you are going to be very happy.
hence my hoping someone documented a build. I don't claim to be an expert but I repair and upgrade my own ss gear and a long long time ago before retiring for disability, I used to repair inertial guidance systems for the minuteman missile and various aircraft so I do know my way around a soldering iron and troubleshooting using schematics.
I've read through the assembly manual probably close to a dozen times and feel pretty comfortable giving this a shot.
Time is a consideration as far as cutting my teeth on not as involved projects 1st so basically have 3 choices
1. pay someone to build it for me - not economically feasible at this time
2. sell it for a pittance - what's one worth that has been stripped down, $400-$500 maybe.
3. Build it myself - I used to have a Mingda MC34ab that I loved, lost it when divorced and think of this as my opportunity to replace an amp I figured could never be replaced
I'm jumping in with both feet and choose 3
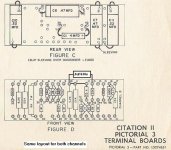
Just because it is posted on the internet doesn't mean its accurate, truthful, or even related. You should have no trouble building the power supply and wiring the heaters. The hardest part will be the turret board. It is a 3 dimensional construction with both the top and bottom of the board being utilized, which can be confusing. I believe the coupling caps go on the "bottom" of the circuit board. Most the Cit.2 were kits so, following that or farming out the circuit board if you get in trouble would save you from shipping the whole thing. cheers.
The Citation II is an all-pentode, U-L rigged Mullard 5-20 with a wee bit of plate-to-grid FB included. It is not that out of line or complex. It has no active regulator for the screen supply...or any number of other complex tricks. It is a solid amp, and it should be quite possible to build from the kit instructions as long as you're properly scared of it to be careful.
cheers,
Douglas
cheers,
Douglas
- Status
- Not open for further replies.
- Home
- Amplifiers
- Tubes / Valves
- Anyone Know Of Citation II Step by Step Build