I bought one of these devices from Aliexpress. Technically, the use case isn't audio - it's radio - but I thought you might be interested in this quick review.
My main goal was to find a decent power supply with the following requirements:

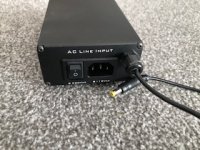
Internally, it's made up of a 2*110V to 2*7.5V transformer. The two primaries are wired in series for 220VAC operation, but typically my mains voltage is around 245VAC here. The switch is single pole. There is no dedicated fuse, although the transformer appears to have a thermal cut-out. There is no connection to earth, despite being metal cased.
That goes into a full wave rectifier and 3300uF and 100nF capacitors. After that, an LM317T regulator, with 2*1000uF, 2*220uF and 100nF capacitors.

Output regulation is acceptable up to around 0.7A. There's quite a difference in behavior between when it is first turned on ("Cold") and after it has been loaded for a while ("Warm").

Ripple is relatively well controlled at lower currents but gets pretty wild later. At 0.7A it is around 5mV. By 0.8A it is 235mV. At 1A it is 660mV - although from time to time, when warm, it gets worse.
When connected to a USB device drawing 0.9A with a switcher inside it, you get a horrible interaction, with the voltage dropping and the current increasing. It ends up oscillating.
As expected, on the spectrum, the 100Hz is the fundamental with several harmonics.

It also gets warm enough to emit that warm plastic smell...

All in all, I would not recommend this device.
My main goal was to find a decent power supply with the following requirements:
- 5V @ 1A (and I need 0.9A of that)
- Low switching noise (so either not a switcher, or very low noise)
- Under 100mV ripple (which probably isn't low noise by audio standards)
Internally, it's made up of a 2*110V to 2*7.5V transformer. The two primaries are wired in series for 220VAC operation, but typically my mains voltage is around 245VAC here. The switch is single pole. There is no dedicated fuse, although the transformer appears to have a thermal cut-out. There is no connection to earth, despite being metal cased.
That goes into a full wave rectifier and 3300uF and 100nF capacitors. After that, an LM317T regulator, with 2*1000uF, 2*220uF and 100nF capacitors.
Output regulation is acceptable up to around 0.7A. There's quite a difference in behavior between when it is first turned on ("Cold") and after it has been loaded for a while ("Warm").
Ripple is relatively well controlled at lower currents but gets pretty wild later. At 0.7A it is around 5mV. By 0.8A it is 235mV. At 1A it is 660mV - although from time to time, when warm, it gets worse.
When connected to a USB device drawing 0.9A with a switcher inside it, you get a horrible interaction, with the voltage dropping and the current increasing. It ends up oscillating.
As expected, on the spectrum, the 100Hz is the fundamental with several harmonics.
It also gets warm enough to emit that warm plastic smell...
All in all, I would not recommend this device.

Well, the BRZ linear supply costs about 20 USD in China.
Whatever you pay on top via AliExpress is dealer overhead.
I wonder what one should expect from 20 USD.
One can of course choose a "Hi-End" linear supply from Topping, the P50.
Oversized toroidal transformer, 3x TPS7A4700, aluminium case milled from solid.
Just costs a bit more, like USD110-.
As always, you get what you pay for.
😊
Patrick
any recommended linear power supplies? 12V output.
25VA R-Core, Soft recovery diodes, 7815 pre-reg, LT3045 or TPS7A4700 set to 12V.
Max. output current 500mA. Silicon pad for heat sinking for LT3045.
No such commercial solution. But this is DIY forum anyhow.
🙂
Patrick
Thank you for doing a review and testing the output voltage ripple.
They need to derate it to 0.7A max and drop the “audiophile” tag. I submit if their target market really is audio, then, they should also add a DC blocker on the primary side. Some of those small toroids saturate if there is even a squeak of DC on the mains.
They need to derate it to 0.7A max and drop the “audiophile” tag. I submit if their target market really is audio, then, they should also add a DC blocker on the primary side. Some of those small toroids saturate if there is even a squeak of DC on the mains.
It is a low-cost linear supply meant for the internal market, as an alternative to 5V USB charger SMPS.
Anything more than that is, IMHO, wrong expectation.
People in China know that the specs should be taken with at least 20% derating.
Different culture, rightly or wrongly.
You can always choose not to buy from AliExpress.
If you do, you know what to expect.
😊
Patrick
Anything more than that is, IMHO, wrong expectation.
People in China know that the specs should be taken with at least 20% derating.
Different culture, rightly or wrongly.
You can always choose not to buy from AliExpress.
If you do, you know what to expect.
😊
Patrick
Linear PSUs in this category can be made better by investing time and money but if that is worth the effort is up to you. If they are given for free when defective or when you can't use it like it is now things start to make sense IMHO. The focus is on "linear" and to the buyers "it must be cheap" so that are their key parameters.
Haven't had this particular PSU at hand but since I am a Netzteilmaniak I regularly work on similar stuff. BingZi is used as these cost nil to nothing but they are cheap garbage that just work. A Talema 7VA 2 x 7V with 240V primaries is a first. The 72430K to be precise. Then replace the 3300 µF cap for a 4700 µF or 5600 µF one by a good brand so Panasonic FC/FR or the like. Check footprint width and determine maximum height and choose the one that fits. Replace rectifier (can't see it) for a Schottky version or separate Schottky diodes and finally the LM317 for a LT1086ADJ. Check setting resistor values please and correct to right values for LT1086 if necessary. Replace the series resistor to the blue LED for a value where not the whole room is lit. Or replace that tacky grausame blue LED for a soft glowing white one.
Stick adhesive tape to the casing, mark the spots and drill at least 2 x 6 mm ventilation slots at the upper backside and deburr at both sides. Also drill at least 2 x 6 mm ventilation holes in the bottom at a spot where no mains voltage or sensitive circuit is near. Check for improvement of air flow. Use a little black paint and a small brush to cover up the deburred holes. The hole for the previous DC jack can be covered with a brass coin/symbol as used on branded clothing with a little 2 component glue. I once made the error to use a random one that I noticed on the floor and then a visiting lady said it to be strange that I had stuff by a brand for extra large lady sizes.....
For my own use of similar contraptions I insist on removing the front DC jack and move it to the back away from the mains entrance and either make a new hole for a Lemo connector or use a PG7 wire grommet and solder the DC cable straight to the PCB. Connectors should be at the back, not the front.
BTW for 0.9A load current one better not chooses a 1A max. PSU. That is an inadequate choice. In whatever shape these are in, they have a 7VA transformer so maximum allowable current is about 0.8A with wind in the back and no rain. For 0.9A load current one needs a 1.5 or 2A PSU.
Last edited by a moderator:
Addendum: the 230V mains connector is at the wrong side as the switch is not aligned so mains cabling is crossing and close to the DC side. Maybe if space allows (working in tiny PSUs is both Zen and technical 3D horror) an IEC inlet with 6.3 mm faston connectors or a PG9 grommet at the other side can be used with PE wire. Detachable mains cables are normally unnecessary certainly in low power stuff and with permanent connection one can choose optimal length of the mains cable too. A 5 x 20 mm fuse holder can be drilled too, again if space permits. Always dry test with the actual fuse holder and IEC inly in your hands before any drilling. Stick adhesive tape to the casing and always use cloth to avoid scratches. Deburr at both sides. Mount the connectors/cables/grommets. Measure stuff and if GND is not connected to the casing connect PE to the casing with the usual M4 set of washers, bolt and nut. Now reference GND to PE by means of a 100 Ohm 2W resistor and leakage is solved too. The hole for the IEC8 connector can be used for a piece of plastic with a hole for either a PG7 grommet or a Lemo connector for the DC connection.
Illustrations to show what is meant by grommets and also the covering an undesired hole with a clothing brass coin. The odd mix of DIY and semi-DIY/modified ChiFi.
Illustrations to show what is meant by grommets and also the covering an undesired hole with a clothing brass coin. The odd mix of DIY and semi-DIY/modified ChiFi.
Attachments


Last edited:
Thanks Patrick. Are you aware of any Gerber files floating around this site for this type of supply?25VA R-Core, Soft recovery diodes, 7815 pre-reg, LT3045 or TPS7A4700 set to 12V.
Max. output current 500mA. Silicon pad for heat sinking for LT3045.
No such commercial solution. But this is DIY forum anyhow.
🙂
Patrick
Try the Salas Ultra BiB psu boards for low current or Salas L adapter for high currents. I use Salas BiB in most of my preamp/dac builds and I am using a L adapter for my streaming solution powering the Raspberry Pi4 works like a charm. Best solution possible from the DIY world right here -Thanks Patrick. Are you aware of any Gerber files floating around this site for this type of supply?
- We many times wonder what if that SMPS brick that feeds the Raspberry Pi or the mini PC or the MiniDSP or the Squeezebox or the DAC or the desktop Class-D amp etc. was a linear PSU? How such wonder boxes would perform without switching noise polluting their rail and most crucially their many times interconnected ground?
- What if we had a simple and strong linear PSU instead of fixed SMPS brick adapters that it could cover the voltage range for such applications by only setting it up with a jumper?
- Enter the L-Adapter. A versatile Sziklai pair stabilizer / capacitance multiplier...
- What if we had a simple and strong linear PSU instead of fixed SMPS brick adapters that it could cover the voltage range for such applications by only setting it up with a jumper?
- Enter the L-Adapter. A versatile Sziklai pair stabilizer / capacitance multiplier...
- Salas
- Replies: 1,256
- Forum: Power Supplies
A Talema 7VA 2 x 7V with 240V primaries is a first. The 72430K to be precise.
10 Minutes of Google did not return anyone stocking the 2x120Vac version.
Maybe you know of someone ?
BTW the 2x115Vac version is "merely" 19.76 USD at DK USA.
Cheers,
Patrick
Yes I do. Otherwise the 2 x 115V version works out OK too. Just not a 220V version.10 Minutes of Google did not return anyone stocking the 2x120Vac version.
Maybe you know of someone ?
BTW the 2x115Vac version is "merely" 19.76 USD at DK USA.
Cheers,
Patrick
Again yes, the only way these companies can offer stuff for such low prices is as said before to use dirt cheap BingZi transformers. A normal quality minded person does not want BingZi, even the chinese sellers often offer Talema as an upgrade. A Talema 7VA one is indeed around 20 euro. As said before it is up to the owner to recycle it to something useful or to throw it away. Maybe it was better not to buy too cheap stuff from the start. Today anything with reasonable specs costs more than 100 Euro. The PSUs by Topping are better with some exceptions. P50 is a good one.
As I have described in detail one can see a challenge in making it well functioning and to pick out design errors.
What was your point exactly?
Last edited:
Examples of adequate (passive of course) cooling vents. This DIY linear one called "Block" does 5V 3A. It has a soft glowing diffuse white power on LED at the bottom which gives a nice effect. A linear PSU generally can not have a fully closed casing but please explain that in China 🙂
In fact costs of a casing are pretty high these days, it may be worthwhile to buy a cheap chinese linear PSU and replace the innards.
Only suggestions folks. There are enough ways to improve cheapos but nearly always a dreaded 220V BingZi (sometimes even having the wrong voltage) is used so minimum cost is a suitable Talema. In the older ones the PE scheme is often faulty.
Attachments


Last edited:
- Home
- Amplifiers
- Power Supplies
- BRZHiFi 5V 1A "Audiophile Grade" Portable Linear Power Supply Review