Hi DIYers,
I have broken the stylus on my Clear Audio Concept MM cartridge. How do you remove the broken stylus and replace it with an AT stylus. Which AT stylus suits the Concept MM best. Thanks in advance.
Keith
I have broken the stylus on my Clear Audio Concept MM cartridge. How do you remove the broken stylus and replace it with an AT stylus. Which AT stylus suits the Concept MM best. Thanks in advance.
Keith
Your cartridge appears to use the same stylus mounting as other Clearaudio carts that have been repaired with an Audio-Technica AT95E replacement stylus.
There are also a variety of other “flavors” available from AT vendors that fit the AT95E. For example Shibata, Vivid Line etc. versions. Depends on how much you want to spend and what you like.
Personally, I used a standard AT95E replacement stylus on my Virtuoso. I felt the sound quality was the same.
Here is a link to another thread outlining replacement on a Clearaudio cart with the AT stylus.
How to change the needle on your Clearaudio MM for 30 euros
It is pretty straight forward.
It helps to have a magnifying glass, something to hold the stylus body in or on (a clamp or rubber matte) to help with stability and a steady hand. You’ll also need some kind of small needle nose pliers to remove and install the stylus in the body...something with a little texture in the jaws provides better grip.
While removing the excess part of the stylus body I didn’t try to chop through the plastic all at once. I made several passes gradually applying more pressure.
As I mentioned in the other thread, there is a slight pivoting/rotation of the stylus which allows you to remove and insert it onto the body while clearing the channel for the tiny magnets on the other end of the cantilever. Pay attention during removal of the broken stylus so you can mimic the motion in reverse and avoid any damage to the new stylus magnets or cantilever.
I would read through that thread a few times to get a better idea of the details. I thought there was even a video somewhere. Perhaps a Google search would turn up even more details.
Thank you again @chromenuts. So to remove the old stylus I need to get a small long nose pliers and pull the cantilever up and twist it to the side?
I am going to get the new stylus tomorrow and try to do it tomorrow. I will keep you posted how I get on. Hopefully, I will be able to bring you good news. Thanks again.
I am going to get the new stylus tomorrow and try to do it tomorrow. I will keep you posted how I get on. Hopefully, I will be able to bring you good news. Thanks again.
Last edited:
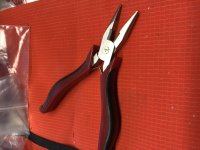
I’m sure other people have used a variety of tools to remove the old stylus. A long nose pair of pliers probably would not have very good control or leverage. I used the small pointed pliers pictured below which has a gripping texture in the jaws. I found it worked better on the small slippery plastic during removal.
There is no side movement (if you look at the stylus head on from the tip). I simply noted a slight rotation toward the tip of the stylus allowed the magnets to clear the channel they sit in better.
Watch the video I link below showing the change of a stock AT95E stylus. He does wiggle the stylus during removal a little, perhaps just to break it loose, but then when he pulls the stylus cartridge off the body he pulls it towards the front of the cartridge slightly. During installation he reverses the motion. He has the benefit of the full shell of the stylus replacement guiding his alignment. When the stylus is trimmed down to mimic the original you will have to guide it by hand and eye to seat it properly without damaging the cantilever or magnets.
AT95E: Stylus Replacement - YouTube
Attachments
Thank you Chromenuts, now I have a better idea what has to be done. I will keep you posted.
Take care amigo.
Take care amigo.
Success
Hi DIYers,
I am glad to say that I followed the instructions on this thread and have successfully fitted an ATN95e stylus onto the clear audio concept MM cartridge. Thank you chromenuts for giving me the detailed instructions. I can't believe how good the sound is. I don't know if I had damaged the original stylus because I had hit it so many times when cleaning the turntable that the cantilever was bent. Anyway, it sounds amazing now.
If anyone is doing this job be careful when you are disconnecting the wires from the cartridge. I used a tweezers for electronics. Be careful that the metal plug comes off and not just the coloured plastic. That's what happened to me with the white cartridge plug, just thought I would inform yous.
The old stylus came out very easy following the instructions. I put the new stylus in a clamp and used a craft knife to do the cutting. Taking it very slowly and carefully. I held the stylus in the protector with my left hand as I used my right for cutting. The new stylus went in easy peasy. Just be very careful and gentle. I will upload photos of the tools I used. Thanks again, you good people.
😛
Last edited:
Attachments


- Home
- Source & Line
- Analogue Source
- Clear Audio Concept, How to remove and replace broke stylus