I'm relatively new to speaker building, only last summer, I restored a pair of 1971 Klipsch H700 Heresy speakers that I rescued from a dumpster on my job site almost 17 years ago:


Frankly, I was underwhelmed by the results: the highs were sibilant and harsh and the tone was boxy and dull. I was easily persuaded to do @claudej12000 's Super Heresy mods, which I found more to my liking, but there remained some shortcomings from the stock, Decorator cabinets, namely the thin plywood transmitted too many resonances and while I considered bracing them, I felt that they needed their own boxes with proper baltic birch to really shine to their full potential and I made a pair from scratch, put the H700's back to stock and sold them off.

The super-H clones satisfied me for a while, but what they really did was opened my eyes to the beauty of horn speakers. Eventually, I kept wondering if they could be better and since I wasn't satisfied with the finish job I did on them, I decided to give them some mods to improve their sound, with an eye on building pair of "lifetime" speakers, somewhere down the road. cutting to the chase, I arrived at a set of mods that made them the functional equivalent of a pair of Klipsch Forte's, adding a bass extension bin with a 15" passive radiator and going through a series of mid horns, before settling on a K510 clone and a 2" driver, a PRV Audio D2200PH and one of Dave Ault's fantastic L-MAHL tweeters. Visually, it was a bit of a kluge, standing at over 4' tall and looking more like a collection of parts than an integrated speaker, but sonically, if was a few steps closer to audio nirvana and pointed the way to what I thought was my endgame speaker, envisioning what PWK's vaunted and short-lived Cornwall replacement, the Chorus, might sound like with a bigger mid horn & driver and a super tweeter.


It's not pretty, but with a little help in designing the crossover network, a modified ALK Universal and ultimately Bi-amping them with a Dayton Audio DSP 408, an Emotiva MiniX A-100 pushing the woofers and a lightly modded 15-Watt, P/P Glow Audio Amp Two driving the horns, the low-end played down to 30Hz, while the mids dipped down to just under 500Hz, filling my living room with luscious clarity and dulcet tones, bringing me one step closer to audio nirvana. However, as I began collecting parts and pricing out materials for the Super Chorus project, I ran into some roadblocks: my goal was to make them with the same internal volume as a Cornwall but leave behind the vintage box look for something a little more contemporary, with thick, solid wood motorboards, with diffraction bevels for a more up-to-date look. The only problem was that since the pandemic, the cost of materials has gone up exponentially and the price of 1.5" Walnut or mahogany began to make the intended build cost prohibitive. A chance encounter at a listening room in my neighborhood provided another option: LaScala clones:

To be honest, La Scalas had always seemed a bridge too far for me: their footprint, at 24" x 24" x 36-ish took up a lot of space and I couldn't justify them in my own mind, let alone consider WAF. To that end, my proposed Super-Chorus, at roughly 19" x 16" x 48", took up far less floor space and were only slightly larger than my Frankenstein Heresy/Forte/Jubilee experiment. However, hearing these ratty old LaScalas, even in a less than ideal configuration and setting, changed everything. Even my spouse was onboard after hearing them that night. With my eyes on an even better endgame , goaded and enabled, I scoured the internets for plans and instructions to make my own, top-ported La Scala clones. Plans in hand, I ordered material- 1" baltic birch or its alternatives aren't available anywhere in my area, so I settled on 1" maple-faced, poplar core ply for the bass bin cabinets and motorboards, while the doghouse would be constructed from 3/4" MDF, the upper horn enclosure will be made from a 3/4" Baltic Birch alternative, Spartan-Ply, while the entire cabinet will be painted piano black and face-trimmed with 5/4" Mahogany.
Even with my 30 years of experience as a master carpenter and cabinet maker, I was a little daunted at the perceived complexity of the bass bins, however, I was able to knock out the parts in less than an afternoon:

Instead of the K510 I'd used before, I opted for the popular 10' x 18" horn. I had a bad experience with ZXPC, where they sent me the wrong horns that were also damaged and refused to return them, so I opted for the the PRV version, which is substantially thicker. I've got it mocked up on a baffle board below with a K-792-K, but ultimately, I'll use an L-MAHL Machined Audio Horn Lens with a B & C DE10 driver.


Frankly, I was underwhelmed by the results: the highs were sibilant and harsh and the tone was boxy and dull. I was easily persuaded to do @claudej12000 's Super Heresy mods, which I found more to my liking, but there remained some shortcomings from the stock, Decorator cabinets, namely the thin plywood transmitted too many resonances and while I considered bracing them, I felt that they needed their own boxes with proper baltic birch to really shine to their full potential and I made a pair from scratch, put the H700's back to stock and sold them off.
The super-H clones satisfied me for a while, but what they really did was opened my eyes to the beauty of horn speakers. Eventually, I kept wondering if they could be better and since I wasn't satisfied with the finish job I did on them, I decided to give them some mods to improve their sound, with an eye on building pair of "lifetime" speakers, somewhere down the road. cutting to the chase, I arrived at a set of mods that made them the functional equivalent of a pair of Klipsch Forte's, adding a bass extension bin with a 15" passive radiator and going through a series of mid horns, before settling on a K510 clone and a 2" driver, a PRV Audio D2200PH and one of Dave Ault's fantastic L-MAHL tweeters. Visually, it was a bit of a kluge, standing at over 4' tall and looking more like a collection of parts than an integrated speaker, but sonically, if was a few steps closer to audio nirvana and pointed the way to what I thought was my endgame speaker, envisioning what PWK's vaunted and short-lived Cornwall replacement, the Chorus, might sound like with a bigger mid horn & driver and a super tweeter.
It's not pretty, but with a little help in designing the crossover network, a modified ALK Universal and ultimately Bi-amping them with a Dayton Audio DSP 408, an Emotiva MiniX A-100 pushing the woofers and a lightly modded 15-Watt, P/P Glow Audio Amp Two driving the horns, the low-end played down to 30Hz, while the mids dipped down to just under 500Hz, filling my living room with luscious clarity and dulcet tones, bringing me one step closer to audio nirvana. However, as I began collecting parts and pricing out materials for the Super Chorus project, I ran into some roadblocks: my goal was to make them with the same internal volume as a Cornwall but leave behind the vintage box look for something a little more contemporary, with thick, solid wood motorboards, with diffraction bevels for a more up-to-date look. The only problem was that since the pandemic, the cost of materials has gone up exponentially and the price of 1.5" Walnut or mahogany began to make the intended build cost prohibitive. A chance encounter at a listening room in my neighborhood provided another option: LaScala clones:
To be honest, La Scalas had always seemed a bridge too far for me: their footprint, at 24" x 24" x 36-ish took up a lot of space and I couldn't justify them in my own mind, let alone consider WAF. To that end, my proposed Super-Chorus, at roughly 19" x 16" x 48", took up far less floor space and were only slightly larger than my Frankenstein Heresy/Forte/Jubilee experiment. However, hearing these ratty old LaScalas, even in a less than ideal configuration and setting, changed everything. Even my spouse was onboard after hearing them that night. With my eyes on an even better endgame , goaded and enabled, I scoured the internets for plans and instructions to make my own, top-ported La Scala clones. Plans in hand, I ordered material- 1" baltic birch or its alternatives aren't available anywhere in my area, so I settled on 1" maple-faced, poplar core ply for the bass bin cabinets and motorboards, while the doghouse would be constructed from 3/4" MDF, the upper horn enclosure will be made from a 3/4" Baltic Birch alternative, Spartan-Ply, while the entire cabinet will be painted piano black and face-trimmed with 5/4" Mahogany.
Even with my 30 years of experience as a master carpenter and cabinet maker, I was a little daunted at the perceived complexity of the bass bins, however, I was able to knock out the parts in less than an afternoon:
Instead of the K510 I'd used before, I opted for the popular 10' x 18" horn. I had a bad experience with ZXPC, where they sent me the wrong horns that were also damaged and refused to return them, so I opted for the the PRV version, which is substantially thicker. I've got it mocked up on a baffle board below with a K-792-K, but ultimately, I'll use an L-MAHL Machined Audio Horn Lens with a B & C DE10 driver.

the build will be using the following drivers:
Bass will havre a pair of JBL 2225H:


Mids will feature the vaunted and much ballyhoo'd combination of the PRV Audio D-2200PH and PRV Audio's iteration of the 18 x 10 horn, their WG 45-50:


And finally, the aural icing, @Dave Tennesseee 's venerable L-MAHL Large Machined Audio Horn Lens, featuring a B&C DE-10 1" Mylar compression driver:


The passive network will be based on an ALK Universal Crossover:

Lastly, the clones will be bi-amped, with a DSP crossover managing the split between low and mid/high frequencies, as well as PEQ to better shape the curves and tame the low frequency hump. I'm currently using a Dayton Audio DSP408, but that is not yet set in stone for future continuance.
Bass will havre a pair of JBL 2225H:
Mids will feature the vaunted and much ballyhoo'd combination of the PRV Audio D-2200PH and PRV Audio's iteration of the 18 x 10 horn, their WG 45-50:
And finally, the aural icing, @Dave Tennesseee 's venerable L-MAHL Large Machined Audio Horn Lens, featuring a B&C DE-10 1" Mylar compression driver:
The passive network will be based on an ALK Universal Crossover:
Lastly, the clones will be bi-amped, with a DSP crossover managing the split between low and mid/high frequencies, as well as PEQ to better shape the curves and tame the low frequency hump. I'm currently using a Dayton Audio DSP408, but that is not yet set in stone for future continuance.
making the doghouse jigs:


Forming one of the doghouses; I used MDF for the doghouses, partly for its alleged damping qualities, but mostly because it's a cheap material and despite my woodworking experience, I was a bit daunted by cutting and forming them due to the acute 60º angles. This turned out to be a good move, as my first attempts were not perfect, but I got them right in the end:

Next I began the motorboards:


doghouses, glued up:


Forming one of the doghouses; I used MDF for the doghouses, partly for its alleged damping qualities, but mostly because it's a cheap material and despite my woodworking experience, I was a bit daunted by cutting and forming them due to the acute 60º angles. This turned out to be a good move, as my first attempts were not perfect, but I got them right in the end:
Next I began the motorboards:
doghouses, glued up:
Attachments

A little more progress, all of the cabinets are constructed and almost everything is primed. At this point, a little more prep is needed before applying the enamel and building my router jigs. After a couple coats, I’ll route for the horns, assemble the bins, install mahogany trim, stain and clear coat everything. After that, it will be assembly and time to rock the house.

These are going to be really big. With the PRV 18r x 10 and L-MAHLs, the horn enclosure is 18” tall. With casters, they will be about 4 feet tall. I may be pushing the WAF.
making the router jigs:


Routing the baffles:

routed and mocked up with the waveguides in place:

These are going to be really big. With the PRV 18r x 10 and L-MAHLs, the horn enclosure is 18” tall. With casters, they will be about 4 feet tall. I may be pushing the WAF.
making the router jigs:
Routing the baffles:
routed and mocked up with the waveguides in place:
Now, it's time to start trimming them out. I'm using Meranti Mahogany for the face frames and spacers, here's one of t:
the bass bins:

a 3/4" spacer between the cabinets, with 1/4" Mahogany edge banding- I'm not a fan of veneer for edge banding, I don't think it's particularly durable. This works much better:

one of the cabinets completed and mocked up:

the bass bins:
a 3/4" spacer between the cabinets, with 1/4" Mahogany edge banding- I'm not a fan of veneer for edge banding, I don't think it's particularly durable. This works much better:
one of the cabinets completed and mocked up:
laying out the rear panels:

here's where the Chorus comes in: I'd already purchased the components for making what would have effectively been a Klipsch Chorus clone on a lot or steroids, with the aforementioned drivers and waveguides, increased cabinet volume for better bass extension and 15" passive radiators. I feel that the biggest shortcoming of the stock LaScala is that the bass effectively rolls off at 60Hz, requiring a subwoofer. I feel that they already take up an excessive amount of space and adding a subwoofer is absurd. since the PRV Audio WG 45-50 waveguide and L-MAHL require a bigger enclosure than an OEM LaScala, I did some calculations based on the tables in the Loudspeaker Design Cookbook and determined that with a 15" passive and the enclosure size required to fit it, it should extend the bass somewhere into the ballpark of 28-32Hz, which is plenty enough to run without a sub and the passive eliminates the potential for port chuffing, not that I listen at volumes that cause it, but just the same...

here's where the Chorus comes in: I'd already purchased the components for making what would have effectively been a Klipsch Chorus clone on a lot or steroids, with the aforementioned drivers and waveguides, increased cabinet volume for better bass extension and 15" passive radiators. I feel that the biggest shortcoming of the stock LaScala is that the bass effectively rolls off at 60Hz, requiring a subwoofer. I feel that they already take up an excessive amount of space and adding a subwoofer is absurd. since the PRV Audio WG 45-50 waveguide and L-MAHL require a bigger enclosure than an OEM LaScala, I did some calculations based on the tables in the Loudspeaker Design Cookbook and determined that with a 15" passive and the enclosure size required to fit it, it should extend the bass somewhere into the ballpark of 28-32Hz, which is plenty enough to run without a sub and the passive eliminates the potential for port chuffing, not that I listen at volumes that cause it, but just the same...
face frames and edge banding has been stained and sealed:

and the cabinets have been masked for paint:


In the paint booth receiving several coats of Benjamin Moore Advance hybrid Alkyd/Acrylic enamel:


and the cabinets have been masked for paint:
In the paint booth receiving several coats of Benjamin Moore Advance hybrid Alkyd/Acrylic enamel:
While the paint cures, it's time to give some attention to the squawker waveguide. One of the biggest, most valid complaints about horn speakers is their tendency to "beam": they'll can be hyper-directional and sound great only in a limited seating area. Klipsch's Chief Bonehead, Roy Delgado, had a brilliant solution while watching his kids blow bubbles outside and created diffusion flares, known as "Mumps™."
 I played around with the diffusion flares with the K510 horns in the Frankenstein Fortes in the first post above, using plasticine and found it to be very effective in aiding the dispersion of the waveguide, however, while Sculpey clay is great for experimentation, it's not particularly presentable; the Mumps™ ended up looking a bit too organic, like the Mind Flayer from Stranger Things. These would need better flares, so I set out to make them out of plastic pick guard material. I laid out the shape by hand on 3/4" MDF and cut the rough shape on a bandsaw:

Next, I shaped them on a belt sander:

the area towards the horn throat has a slight recurve, which I formed on a spindle sander:

Next, I coated the edges with thin CA glue to keep them from blowing out on repeated passes on the router table:

Next, I shaped them on a belt sander:
the area towards the horn throat has a slight recurve, which I formed on a spindle sander:
Next, I coated the edges with thin CA glue to keep them from blowing out on repeated passes on the router table:
there's a great trick for using router forms that I learned while making guitars: to attach the pieces to the jigs, you apply low-tack masking tape t both surfaces, then attach them together with super glue on the tape. This makes doing multiple pieces easily repeatable:

I cut the pickguard material into strips, slightly wider and longer than the jig/form and first, cut them to the approximate shape on a band saw:

Then I cut them to shape with a bottom bearing straight bit:

and put a 45º bevel on them

I cut the pickguard material into strips, slightly wider and longer than the jig/form and first, cut them to the approximate shape on a band saw:
Then I cut them to shape with a bottom bearing straight bit:
and put a 45º bevel on them
The pieces were then glues into the waveguides with thick CA glue:

I used more glue and accelerator to build up any gaps at the edges, then sanded them flush:

and gave them a chrome base coat:

One of my side hustles is doing glitter finishes on guitars, a skill I picked up during the pandemic- I do paint jobs for customers locally here n Philadelphia, Dipinto Guitars is a regular client and I've done guitars for Los Straitjackets recently. I figured that it would be entirely on brand to glitter the horns up, which would also cover any imperfections from gluing up the Mumps™.

I used more glue and accelerator to build up any gaps at the edges, then sanded them flush:
and gave them a chrome base coat:
One of my side hustles is doing glitter finishes on guitars, a skill I picked up during the pandemic- I do paint jobs for customers locally here n Philadelphia, Dipinto Guitars is a regular client and I've done guitars for Los Straitjackets recently. I figured that it would be entirely on brand to glitter the horns up, which would also cover any imperfections from gluing up the Mumps™.
Attachments

Last edited:
While the cabinets cured, I also took the time to firm up some unseen details. the insides of the doghouses got damped with Ice and Water Shield, which I had leftover from work; it's essentially the same material as Dynamat, but a whole lot less cheaper:

I also covered the insides of the cabinets with acoustic foam:


I also glued up the doghouse braces with scrap Meranti that I saved from the dumpster at work:

I also covered the insides of the cabinets with acoustic foam:
I also glued up the doghouse braces with scrap Meranti that I saved from the dumpster at work:
it took a bit to wrestle the doghouses into the enclosures, but once I got them in, I had to hear how they sounded:

first listening in a sub-optimal warehouse space was promising. Playing some bass heavy dub, they had no problem digging deep. While it's a far cry from using REW and a measurement mic, I checked the sound with an SPL meter app on my phone:

There's quite a bit of room gain on the low end- running through a receiver, the bass should (and is) be 3db attenuated from the upper horns, which is way different that what's represented above, but I'm using a phone, standing about 5m away in a very large and airy space.
Finally, they're finished and ready to go home for setup and measuring:

first listening in a sub-optimal warehouse space was promising. Playing some bass heavy dub, they had no problem digging deep. While it's a far cry from using REW and a measurement mic, I checked the sound with an SPL meter app on my phone:
There's quite a bit of room gain on the low end- running through a receiver, the bass should (and is) be 3db attenuated from the upper horns, which is way different that what's represented above, but I'm using a phone, standing about 5m away in a very large and airy space.
Finally, they're finished and ready to go home for setup and measuring:
They’re flexible enough. I glued the root in the throat of the horn, let it cure, then formed and glued the rest of it. It was kinda tricky, however and there really isn’t a way to clamp them in place and I ended up gluing my fingers to the horns several times. Fortunately, the glue accelerator, which is basically acetone, is also good at freeing stuck fingers.
inside, the crossover is a modified ALK Universal, with primarily Audyn Q4 capacitors. The Bass/Midrange is crossed over at 400Hz and the mid/tweeter is crossed over at 6000Hz. I'm also using a Dayton Audio DSP 408, crossing over the woofer and upper horns at 400Hz, but with a 24dB Linkwitz-Riley filter. Additionally, I've added PEQ to smooth out the bass horn, copied from Roy Delgado's settings for the Jubescala:
EQ 87Hz, Q3.5, +5dB
EQ 148Hz, Q8, -7dB
EQ 380Hz, Q5.5 +2dB

EQ 87Hz, Q3.5, +5dB
EQ 148Hz, Q8, -7dB
EQ 380Hz, Q5.5 +2dB
went to do measurements this morning and naturally, the laptop that I use for streaming and measurements, a 2014 MacBook Pro 13, took a dump on me, the trackpad wouldn't click on anything. Fortunately, my main MBP has REW on it, as well as windoze for running HornRESP and the DSP tuning software, so after taking a few moments to find the right cables and USB-C adapters, we were off to the races.
the first measurements showed that my amps were WAY out of alignment. I'm using my 15W Glow Audio Amp Two and a pair of 150WPC Alesis RA-150 in bridged mono mode. It sounded good, but after a week of listening, I started to feel that the bass was a bit much. I was not wrong.

I did a couple runs to align the amps and got somewhere in the ballpark:
I'd also lowered the SPL to annoy my neighbors less at 10 am... I also noticed a few nodes in the bass response that were worth addressing with PEQ. I started with the bump at 183 Hz

then I addressed the dip around 375Hz

I got that pretty smoothed out, here's the progression overlaid, with the final measurement in orange

the first measurements showed that my amps were WAY out of alignment. I'm using my 15W Glow Audio Amp Two and a pair of 150WPC Alesis RA-150 in bridged mono mode. It sounded good, but after a week of listening, I started to feel that the bass was a bit much. I was not wrong.
I did a couple runs to align the amps and got somewhere in the ballpark:
I'd also lowered the SPL to annoy my neighbors less at 10 am... I also noticed a few nodes in the bass response that were worth addressing with PEQ. I started with the bump at 183 Hz
then I addressed the dip around 375Hz
I got that pretty smoothed out, here's the progression overlaid, with the final measurement in orange
Attachments
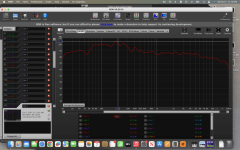
with that smoothed out, the low end fell off more than I liked after 70 Hz and there was a node at 58Hz that I found annoying. At this point, I had 231 grams of weight on the back of the passive.
I added another 77 grams and have a relatively flat response +/- 5db from 28hz to just over 17kHz. I am beyond pleased.
Final PEQ settings are:
55Hz: +11 Q 2.515
87Hz +5.1 Q 3.507
148Hz -4 Q 8.010
155 Hz +5 Q 2.515
183 Hz -8.3 Q 1.693
350 Hz +8.8 Q 5.541
Woofer Low Pass Filter Linkwitz-Riley, 475 Hz 24dB/Oct
Mid High Pass Linkwitz-Riley, 400Hz, 24dB/Oct
mid and tweeter is managed by the ALK universal passive network.
I'll have to admit that I don't really understand damping and Q-factor at all, so I left the settings for 55Hz and 155Hz at 2.515, which is default for the Dayton Audio DSP-408, so that will be my next focus of understanding.
one last thing to address is room response. The previous measurements were from my right speaker, which is more or less in a corner, tilted at 22º, the inside rear corner 3" from the wall and the outside rear corner, 12" from the wall. The positioning is not quite ideal, but that's what I've got to work with in my space. The left speaker has equal positioning, but it doesn't have the benefit of a corner. With equal attenuation and PEQ settings, it's a bit hot and it has a significantly bumpier curve, so I'll have to deal with that next.
- Home
- Loudspeakers
- Multi-Way
- LaScalus, a Horn-Loaded LaScala/Chorus Hybrid