I had decided to add SACD to my dedicated 2 channel system and thought that the 2900 was a good candidate for upgrading.
I purchased the 2900 on **ay for $175. When all was said and done I probably spent about $600 on upgrade parts using the best that I could afford.
I must state that most of the ideas came from lots of reading and even more help from the members here!! THANKS CHAS !!
The Mods started at the Power supply which I think is the weakest point in the player.
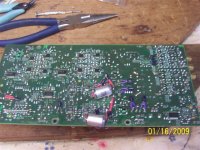
Upgrades included, new hexfred diodes,BG capacitors, some poltstryrene caps, Auri caps for input coupling and larger inductors
The picture shows the new P.S. and the parts removed
I purchased the 2900 on **ay for $175. When all was said and done I probably spent about $600 on upgrade parts using the best that I could afford.
I must state that most of the ideas came from lots of reading and even more help from the members here!! THANKS CHAS !!
The Mods started at the Power supply which I think is the weakest point in the player.
Upgrades included, new hexfred diodes,BG capacitors, some poltstryrene caps, Auri caps for input coupling and larger inductors
The picture shows the new P.S. and the parts removed
Attachments

Next, I attacked the audio board. Before undertaking a modification like this it is imperitive that you obtain a service manual.
On the audio board I worked specificly on the main Left and Right channels. All critical electrolytic caps were changed to Blackgate type and and bypassed with .1NX HiQ. The film types switched to polystyrene.
Resistors in the signal path were changed to Riken carbon comps.
The output coupling caps switched from 'lytics to 10uf Auricaps.
The opamps in for I/V and filtering were changed to AD8620 and the output stage changed to opa627's on browndog converters(more on that later!)
I decoupled the 627's with .01uf +V to -V and with .1uf to Gnd on the +ve and -ve rails.
Attachments

I came across some discrete opamps on a web in site in China called "Audio-gd" that seemed very resonably priced!!
So I took a chance and placed an order.
I payed via paypal on a Thursday morning and the opamps were in my hand on the following Monday morning
They have different "flavors" so I ordered a couple of different ones(the Sun and Moon) to try.
Here is where I ran into my only problem....
After I switched the opamps, the right channel was very distorted.Even after switching back to the opa627's .
After much headbanging it turned out to be a bad solder joint on one of the new Riken resistors. I reflowed the bad joint and all was good again.
here is a pic with the discrete opamps
Attachments

Since then I have replaced the voltage regulator for the DAC with a Dexa super regulator and changed the rca connectors to
Vampire's with DH labs silver wire for the rca's to the board.
I then used a "burn-in" disc that is supposed to help speed up the break-in period and help form the Caps.
Listening impressions range from WoW to Unbeleivable😀
I'm not good with all the adjectives that others use to describe the sound, however the quiet periods semm quieter and the impact and detail are greatly improved!!
I have about 10 hrs of listening so far, and I"m looking forward to comparing the different opamps and hearing the subtle differences that more time will bring!!
All in all a VERY worth while project and I think difficulty would be in the moderate range.
Attachments

I must state that most of the ideas came from lots of reading and even more help from the members here!! THANKS CHAS !!
You're Welcome!!
I'm glad you enjoyed employing some of the mods I described in my posts
http://http://www.diyaudio.com/forums/digital-source/115551-comparison-denon-dvd-2900-mods.html
I owe a debt of gratitude to others here and especially to Mark at SACDMods, who modded my first DVD2900(the best bang-for-buck mods going). I took his mods a step further on my second unit(described in my posts), with pleasing results.
AND you've taken yours further with parts quality(the Auricaps and discrete amps)
Also I'm glad you figured out and resolved the problem with the resistor solder joint (Murphy's Law at work again!).
Next up is the clock! I used the DEXA D-Clock, and it made almost as much difference as either of the power supply and audio board upgrades.
Thanks for your listening impressions! It is nice to read when other people put their subjective impressions into words.
Last edited:
Denon DVD-2900 mod
I just picked up a unit locally for a very good price ($30). I am thinking about doing some mods a bit at a time.
I am not really a electronic technical person, but I can read reference designators on board and part number and some soldering skills. Also, I am searching for instructions step by step (which is my level is) to do the mods.
Any suggestions what to do first and last per your experience?
Is there any website with instructions how to do the mods with parts list?
Thank you very much.
Since then I have replaced the voltage regulator for the DAC with a Dexa super regulator and changed the rca connectors to
Vampire's with DH labs silver wire for the rca's to the board.
I then used a "burn-in" disc that is supposed to help speed up the break-in period and help form the Caps.
Listening impressions range from WoW to Unbeleivable😀
I'm not good with all the adjectives that others use to describe the sound, however the quiet periods semm quieter and the impact and detail are greatly improved!!
I have about 10 hrs of listening so far, and I"m looking forward to comparing the different opamps and hearing the subtle differences that more time will bring!!
All in all a VERY worth while project and I think difficulty would be in the moderate range.
The FIRST thing any Denon DVD29/39/59xx owner should do is order at least half a dozen HOP1200S laser pickups from dalbani.com($13 each-ish) or ebay sources(HOP1200W is physically different, but S is backwards compatible), as the HOP1200 series Hitachi lasers are THE MOST guaranteed to fail in two years or less(usually a lot less) dvd laser in history, save for the drop-like-flies first gen Panasonic dvd lasers. I can excuse Denon for using these horrible lasers in the first model series(2900/3900/etc), but they kept up using them in the succeding models, even as the parts were crapping out like crazy within warranty. There's no excuse for that, in my opinion.
Sorry to rant, but that sort of thing drives me a bit off the deep end.
Sorry to rant, but that sort of thing drives me a bit off the deep end.
I just wanted to add a thank you to both rtate and clm811 for their excellent posts, which were a huge help and my primary 'guidelines' for modding my 2900. I did a number of upgrades to the power and audio boards, most of which mirrored those described in this post. I upgraded the power board with a mix of BG and Panasonic FM caps, Auricaps for the x-rated caps at the input, and hexfred diodes. The audio board had the OP275's changed to OPA627BP's on adapters (from china, but appear to be good chips), the other IC's under the board replaced with AD8620's (for the left and right analog channels only), the DAC regulator changed to a Dexa unit, some of the caps changed to Panasonic FM's, all of the blue caps changed to polystyrene caps of the same values, and the output caps changed from the assortment of electrolytics to Auricaps as noted in the post above.
I started with the power board upgrades, which went smoothly without any problems. After installing the power board back in the player, everything worked fine.
Things were a lot more difficult with the audio board, both in assembly and in getting it running again. The small SOIC chips on the underside were a PAIN to remove, being glued to the board. Also, getting things to fit was a challenge. I used stacked DIP sockets to get the 627 adapters above the caps on the top side of the board (one extra DIP socket in between the soldered socket on the board and the adapter). I moved one of the jumper wires to the underside of the board to help the Auricaps fit better.
The bad news came when I got it all back together - it was not working right. Sound was very distorted and prevalent in one channel only. I was a bit distressed as this was my first major electronics project in a large number of years and my first time ever working with SMD soldering. With a bit of methodical tracing of circuit connections with my multimeter, I found two issues. One was a stray drip of solder in an area I had not worked in, and another was one of the 'feet' of the tiny AD8620's was not contacting the pad. After fixing these two, the player was working!
Sound improvements are showing initially in lower background noise (very, very low, though not 100% gone), and a MUCH more open sound (a combination of a wider soundstage and more effortless dynamics?) I had noticed before a kind of 'dense' or compressed sounding background noise that came on just before a song started playing, that is not there anymore. Imaging may have sharpened up just a bit as well, though this is not as clear of a gain as the areas mentioned above. All in all, the improvements I am seeing have been worth the effort to get there.
Thanks again to the two mentioned above and to others in this forum who have contributed indirectly to my 'project', this forum has been a great resource.
Tom
Denon DVD-2900 Mods
I am interested to have Denon DVD-2900 modded. I have modded Samsung DVD player before and I consider doing this by myseft again.
Can any one tell me where I can instructions how to do this?
Is it worth while to do it or not since BluRay already coming?
Thank you very much.
You can send info directly to d052057@yahoo.com
Good choice, the Denon 2900 is one of the greats for audio, and great value. I combed through measurements at Stereo Review to see that the 2900 has superior measured audio performance to 3910, and nearly as good as 5910. The 2900, 5900, and 5910 all have similar Burr Brown DAC, the 2900 just got the early "beta" version.
Denon DVD-2900 mod
Here is one of instructions which is unclear to me how to upgrade power supply.
Replace OP Amps (IC216 and IC21?) with AD8066.
1. Months ago I replaced the two opamps (IC216 and IC21?) on the top of the audio board and the one underneath the board marked "IC213" with AD8620's. You can also use BB OPA627's on browndogs if you prefer a warmer sound. Of course, it all depends on your ears, your system, and your budget. (Note: I have found the AD8620 midrange is too light for my ears, so over the weekend, I am going to try AD8066's which some say provide the detail of the AD8620's and warmth of the BB opa627's.)
Replace Caps (C369, C360, C366, C355, C367, C357, C421) with caps 10uf/200v?
2. I removed all the two-channel output caps from the top of the audio board using a hot iron and soderwick. They would be
C369 and C360 (Blue film caps)
C366, C355, C367, and C357 (4- 2.2uf/50V caps)
C421 and it's mate (2- 220uf/50V caps)
3. I replaced all these caps with 2 - 10uf/200V Auricaps (Actually I used OEM Auricaps from RTI Film Capacitors - High End Audio Capacitors - Mylar Capacitors. I am sure Solens, Audyncaps, Multicaps, Sonicaps, etc... are good and in some cases cheaper equivalents. I soldered the negative leads to the negative pads of C357 and C355. I soldered the postive leads to now shorted C369 and C360 (where the Blue film caps used to be).
Can some one explain this clearly, what location and what Caps will go to?
Thanks.
I'm just a few months ago I finished a comprehensive project of rebuilding the power supply
And reconstruction of the audio circuit
of my DENON DVD 3910
I also have a DENON DVD 2900
I will make a DIY project according to your diy
Its will be interesting to compare between them after that 🙂
And reconstruction of the audio circuit
of my DENON DVD 3910
I also have a DENON DVD 2900
I will make a DIY project according to your diy
Its will be interesting to compare between them after that 🙂
- Status
- Not open for further replies.
- Home
- Source & Line
- Digital Source
- My Denon DVD2900 MOD !!