Hello,
Possibly good news for those looking for an easy fix to those failing displays on early CD players.
Lite-On
LTM-8328PKR-04
is a direct substitute, pin correct and physically identical. Only problem is that its RED.
Available from Mouser and Digi-key. MOQ: one.
There is also the Lite-On LTM-8328GKR-04, which is green, but unfortunately the MOQ at both these suppliers is ....570.
Maybe if enough people bug them, they'll order 570 for themselves, so we can buy in small quantities.
Also, its less than $15 ;-)
I just fitted one to my CD202 and its better than the original as it has a black face, rather than the light grey of the original. It disappears when not operating, seamless on the front panel.
Good news, especially for those who - like my Cambridge CD2 - have no space to replace them with alternative LEDs 🙂
Is it really pin compatible?
I think you need also some extra pins to control some other LEDs (track/time, pause etc)
At least in the old Philips players.
Alternatively one can use these:
OSH Park ~ Shared Projects
But it will be somewhat more expensive.
I think you need also some extra pins to control some other LEDs (track/time, pause etc)
At least in the old Philips players.
Alternatively one can use these:
OSH Park ~ Shared Projects
But it will be somewhat more expensive.
This is the display being fitted to my Meridian 206.
It's the same identical twin equivalent duplicate part.
has the same pin header and functions the same as it has the NM5450 on board.
Gregje, honestly mate, there's enough FUD already in this world.
It's the same identical twin equivalent duplicate part.
has the same pin header and functions the same as it has the NM5450 on board.
Gregje, honestly mate, there's enough FUD already in this world.
Attachments


Is it really pin compatible?
I think you need also some extra pins to control some other LEDs (track/time, pause etc)
At least in the old Philips players.
Alternatively one can use these:
OSH Park ~ Shared Projects
But it will be somewhat more expensive.
DIY version with smd leds 🙂
Making of NSM 4202 – NSM4202a replacement – Bram Jacobse
This is the display being fitted to my Meridian 206.
It's the same identical twin equivalent duplicate part.
has the same pin header and functions the same as it has the NM5450 on board.
Gregje, honestly mate, there's enough FUD already in this world.
Does the 206DS have the same display board? Also, do you have any tips
on how to remove the old display. I read somewhere that the double board
is very difficult to remove in the 206.
Michael
Hi, yes NSM 4002 fits the 206 (at least my version - there are several), but its a Delta Sigma, like yours, so should work.
The removal is simple, once you know how ;-)
the trick is to look for the correct two allen head screws at the base of the unit - under the display/control side. They are about 4cm back from the front, on their own. There are two other screws holding the connecting metal strap between the two boxes - these are not the screws you are looking for ;-)
Remove those screws and the whole display face can be moved out from the box. Its on a metal subframe. There are ribbon cables that are long enough to reach behind and disconnect at their respective plugs/sockets. They are the Philips grey plugs like found in all Philips CD players at that time.
The PCB for the display is held onto the back of the display/control panel and mounting sub frame with four self taper screws, and further dismantling is obvious.
If you are going to do this, and use the red display rather than green, swap over (trade places) the standby and pause led while you are there, as the colour will be more consistent with the final aesthetics of the player.
Also, remember to peel the protection film off the new numeric display, else the final appearance is disappointing. ;-)
You may have to increase the 'dimming' resistance too - its under the numeric display.
But beware, this is not for the fainthearted; the original soldering is top class and will fight you all the way when removing all those pins on the display.
good luck
But beware, this is not for the fainthearted; the original soldering is top class and will fight you all the way when removing all those pins on the display.
That's what I thought looking at it...and there's so little room to move for Neanderthal solderers like me. I need to decide if I want to risk messing it up.


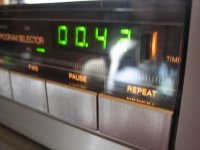
Here it is in my Philips CD 202.
(I got lucky and bought a green one before the MOQ went up to ridiculous).
All other LED work.
I am going to do the same thing, just ordered 2 (red). For my CD450 and one spare. Any advise on how to remove the faulty display? Looks like the hardest part to me ....
HI!, does anyone have a spare LTM-8328PKR-04 to sell? I'm trying to find one but they got very difficult to find. Thanks
Hi , I have 2 new LTM-8328PKR-04 , for mouser 28-jun-20HI!, does anyone have a spare LTM-8328PKR-04 to sell? I'm trying to find one but they got very difficult to find. Thanks
Regards Bram
- Home
- Source & Line
- Digital Source
- NSM 4002 display - good news