(reposted to the correct thread bc im stupid) Howdy guys. Sorta new here. I'm really just posting this to show off what I've been working on for the past few weeks, but all tips and suggestions will be much appreciated:


The idea was to make something akin to a traditional guitar amplifier, but with a little more versatility. I had a few parts laying around: an old mini-pc, amplifier, and a Focusrite USB interface. To make use of them, I settled on using the standard 19" rackmount system to mount whatever I needed. Funny enough, there is not a single consumer-grade piece of rackmount audio equipment in there (dedicated EQ, compression, etc.) This was mostly by design. The mini-pc allows for fully digital effects (basically anything you can imagine), so there's little point in buying even a simple 1U signal processor. Moreover, more metal in the case = more weight. Portability of this system is very important. If I were to add something like that, it'd probably be an EQ, but I am full up on rack space in the front.
Anyways, I settled on a 6U rackmount flight case. 17" deep, 19" wide. It has a cover for front/back which is quite nice for portability. The covers themselves have zippers and can hold things - very nice.
From top to bottom, here are the components on the front of the rack:
1st U: Sliding tray with portable 15.something" monitor. Hold a bluetooth keyboard+touchpad combo.
2nd U: Fixed tray with Beelink s12 mini-pc, Focusrite interface (2nd gen), and a fosi audio 2.1 amplifier
3-6th U: Speaker solution. Material is either MDF or 3D-Printed (PLA). Many different speakers have been used: Marcaudio fullrangers, Fountek fullrangers, SKAR audio coaxials, woofers stolen from various studio monitors, and a Dayton audio 7" woofer (newest addition).
The back of the rack holds only the PDU. Just don't look at my solution for mounting the sliding tray. I'll probably be filling the rest of the back with a blank panel covered in acoustic foam. What do you guys think about that? Because I've just been running these speakers with the back of the rack OFF, creating a pseudo open-baffle speaker. Still sounds alright.


Signal chain: Signal sent to the interface is sent to the mini-pc which is then processed by FL Studio, and then sent back out the interface into the amplifier via RCA. Speakers are passive.
Speaker solution: The most challenging part of this was designing a "baffle" that would house speakers and sit within a standard rack. If you look up "rackmount speakers" you really don't get anything useful for this application. Why? Because this is an insane niche that never needed to be filled. What you find on google are these weird audio monitoring speakers that are very nearfield. So, I had to make my own thing. At first, I was able to get away with it by sticking a Kenwood CRS-158 on a shelf inside the rack. That worked good enough as the center speaker was exactly 17" wide, but it took up about 3.5U of rackspace, leaving lots of dead space. I started making designs on TinkerCAD and sent them to a guy who routes MDF and a co-worker that does 3D printing. So far, the only difference I've noticed between MDF and PLA is WEIGHT. My god, even with more/heavier drivers in a 3D-printed baffle, it's lighter than any MDF baffle. I'm sure there are drawbacks to PLA acoustically (not totally infilled, resonant maybe?) but my ear really hasn't heard a difference.

Drivers, how it sounds: I got a combination of full-range drivers and woofers and just started trying them out. It sounded pretty damn good in the beginning, despite the cheap/small speakers and shoddy measurements. But I quickly realized that I needed to optimize for speaker size, as a 4" speaker is NOT going to reproduce 60-70hz (I downtune my guitar), especially in this enclosure. Enthused, I went ahead and got some nicer speakers with a good cone area. These were the CHP-90s from Marcaudio and a 7" woofer from dayton audio, paired with some smaller fountek full-rangers(I also got some 4" marc audio drivers, the CHP-70s, those didn't work out very well in terms of response). Now it's sounding really nice to me. It fills to room, produces bass, and just lets me vibe out. I have yet to measure the frequency response, but I'm sure it's ****** in some way.
I settled on a 2.1 amp so that I could use a dedicated woofer if needed, reducing stress on the full-rangers. Uniquely, this allows me to run the speakers in stereo, which is actually quite noticeable, especially on my "2-way" baffle. The focusrite interface allows the system to receive two signals at a time. Some fiddling around with my DAW (fl studio) allows me to assign different inputs to different speakers, if I really wanted to. I'm also exploring ways to angle the smaller full-range drivers outwards to get a better stereo image. Basically a toe-out.
It really is more than just a guitar amplifier. As I play my guitar, you can send MIDI signals to FL Studio via USB and at the same time be using an XLR input from a vocalist for example, all while drums are looping on the playlist. And you can record it all. That is really ******* cool.
Some problems I battle:
VIBRATION: oh my god, does this thing like to vibrate. At med-low volumes, there is no issue. The moment you go past any reasonable listening level for a small room, the entire case and the contents within begin to resonate at particular frequencies. To account for this, I need to remove anything that is sitting on top of the case. Make sure that all screws are tight and even. Use many rubber washers. I've also stuck a few vibration-absorbing gels around the inside (you know, the ones drummers use on their snare), who knows if that's done anything. I guess I'm sort of asking for it, sticking speakers in a plastic enclosure which houses several different components fixed in weird ways.
COOLING: After I added the 2.1 amplifier, thing get kinda toasty in there. I mean the pc, interface, and amplifier sit right next to each other. It hasn't necessarily become a problem yet, but I'm exploring lightweight, quiet, and unobstructive cooling solutions. I'm thinking of a 1-2U panel lined with noctua fans.
PORTABILITY: This really just means weight. This thing gets heavy quick, as rackmount equipment is almost always full metal. Any addition must pass weight consideration. Also, I definitely don't need 17" deep in my rack. I could probably get away with 12" deep, just to reduce bulk.
Let me tell you, I ******* love this thing. It gets loud, shakes my room, and is just overall so much fun to play with. I've spent so many hours modelling cabinets and playing with effects. I just got so tired of playing guitar on my "main" computer, and said screw it, I'll build something legit. And lord knows I'm not dropping $500-1000 on a decent guitar amplifier when I can drop the same amount of money to build something truly unique and more versatile. Don't get me wrong, guitar amps are cool, but this is RAD.


The idea was to make something akin to a traditional guitar amplifier, but with a little more versatility. I had a few parts laying around: an old mini-pc, amplifier, and a Focusrite USB interface. To make use of them, I settled on using the standard 19" rackmount system to mount whatever I needed. Funny enough, there is not a single consumer-grade piece of rackmount audio equipment in there (dedicated EQ, compression, etc.) This was mostly by design. The mini-pc allows for fully digital effects (basically anything you can imagine), so there's little point in buying even a simple 1U signal processor. Moreover, more metal in the case = more weight. Portability of this system is very important. If I were to add something like that, it'd probably be an EQ, but I am full up on rack space in the front.
Anyways, I settled on a 6U rackmount flight case. 17" deep, 19" wide. It has a cover for front/back which is quite nice for portability. The covers themselves have zippers and can hold things - very nice.
From top to bottom, here are the components on the front of the rack:
1st U: Sliding tray with portable 15.something" monitor. Hold a bluetooth keyboard+touchpad combo.
2nd U: Fixed tray with Beelink s12 mini-pc, Focusrite interface (2nd gen), and a fosi audio 2.1 amplifier
3-6th U: Speaker solution. Material is either MDF or 3D-Printed (PLA). Many different speakers have been used: Marcaudio fullrangers, Fountek fullrangers, SKAR audio coaxials, woofers stolen from various studio monitors, and a Dayton audio 7" woofer (newest addition).
The back of the rack holds only the PDU. Just don't look at my solution for mounting the sliding tray. I'll probably be filling the rest of the back with a blank panel covered in acoustic foam. What do you guys think about that? Because I've just been running these speakers with the back of the rack OFF, creating a pseudo open-baffle speaker. Still sounds alright.
Signal chain: Signal sent to the interface is sent to the mini-pc which is then processed by FL Studio, and then sent back out the interface into the amplifier via RCA. Speakers are passive.
Speaker solution: The most challenging part of this was designing a "baffle" that would house speakers and sit within a standard rack. If you look up "rackmount speakers" you really don't get anything useful for this application. Why? Because this is an insane niche that never needed to be filled. What you find on google are these weird audio monitoring speakers that are very nearfield. So, I had to make my own thing. At first, I was able to get away with it by sticking a Kenwood CRS-158 on a shelf inside the rack. That worked good enough as the center speaker was exactly 17" wide, but it took up about 3.5U of rackspace, leaving lots of dead space. I started making designs on TinkerCAD and sent them to a guy who routes MDF and a co-worker that does 3D printing. So far, the only difference I've noticed between MDF and PLA is WEIGHT. My god, even with more/heavier drivers in a 3D-printed baffle, it's lighter than any MDF baffle. I'm sure there are drawbacks to PLA acoustically (not totally infilled, resonant maybe?) but my ear really hasn't heard a difference.
Drivers, how it sounds: I got a combination of full-range drivers and woofers and just started trying them out. It sounded pretty damn good in the beginning, despite the cheap/small speakers and shoddy measurements. But I quickly realized that I needed to optimize for speaker size, as a 4" speaker is NOT going to reproduce 60-70hz (I downtune my guitar), especially in this enclosure. Enthused, I went ahead and got some nicer speakers with a good cone area. These were the CHP-90s from Marcaudio and a 7" woofer from dayton audio, paired with some smaller fountek full-rangers(I also got some 4" marc audio drivers, the CHP-70s, those didn't work out very well in terms of response). Now it's sounding really nice to me. It fills to room, produces bass, and just lets me vibe out. I have yet to measure the frequency response, but I'm sure it's ****** in some way.
I settled on a 2.1 amp so that I could use a dedicated woofer if needed, reducing stress on the full-rangers. Uniquely, this allows me to run the speakers in stereo, which is actually quite noticeable, especially on my "2-way" baffle. The focusrite interface allows the system to receive two signals at a time. Some fiddling around with my DAW (fl studio) allows me to assign different inputs to different speakers, if I really wanted to. I'm also exploring ways to angle the smaller full-range drivers outwards to get a better stereo image. Basically a toe-out.
It really is more than just a guitar amplifier. As I play my guitar, you can send MIDI signals to FL Studio via USB and at the same time be using an XLR input from a vocalist for example, all while drums are looping on the playlist. And you can record it all. That is really ******* cool.
Some problems I battle:
VIBRATION: oh my god, does this thing like to vibrate. At med-low volumes, there is no issue. The moment you go past any reasonable listening level for a small room, the entire case and the contents within begin to resonate at particular frequencies. To account for this, I need to remove anything that is sitting on top of the case. Make sure that all screws are tight and even. Use many rubber washers. I've also stuck a few vibration-absorbing gels around the inside (you know, the ones drummers use on their snare), who knows if that's done anything. I guess I'm sort of asking for it, sticking speakers in a plastic enclosure which houses several different components fixed in weird ways.
COOLING: After I added the 2.1 amplifier, thing get kinda toasty in there. I mean the pc, interface, and amplifier sit right next to each other. It hasn't necessarily become a problem yet, but I'm exploring lightweight, quiet, and unobstructive cooling solutions. I'm thinking of a 1-2U panel lined with noctua fans.
PORTABILITY: This really just means weight. This thing gets heavy quick, as rackmount equipment is almost always full metal. Any addition must pass weight consideration. Also, I definitely don't need 17" deep in my rack. I could probably get away with 12" deep, just to reduce bulk.
Let me tell you, I ******* love this thing. It gets loud, shakes my room, and is just overall so much fun to play with. I've spent so many hours modelling cabinets and playing with effects. I just got so tired of playing guitar on my "main" computer, and said screw it, I'll build something legit. And lord knows I'm not dropping $500-1000 on a decent guitar amplifier when I can drop the same amount of money to build something truly unique and more versatile. Don't get me wrong, guitar amps are cool, but this is RAD.
Last edited:

Boxing in the speakers should help a bit but wont stop all resonances/rattles and of course add more weight, you will need separate chambers for the mids also.
Another idea could be to have opposing bass drivers so they cancel vibrations out by opposing force(great for subwoofers mainly), more weight!
I like your idea seems like it'll be very versatile, putting it in a rack mount will limit things somewhat compared to a custom well constructed ply 3/8" outer housing with 1/4" internals.
I have been down the portable studio / guitar amp road several times, and have wound up finding some dissatisfaction with my projects. I got a "Gator" brand 8 U case cheap at a ham radio show because there were some holes drilled in it. That thing rattled real bad with the back cover on, but worked fair with it off. It had a fairly stout aluminum cage, but the plastic exterior was very thin and vibrated a lot. Gator's new stuff look s good, but costs too much.
The unit in the vacation pictures was my most successful version. It was built about 7 years ago and it died about 4 years ago when the cheap handle on the top broke and the rest went down a flight of stairs. There was a Mini ITX PC motherboard inside running Ableton Live or Overloud's TH-3 (Now TH-U). Those crappy little Parts Express speakers didn't ROCK, or even make much noise. The interface for the guitar and speakers is a MOTU Micro Book seen between the Keystep keyboard and the DIY synth (blue faced box with lots of knobs). The Keystep plugs into USB and provides CV and Gate for the synth. That's the Atlantic Ocean in the background.
I have started collecting parts for a new build. The brains of the project will be this ASRock Industrial Motherboard that I got cheap when they were discontinued by Newegg. It has a Ryzen 7 CPU chip with plenty of power. I still have the MOTU Micro Book and a Focusrite Scarlett Solo, but neither do MIDI, so I'm may keep looking for something else. The unit in the picture could run for about two hours on internal battery power, and I still have all of the LiFePo4 cells and the controller, so it will be reused if it all works. The 10 watt per channel amp in the pictured unit still works, bit those tiny speakers suck. The 19 inch screen did not survive and neither did the PC motherboard. 19 inch was too big. Not sure what I'll do in the speaker department. I don't need lots of loud as I can always plug in an external amp. The 10 WPC amp would probably be OK with better speakers.
I'll probably knock together a simple pine box like the two units in the pictures have. I like the sound of pine for guitar speaker cabinets.
Attachments


Boxing them in would be awesome. There's a few challenges there though. Mainly the loss of space on the front baffle due to inner walls blocking stuff. It could work really well though. I'm imagining an enclosure that goes all the way through the rack and is screwed in on the back posts as well. Thanks 🙂Boxing in the speakers should help a bit but wont stop all resonances/rattles and of course add more weight, you will need separate chambers for the mids also.
Another idea could be to have opposing bass drivers so they cancel vibrations out by opposing force(great for subwoofers mainly), more weight!
I like your idea seems like it'll be very versatile, putting it in a rack mount will limit things somewhat compared to a custom well constructed ply 3/8" outer housing with 1/4" internals.
@Tubelab_com, it was hard to read that part about your rig falling down the stairs. My god. I don't have much confidence in my own case as is.
Running your rig off of battery power is a really cool implement. Even two hours is quite impressive. I wonder how much power draw my setup requires. Batteries would add quite a bit of weight. Maybe I could snag a 1U UPS.
That custom rig is really neat. You built it yourself?
Running your rig off of battery power is a really cool implement. Even two hours is quite impressive. I wonder how much power draw my setup requires. Batteries would add quite a bit of weight. Maybe I could snag a 1U UPS.
That custom rig is really neat. You built it yourself?
Not so neat when you take the cardboard back off and look inside. Everything was done with a table saw and a box of sheet rock screws. The motherboard is a generic ITX unit from Newegg, The CPU chip is a core i7-7700T. The T version is a low power version of the base i7-7700 chip. The small green board is a power supply from Mini-Box.com but it is no longer available. It was made for 12 volt car power. The blue board is a 10 watt per channel class D amp board from TI. It's also about 10 years old and likely no longer available. The display is a cheap ACER 19 inch display that was removed from its plastic case. The large green board came out of the ACER display. All of this stuff is screwed to a piece of 1/8 inch thick "plywood" from Lowes which is held in place with a few angled sheetrock screws. One is visible between the WiFi antennas on the motherboard. I cut a groove in the pine board that makes up the outer housing before cutting it to size and simply slid the glass display panel into the grooves once the outer rim had three sides, then screwed on the last side. None of this stuff was glued together since I had to take it apart several times before getting it to work. That was likely one of the reasons for its rather complete disassembly when the handle came apart. The battery packs and controller were not in place when these pictures were taken. What is not obvious in the pictures from post #3 is that everything was powered by a UPS sitting on the deck for those pics. The battery packs and controller were also screwed to a piece of 1/2 inch plywood that became the back panel, also mounted with sheetrock screws. I never expected that creation to work so good for over 3 years. It made 3 trips to Florida and several others before being dropped. That's what I get for using a handle that I took off of a dead guitar amp. Oddly the real Samsung spinning platter hard disk survived the drop, but the SSD did not.That custom rig is really neat. You built it yourself?
https://www.mini-box.com/site/index.html
I like your idea for a swappable speaker panel since speakers are the hardest thing to get right. After sleeping on it last night, I think a DIY rack mount box made with 3/4 inch pine, but GLUED AND SCREWED together using rack mount rails from Parts Express will be my next experiment.
Attachments

I'm wondering, why build your own rack box instead of just buying one? Obviously you can make it super custom, but my thought was that it'd be fine just working around existing racks. With a rack that has proper depth, you could store your monitor horizontally like mine, if that interests you. Before I settled on using a mini-pc I was considering using a 1U computer chassis with some small form factor PC parts. It would have been more expensive but would have worked just as well, although it would be heavier. Your rig in those beach pictures has a very particular design, I wonder if it could be compacted into a single portable rack. If I'm seeing it correctly, that rig is at least two seperate pieces.All of this stuff is screwed to a piece of 1/8 inch thick "plywood" from Lowes which is held in place with a few angled sheetrock screws. One is visible between the WiFi antennas on the motherboard. I cut a groove in the pine board that makes up the outer housing before cutting it to size and simply slid the glass display panel into the grooves once the outer rim had three sides, then screwed on the last side.
The PC with DAW is one single box. The MOTU USB sound module was external in this version. The second wood rimmed box with the blue face is a "Virtual Analog" music synthesizer that's controlled by the white music keyboard, an Arturia Keystep that plugs into the PC via USB. The MOTU box has a 1/4 inch input jack for guitar input. On later trips the MOTU was replaced by a Focusrite Scarlett Solo. Both interfaces work good, the the Focusrite has the inputs and the controls on the front, while the MOTU has the inputs on the front the USB and additional I/O on the back and the controls on the top making is useless for rack mounting. This picture was taken inside a room in the rented "home by the sea." The synth can be played via the Keystep and heard through the headphones without the PC/DAW. The PC/DAW box functions without the Keystep and Synth. I have used it with the wireless qwerty keyboard, the MOTU, headphones and a guitar. Ableton Live has lots of built in instruments much like FL Studio, so a lot of features are available for use without any additional hardware. The PC/DAW box as it existed then could not play the synth directly since the synth does not have USB. All of the functionality of the "Blue" synth has been condensed into the smaller unit sitting on top of it. This can be easily integrated into something portable.
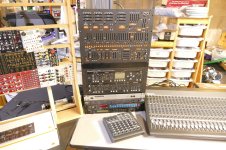
Why build? Well, I have enough wood, some rack mount rails, and the tools to make a rack mount box, some experience making speaker and amp head boxes, so it should be a zero dollar project costing only time. Note the rack without a case holding several synths a stereo graphic EQ and an ADA MP-1 that I got on Ebay over 30 years ago. I slapped together a wooden Eurorack synth case that used to house the DeepMind12, a few Behringer clone synths, and a bunch of Eurorack synth modules. I will eventually make a better case for all the Eurorack compatible stuff. The MP-1 and maybe the EQ may wind up in my portable rack. For now, it's too soon to tell, as there are too many unfinished projects. A few weeks ago I ripped up my "toy shop" and started rearranging it all when the Behringer 2600 clone synth showed up. Got to finish it so I can play with the toys. The 1 X 12 cab with the tube amp on top is done and working. The 1 X 15 + 2 X 6 speaker cabinet needs the speakers and hardware installed and 2 X 50+ watt tube powered Bi-Amp that feeds it needs to be completed.
I haven't decided if I will use the sliding monitor concept like you are using, or simply put a smaller monitor above the speakers in the rack and put the qwerty keyboard and the Keystep in a removable front cover. The original portable unit might have survived the fall if it had a cover and something better than cardboard on the back.
Attachments


- Home
- Live Sound
- Instruments and Amps
- Rackmount guitar rig using a mini-PC + DAW with custom built speakers