Guys,
I finally started building my hand made lens to replace the fresnel between the objective and the LCD. This is kind of an experiment and I want to document what I'm doing here in case anyone else wants to do the same thing.
I started out laminating several short pieces of 2x6 together. I didn't have any long clamps but I did have some pony clamps left over from a speaker building project. They work quite well for things like this and they are relatively cheap.
I used polyurathane wood glue because I had some and because these were old pieces of wood that were kind of warped. The polyurathane glue foams up and expands somewhat to fill in oarger gaps.
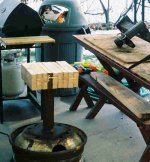
I didn't take a picture of the glue up phase but here is a shot of the block mounted on a stand that I make from an old disgarded semi wheel. I don't have a workshop so I am somewhat limited but I do have a welder and so I build this pedestal stand out of scrap metal for nothing since I had the scraps laying around.
I finally started building my hand made lens to replace the fresnel between the objective and the LCD. This is kind of an experiment and I want to document what I'm doing here in case anyone else wants to do the same thing.
I started out laminating several short pieces of 2x6 together. I didn't have any long clamps but I did have some pony clamps left over from a speaker building project. They work quite well for things like this and they are relatively cheap.
I used polyurathane wood glue because I had some and because these were old pieces of wood that were kind of warped. The polyurathane glue foams up and expands somewhat to fill in oarger gaps.
I didn't take a picture of the glue up phase but here is a shot of the block mounted on a stand that I make from an old disgarded semi wheel. I don't have a workshop so I am somewhat limited but I do have a welder and so I build this pedestal stand out of scrap metal for nothing since I had the scraps laying around.
Attachments
Next I printed out a 1:1 profile of the lens curve which I hade calculated in the freeware version of OSLO, which is a lens design program. My printer can print on 11x17 paper so I drew the profile of the lens in TurboCAD and then printed it at it's 1:1 scale. I had a picture of the printout but it wasn't very easy to see the lines so I'm not including it here.
I then transferred the profile of the lens onto the sides of the wood block after trimming the block down the 12.5 x 9.5 size. Then I went to work with only hand tools. I first used an old circular saw to remove as much as I could close to the lines. Then I made cuts of varying depths close together making sure not to go too deep past the lens profile.
I then took a 1 1/4 inch wood chiesel and cleans it up the best I could on the long profile which was with the grain of the wood. It is not possible to get this really perfect and that is not the idea. Just as good as I could get it without diggint into the lens area if possible.
Here is a picture of the block with one contour cut with a chiesel. After the chiesel I cleand it up some more with a medium sized wood plane.
Don't you just love this. I feel like Roy Underhill. Making high tech things with low tech tools is really cool.
Attachments

Next, I made a scraper and guide out of a piece of 6 x 18 inch sheet metal. This is thich enough metal so that it doesn't bend too easily or it will through off the measurements.
I then took the saw out and made some cuts that cut off large pieces of material on the ends. I kept doing this until I goe as close as I dared to where I thought the lens sphere would be.
The only reference points I had were the edges and the center of the lens which is the highest point. After taking as much as possible off with both the cirular saw ans a combination of hand saws I then went to a large wood rasp. Most of the rest of the shaping was done with this wood rasp and a little bit with a plane.
After a while I started using the sheet metal curve guide to tell where the high and low spots were. When I got it about as close as I could with the tools I was using I took a orbital radial sander and cleand it up a little.
It is important when doing the rasping and the sanding to take even arcing downstrokes from the center of the lens sloping down to the edges. The short side edges were already very close and so most of the work was on the long side edges.
I walked around the piece taking even strokes making sure not to flattern or take material off from the crown of the lens because it was already at about the right height.
So far everything I have described is about 5 - 6 hours work in two days. When I got the lens curvature about as good as I knoe I could get it then I made a quick sanding and applied some bondo to the gouges that I had made do to a combination of sloppy chieseling and impatience.
Here is a photo of somewhere along the process.
Attachments

And another photo of how the mold blank looks right now with bondo curing on it.
The mold blank is actually more spherical in shape then this photo makes it look. Because it was 40 degrees outside the bondo wasn't curing very fast so I had to hang it up for the day.
I now have to make a special tool to get the lens mold blank perfectly spherical. That will be done in a few days as I have to get a bottle of dry garnet power or course abrasive powder to make the next tool. Stay tuned for the next part hopefully not too long.
Attachments

nice work hezz, it will be interesting to see how it turns out, by the way u better empty that bin in the background lol
Ya thanks Ace,
It's the recycled plastic bin so it doesn't get emptied with the other trash. It has a tendency to stay because we have to take it ourselves to recycle it.
Hezz
It's the recycled plastic bin so it doesn't get emptied with the other trash. It has a tendency to stay because we have to take it ourselves to recycle it.
Hezz
no probs buddy was just having a joke, what material are u going to make the lens out of? i hear that acrylic or plexi is near to optical grade, i know polycarbonate is too. actually how thick is the lens going to be?
Trev
Trev
It's Ok I knew you were joking but I had to explain that thing because it does look kind of stupid in the picture.
Anyway, for a long time I was going to melt down optical grade acrylic pellets but I don't really have the equipment for that. I found a company that is near me that sells a deep clear polyester casting resin that is really clear and I think it will work reasonably well.
The finished lens will be about 3 1/4 inches thick at the center and I worry somewhat about reduced light output but if it creates a superior image I will be willing to sacrifice some light output.
The polyester resin is really easy becasue it is a room temperature pourable thermoset plastic I just hope I can mix it without introducing many air bubbles.
Hezz
u can melt plexi down useing that bbq in the back ground, its like melting chocolate u need 2 pots one with water and the other inside with the plexi, a heat gun over the top will help speed up the process, i think the better thing to use would be olive oil as it doesnt boil and gets hotter.
Trev
Trev
Cool Idea! I'd like a copy of that TurboCAD file if it's ver. 5.0 or earlier.
To remove the air bubbles from your "mix" put your electric sander upside-down in a vise or between your knee's if you can stand it and place your mix container on it while your mixing. All the bubbles will rise to the top very quickly. Don't forget to take the paper off the sander first.
John
To remove the air bubbles from your "mix" put your electric sander upside-down in a vise or between your knee's if you can stand it and place your mix container on it while your mixing. All the bubbles will rise to the top very quickly. Don't forget to take the paper off the sander first.
John
Ace_3000,
What is the water for. To increase humidity inside the oven. I'm going to try the polyester casting resin first and if it doesn't work I'll try clear plexiglass. I know that you can buy optical grade acrylic in pellets because thats how they make a lot of small lenses. They would be easier to melt but then again I can get remnents from a local plastic sign shop for 1 dollar a pound. It would take a lot of little remnents. Thanks for the ideas, I have to calculate the exact volume that I need for the lens.
Doon1,
I didn't save the Turbocad file becasue all it was was an arc with a 12 inch radius and then I drew a line 3 1/4 inches from the upper point down and then drew perdendicular lines to the circle and then cut the larger portion of the circle out. It was in version 8 anyway. Do you have an older version of turbocad?
This lens has about an 18 inch focal length. My DIYLABs triplet fuocuses at about 17 inchs from the LCD. Anyway I wanted a longer focal length to reduce the thinkness of an already thick lens and because I want to get a larger, longer focal length lens in the future.
Hezz
P.S. Doon1, If you need I can e-mail you another file in DXF format. Your older TurboCAD should be able to read that.
Ace_3000,
After thinking about it I realized you were talking about a double boiler. Will that get hot enough? Acrylic needs to be heated to nearly 400 degrees to melt I believe. That would require some more direct heat wouldn't it.
Hezz
After thinking about it I realized you were talking about a double boiler. Will that get hot enough? Acrylic needs to be heated to nearly 400 degrees to melt I believe. That would require some more direct heat wouldn't it.
Hezz
hezz
heya hezz, ya plexi needs about 300deg c to melt it into a liquid, thats why i said use olive oil, u can get olive oil upto that on a stove no worries, (trust me ive had it smoking before lol) the double pot method is so u dont burn the plexi with direct heat, thats why u use the same method with chocolate , it will burn on the bottom if u dont use this method, in a industrial machine its not much different, they use air presure to push the pellets through a large pipe with like an electric type boiler surounding it, i think they use oil too not sure but its very hot and its a fast process, in our diy setup we dont have a termostat so we would have to keep an eye on it and by using oil u wont burn the plexi to the pot, but dont let it boil, the best pot to use would be a stainless steal pot as it wont have paint on it and will beable to conduct heat better on the sides, a pot that is also abit thicker on the base then the sides would be ideal as the base will retain the heat for longer while pooring it, in an injection moulding system they use presure to stop the plastics from boiling and also to get them in a very liquid state, not sure if a presure cooker would work, somthing we would have to experiment in.
Trev
After thinking about it I realized you were talking about a double boiler. Will that get hot enough? Acrylic needs to be heated to nearly 400 degrees to melt I believe. That would require some more direct heat wouldn't it.
heya hezz, ya plexi needs about 300deg c to melt it into a liquid, thats why i said use olive oil, u can get olive oil upto that on a stove no worries, (trust me ive had it smoking before lol) the double pot method is so u dont burn the plexi with direct heat, thats why u use the same method with chocolate , it will burn on the bottom if u dont use this method, in a industrial machine its not much different, they use air presure to push the pellets through a large pipe with like an electric type boiler surounding it, i think they use oil too not sure but its very hot and its a fast process, in our diy setup we dont have a termostat so we would have to keep an eye on it and by using oil u wont burn the plexi to the pot, but dont let it boil, the best pot to use would be a stainless steal pot as it wont have paint on it and will beable to conduct heat better on the sides, a pot that is also abit thicker on the base then the sides would be ideal as the base will retain the heat for longer while pooring it, in an injection moulding system they use presure to stop the plastics from boiling and also to get them in a very liquid state, not sure if a presure cooker would work, somthing we would have to experiment in.
Trev
Update
Update,
The big lens project is on hold for a couple of weeks through the holidays until I get some more supplies and cash. Christmas soaks me dry. I went to several places locally to try and find some coarse grit aluminum oxide powder. All I could get were 50 pound bags of the stuff and I only need a pound or two. I may have to order some over the internet as I don't want to spring for a large bag that I won't use.
Hezz
hmm...
How are you going to melt plexi over that?
If you just stick the plexi on the mold, then heat it, and wait for it to conform to your mold, i dont think it is going to be even.
I think you should have made a female for the lens instead of a male.
If you have a female, you could melt a piece of lexan glass over the hole. (Imagine a block with a hole in it that is the exact shape of the lens. This way when you melt the glass, it will conform perfectly to the hole.
I dont think wood is what you want either, I would have make a box that is the length, width and height of the lens plus 1 inch in each dimension. Then I would fill that box with concrete or plaster, and create scoops to scoop out the excess concrete. The scoops would have to be like 1/2 circle shapes that are the exact curvature of the lens.
Let me know if you dont understand what im saying
Psionic has a point.
I love the idea of big lenses and making your own would be even better... but I dont think wood is the way to go.
I love the idea of big lenses and making your own would be even better... but I dont think wood is the way to go.
Think sand casting
I could be way off guys, but I get the idea Hezz is making a form that can be used to make the molded shape in a casting medium, then the melted plexi can be poured into the mold.
I could be way off guys, but I get the idea Hezz is making a form that can be used to make the molded shape in a casting medium, then the melted plexi can be poured into the mold.
OK Guys here's the scoop,
I found a nearby source for silicon dioxide powder so I have now cast the tool to do some better grinding of the mold blank. And yes, I know that wood will not make a good lens but it does make an easy to form mold blank!!!!
Here is the process for those of you who don't quite see what I'm doing.
Step 1: Hand forming of a mold blank out of scrap wood. This is because wood is easy to form.
Step 2: Once the mold blank is contoured to sufficient size and quality it will be used to make a mold in a high grade sand or plaster for making the rough lens blank out of optical grade thermosetting plastic. This is done to make the lens cheap to produce. It would take a year of heavy work to hand grind a lens this size out of glass and the glass lens blank would be expensive.
Step 3: Hand grind and polish the rough lens to optical standards using hand work and custom made tools.
Step 4: See if it works better than a fresnel.
Hezz
Some pictures are in the works but I don't have a digital camera so I have to wait until I take more standard pictures.
Sorry,
it was silicon carbide powder. What was I thinking.
Pisonic, you must first have an accurate representation of the original lens before you can make an accurate female mold. We are talking about a process here which will make something that is extremely accurate not hacked out. Although it may seem that way. I have thought about this a long time and also have three years education in manufacturing engineering. While I'm not an expert this process is designed to reduce hand work to acceptable levels. If you just wanted to make one mold you might be able to hack one out with a beach ball impression in sand but it would not be very accurate. I wanted something that I could easily make several lens blanks with in case this turns out well and others want to buy a lens blank.
Also once the plastic lens is cast it will be much more work to get it right if the cast part is not very close to final dimensions. Our goal is to get the lens within a couple millions of an inch to spherical condition. If not that to within at least +\- .0001 inch.
A little more work up front but it offers much greater repeatability.
Hezz
- Status
- Not open for further replies.
- Home
- General Interest
- Everything Else
- The Moving Image
- DIY Projectors
- started my hand made lens