Hello out there,
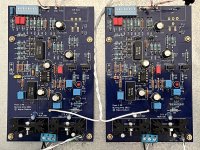
today I will try to complete my third variant of the PEARL 3. I made my own pcbs for use with single OPAmps.
I listened to this variant of the PEARL 3 the last few weeks and used two OPA827 per channel. Very nice OPAmp -
I like it a lot. I used a lot of SUSUMU - smd - resistors. C1 and C12 are some bigger caps from AUDYN.
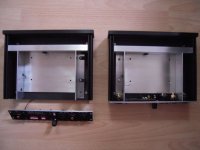
And I put some extra layers of aluminum into the MODUSHOP - cases for some extra shielding. Absolutely not necessary!
I will see, if this lazy sunday brings those pcbs into the cases...
Have a nice weekend and hopefully enjoy fantastic sound out of your PEARLs...
(and it doesn't matter if it is a PEARL 1, PEARL 2 or PEARL 3)
Cheers
Dirk
today I will try to complete my third variant of the PEARL 3. I made my own pcbs for use with single OPAmps.
I listened to this variant of the PEARL 3 the last few weeks and used two OPA827 per channel. Very nice OPAmp -
I like it a lot. I used a lot of SUSUMU - smd - resistors. C1 and C12 are some bigger caps from AUDYN.
And I put some extra layers of aluminum into the MODUSHOP - cases for some extra shielding. Absolutely not necessary!
I will see, if this lazy sunday brings those pcbs into the cases...
Have a nice weekend and hopefully enjoy fantastic sound out of your PEARLs...
(and it doesn't matter if it is a PEARL 1, PEARL 2 or PEARL 3)
Cheers
Dirk
Attachments

Should I match the kind of opamp to the type of MC cartridge? Pearl 3 works great with Empire MC1000, but with a Denon DL-S1 it sounds off.with the Denon the whole image is projected more distant, overly spacious/reverb as if in a church, and lacking some bass. Using the Pearl in MM mode with the Denon AU-S1 (SUT) sounds great and restores the balance and imaging. Could a different opamp or setting achieve the same result as using the SUT ?
Had it at 100ohm, however perhaps I should have used a different setting. Hagtech site mentions that, with the SUT in place, the cartridge sees:
Phonostage: 47k, Turns Ratio: 13, Loading = 278.1 ohms.
Piccolo Zero
The Piccolo Zero is an active transimpedance gain stage meant to replace an SUT. Gain of such a transimpedance stage is given in Ohms (volts per amp), which is also the feedback resistor value. A good starting guess for gain can be made knowing the cartridge's internal resistance (plus resistance of tonearm wiring) and output voltage:
Resistance: 40 ohms,
Voltage: 0.15mV
Gain = 1333 ohms
I have been slowly reading through this thread, and finally have a Pearl 3 kit due to arrive within a couple days. The discussion here has been very helpful.
My main turntable is an old school VPI HW19 Mk II (w/ lead-lined acrylic platter, acrylic & stainless armboard) fitted with a Linn Ittok tonearm. It currently sports a Rega Exact cartridge, and I plan to upgrade to a Hana SL.
This looks like it will be a fun build. I was originally going to try to squeeze everything into a single chassis with a metal partition separating the PSU, but decided to switch to the Modushop two chassis kit. I am unclear which of the extra parts will be included with the chassis kit. Perhaps the build guide could offer a few words to clear this up.
Nice table! I suspect you’ll be very pleased at the sound of the Hana vs. the Rega.
The build document in the first post lists what is in the pioneer kit, also there are photos of the contents.
The Modushop chassis is just the chassis pair, I.E., the 2 boxes with the custom front/back/bottom panels.
If you have the Pearl 3 kit and the Chassis, you’ll need all the connectors and jacks and doohickeys that mount to the chassis, (RCAs, standoffs, 3-pin XLR, 4-pin XLR, ground post, cable gland, switch, power entry module, etc…) wire/cable, and all the PCB stuffings for the power supply board. Randy’s Group buy is a great source for the PSU parts - https://www.diyaudio.com/community/...o-crcrc-power-supply-parts-kit.406461/page-12
Rega cartridges are certainly good, the Hana, well I am using the Umami Bluesound of the Hana vs. the Rega
. The SL/ML are very similarly voiced, very nice!I've completed my build and one channel is working perfectly–the other is silent. The board is powered up properly so I'm guessing it's the signal path. Input and output wiring is fine, and I've checked all of my solder joints and they look good. I'm not sure what next steps I need to go through to check the board, and what, exactly, I should be troubleshooting. Any guidance would be greatly appreciated.
It probably doesn't need to be said here but, standard troubleshooting when 1 channel is out:
Start at 1 end of the signal chain and swap channels moving forward or back to see if the problem switches channels. I usually save swapping cartridge lt->rt for the last, hopefully not needed
Start at 1 end of the signal chain and swap channels moving forward or back to see if the problem switches channels. I usually save swapping cartridge lt->rt for the last, hopefully not needed
Did you swap rt and left channels?Pearl are all correct
I've attached three photos. The single board is the faulty one in question. I've also included photos of the interior of the enclosure with both boards and a closeup of both boards. In each of those, the board on the RIGHT is the faulty one.
Attachments


- Home
- Amplifiers
- Pass Labs
- Pearl 3 Burning Amp 2023