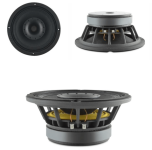
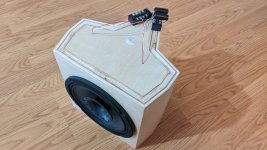
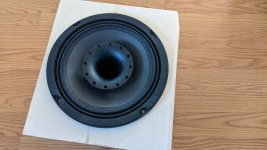
Sica 8C2CP coaxial horn measurements. Not the greatest measurements but I couldn't find any when I looked so decided to post what I have in case it helps anyone else. I put it in a box I had that already had an 8 inch woofer cutout so the woofer is probably the least trustworthy measurement. Use the Sica published specs instead. Also, I used a B&C DE111 compression driver not a full size CD. Unfortunately, you can't remove the horn. It's glued in. I'd like to remove it and replace it with a home HiFi friendly horn. My favorite part about this coaxial is that it allows you to use any 1 inch compression driver you want. I 3D printed a bracket to attach the B&C DE111. I'd like to be able to try the B&C DH350 (1kHz crossover) on it when it becomes available. If I can figure out how to remove the plastic horn I'll print a custom horn for it.
If anyone has advice on how to cut - or press? - the horn out please let me know. Thanks.
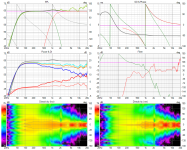
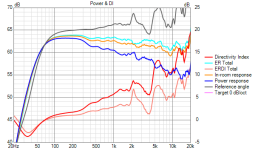
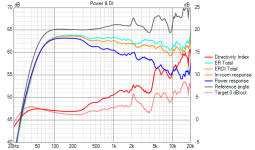
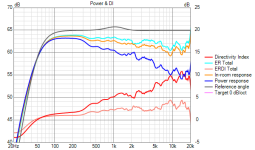
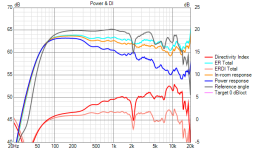
0, 10, 20, 30 degree Sound Power/DI (Equalized at 20 degrees)
Normalized polars, Hor/Ver
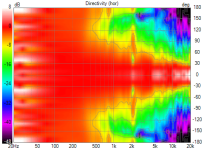
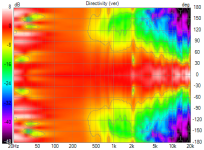
Horn only, Woofer only
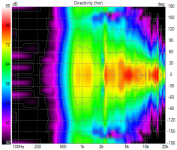
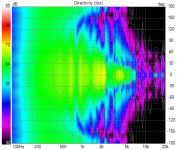
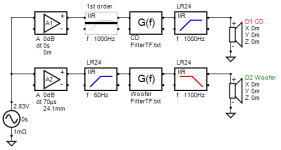
REW measurements: Horn (w/ two 33 uf capacitors in parallel), Woofer (bad results due to my enclosure)
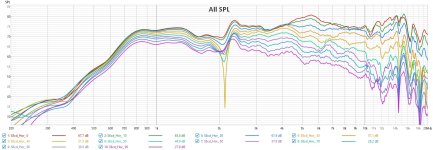
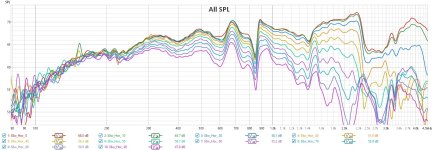
REW Horn normalized at 10 degrees.

REW Horn normalized at 20 degrees.

If anyone has advice on how to cut - or press? - the horn out please let me know. Thanks.


0, 10, 20, 30 degree Sound Power/DI (Equalized at 20 degrees)


Normalized polars, Hor/Ver


Horn only, Woofer only


REW measurements: Horn (w/ two 33 uf capacitors in parallel), Woofer (bad results due to my enclosure)


REW Horn normalized at 10 degrees.

REW Horn normalized at 20 degrees.

Attachments
Last edited:
Hi, have you tried to contact Sica if they could provide some details of the glue for example?
If you need to remove it by force, the holes on the horn flange allow to get good grip with custom tool, attach a long leverage handle and crank it of. Long enough handle and you'd get lots of torgue and it either shatters to pieces or the glue fails. 3D printed tool for good grip, or just long wood plank with some bolts through. But, there is great risk to rip the cone when it goes Perhaps use wood plank like propeller blade, attach middle to the tool/horn, so that the cone is better protected when it gives. Still there is chance to get debris / damage to voice coil so even more elaborate jig might be needed.
There might be some glue residue left on top of the pole piece which you'd need to remove and again danger to the voice coil. Then you must glue your own waveguide in which is another process to get centered and so on. So, quite lot of work. Have you tried to find a coax that has the horn attached with bolts?
If you need to remove it by force, the holes on the horn flange allow to get good grip with custom tool, attach a long leverage handle and crank it of. Long enough handle and you'd get lots of torgue and it either shatters to pieces or the glue fails. 3D printed tool for good grip, or just long wood plank with some bolts through. But, there is great risk to rip the cone when it goes
There might be some glue residue left on top of the pole piece which you'd need to remove and again danger to the voice coil. Then you must glue your own waveguide in which is another process to get centered and so on. So, quite lot of work. Have you tried to find a coax that has the horn attached with bolts?
Last edited:
Beyma makes coaxials with removable horns, however, you're stuck with their compression driver. I would like to use my own compression driver so I can print the internal ring down to the phase plug exit. Too bad Sica didn't make it removable.
In addition to pressing it out, I was also thinking about drilling it out with a hole saw blade on a drill press. But I'm not sure what I'd run into.
In addition to pressing it out, I was also thinking about drilling it out with a hole saw blade on a drill press. But I'm not sure what I'd run into.

