The Plinth has the role to manage energies being produced.
Some are using Methods such as Mass to Damp the Energy, (soak it up, minimising the distribution to other parts not needing to receive produced energies), there are Polybentonite Resin DIY Plinths produced that do this effectively and are seen in use within this thread on SP10's. The same material can be found DIY Produced on other TT's.
Resins are used by other TT Manufacturers and will share similar traits on how they impact on the end sound.
Some are using dissipation as a means to channel produced energies effectively/ efficiently away and dispersed.
(Dispersal as a method can minimise the amount of energies being stored, hence able to be transferred to other parts not needing to receive produced energies).
From an Engineering Point of View, the Phenolic Resin Impregnated Densified Wood is with properties that when measured are ones as good as optimised for achieving both the above and much better than typical selected Plinth Material.
Rainer Weber the owner of Kaiser Speakers has a substantial Career in Engineering, he describes P'holz in a Link below.
To add lib on Rainer's description:
A wood used for a Phenolic Resin Impregnated Densified Wood, is put through a process that leaves it Delignified.
This process removes all the natural Phenolic Materials in the wood that are impermeable and resilient to force.
The Delignified material is improved in the properties of being malleable and compressible.
The Materials removed through Delignifying the wood, also leaves enlarged cavities within the structure of the wood, making the Synthetic Phenolic Resin able to fully impregnate the entirety of the Cavities when submerged in resin in a High Heat Vacuum Chamber.
The compression of the wood is achievable with the force used as a result of the delignifying process.
Less Loss in the Link clearly shows the merits of P'holz as a material.
Similar Measurements as Less Loss for P'holz and P'mali EV6 were made known nearly 20 Years past in the UK, which is possibly the foundation to the growing trend.
I have seen recently that the individual supplying measurements for P'holz similar to the Less Loss method with a sample size, has most recently made known measurements for Plinth Dimensions. The Damping and Dissipation is seemingly more attractive, I intend on making a direct inquiry about this most recent data.
Note: As in all things Audio System Building.
Densified Wood is a material that has become an attractive material to a selection of individuals through their experiencing it in use, which one might suggest is the best method to form a assessment of it how it can make an impression.
A selection of individuals reporting on a good impression made, does not mean that to all individuals, the use of D'wood will have the same impact and create the good impression. As in all things Audio, the individual has an attraction to differing distortions.
If dedicated to the Journey of discoveries with Audio, where the individual gets on and off the Bus, in relation to finding their preferred distortion stop, or having found their Stop where preferred distortion has been found, is their unique Journey.
When the Big Brands such as Linn adopt Densified Wood, as they now have. There will be a lot of convincing to potential customers taking place around the Globe, strongly suggesting that densified wood is now critical to having the ultimate experience from a TT and the Customer has now arrived at Journey's End.
https://www.lessloss.com/page.html?id=80
https://www.monoandstereo.com/interview-with-rainer-weber-of-kaiser-acoustics/
PLEASE stop posts about sprung chassis TTs. So many threads on this whole site have been made almost impossible to follow threw off topic posts which give rise to nothing but confusion and difficulty in following the main theme. Incidentally the real reason that Linn was so successful was due to marketing - not performance and SQ.]
I agree that it is nice and fun to do things on your own but it is well known that hifi is now a hobby for elderly people born when these same people were children or teenagers.
This is to say that looking for Formula 1 performances for people over 50/60/70 with physiological hearing loss not even comparable and comparable to a boy doesn't make much sense; better to enjoy music for the little time left to live... my 2 cents.
This is to say that looking for Formula 1 performances for people over 50/60/70 with physiological hearing loss not even comparable and comparable to a boy doesn't make much sense; better to enjoy music for the little time left to live... my 2 cents.
Thanks to 6L6 and JP, I'm joining the SP-10 owner's club - it is supposed to arrive next Monday. It is a bare chassis in need of a plinth and arm, so I'm just starting to pore over this long thread, and Jim is sharing plenty of information to me. I might possibly build my own plinth, but so far haven't decided on the materials. Also, I haven't yet found any source of the resin impregnated plywood being discussed. Since we have several nice turntables, I'll take my time to do this right and make it a really nice turntable system.
@GKTAUDIO IIRC @donhughes111 bought Permalli for an SP10 plinth project. Hopefully he'll chime in and can tell you where he bought it in the USA.
The alternative is @analogadikt can supply Permalli CNC cut out of India. His pricing was pretty competitive with what I could buy locally even with shipping.
The alternative is @analogadikt can supply Permalli CNC cut out of India. His pricing was pretty competitive with what I could buy locally even with shipping.
Could this be a lead to inexpensive densified wood?
https://www.hartco.com/assets/content/sites/4/Hartco-DogwoodPro-SellSheet.pdf
If the veneer is available?
M
https://www.hartco.com/assets/content/sites/4/Hartco-DogwoodPro-SellSheet.pdf
If the veneer is available?
M
Thanks, @Mike56 - I'll look into this.
The turntable arrived a couple of days earlier than expected, so I've been starting inspection and evaluation. This is a 100V Japanese version. Very clean chassis, minimal corrosion. The platter is pretty clean, with only very slight surface corrosion, so since my lathe has enough swing, I'll be making a clamp plate for my lathe so I can clean up the surfaces while protecting the profiles of the platter.
I'm starting in on the power supply first. The smaller electrolytic caps were replaced at some time with some non-stock values of no-name caps, so I'll be replacing all of those with whatever is recommended by those with experience with these 'tables. The main filter cap was not replaced, and I have seen a wide range of replacement values used by others - from stock at 1,000uf to 6,800uF, which seems quite excessive to me for this circuit. At this time, it doesn't appear that any other components require replacement in the PS.
Next move will be to open up the turntable, inspect and replace the electrolytics on the boards.
This from JP has a great rundown of the process.
Here are my Mouser projects:
PSU
Deck
Don't just order them, trust but verify—unless you want some duplicate parts (I was also ordering qty for more later)—I ordered a couple of different caps for some of the PSU replacements to see what would fit, while being higher spec as detailed by JP in the post linked above. Most of the parts just follow what JP recommends which exceed the specs and likely will last longer. Had I known how simple it was to do this job—I wouldn't have waited two more years since I bought it to do the refresh (unit was born in 1976, I bought it from a woman who was 8 when her father brought it home, she remembers the day, cosmetically it's flawless except for a perfect scratch in a arc from a stylus drag—which I love and respect from a historical perspective, they played mostly 78s in their setup)—it was under 1.5 hrs for me to do the recap on deck and PSU and I'd never taken any of this apart before. The setting of the table speeds is next—and that's much more complex IMO since you need a way to run the table level and get under it at the same time—which is why someplace I saw some insane but also totally sweet plans for building a service mounting jig (in the service manual?).
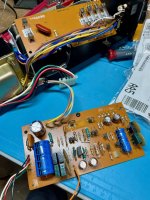
Funnily—I was talking to 6L6 one day and he mentioned "vented" caps... at the time I'd personally never seen what that looks like—he said, go grab your SP-10 PSU and open it—and I did, while talking to him... and yes... right there—vented caps! Cool! That's what lit the fire to dive in immediately—thankfully no evidence of venting in the deck itself...leaking an botching traces...
The attention to detail with all the protected legs of various parts I found remarkable. The random shots below are after cap replacements. No issues, all voltages check out. Timings are off (except for 78rpm!), but that's the next step. This is my second SP-10 so there's no hurry for me.
I like that I found (JP) a PN for a proper axial style cap for the cap that's top most right...other repairs I've seen, including my daily use deck which I didn't do the work on, use radial with heat-shrinked spaghetti leg arrangements. Only outlier is what does one do to replace the often missing knobs on the PSU power switch? I wonder if a knob from an electric guitar pickup selector would fit?
Have fun!

Here are my Mouser projects:
PSU
Deck
Don't just order them, trust but verify—unless you want some duplicate parts (I was also ordering qty for more later)—I ordered a couple of different caps for some of the PSU replacements to see what would fit, while being higher spec as detailed by JP in the post linked above. Most of the parts just follow what JP recommends which exceed the specs and likely will last longer. Had I known how simple it was to do this job—I wouldn't have waited two more years since I bought it to do the refresh (unit was born in 1976, I bought it from a woman who was 8 when her father brought it home, she remembers the day, cosmetically it's flawless except for a perfect scratch in a arc from a stylus drag—which I love and respect from a historical perspective, they played mostly 78s in their setup)—it was under 1.5 hrs for me to do the recap on deck and PSU and I'd never taken any of this apart before. The setting of the table speeds is next—and that's much more complex IMO since you need a way to run the table level and get under it at the same time—which is why someplace I saw some insane but also totally sweet plans for building a service mounting jig (in the service manual?).
Funnily—I was talking to 6L6 one day and he mentioned "vented" caps... at the time I'd personally never seen what that looks like—he said, go grab your SP-10 PSU and open it—and I did, while talking to him... and yes... right there—vented caps! Cool! That's what lit the fire to dive in immediately—thankfully no evidence of venting in the deck itself...leaking an botching traces...
The attention to detail with all the protected legs of various parts I found remarkable. The random shots below are after cap replacements. No issues, all voltages check out. Timings are off (except for 78rpm!), but that's the next step. This is my second SP-10 so there's no hurry for me.
I like that I found (JP) a PN for a proper axial style cap for the cap that's top most right...other repairs I've seen, including my daily use deck which I didn't do the work on, use radial with heat-shrinked spaghetti leg arrangements. Only outlier is what does one do to replace the often missing knobs on the PSU power switch? I wonder if a knob from an electric guitar pickup selector would fit?
Have fun!
Attachments
Last edited:
Patrick! Hey, thank you for that excellent, helpful post. I'll study JP's info and pay attention to your comments. I also would prefer to use good axial caps where they were originally used. Fortunately, guitar amp building/repair has resulted in me having a bunch of good axial caps on hand, and good suppliers.
Cheers,
Greg
Cheers,
Greg
Rather than chasing axial caps, use caps in the PS that have high ripple current vs life expectancy. When I service a TT I up-rate the voltage at least 20% and temp spec to 105deg I also check the ripple current spec and buy caps with the highest life expectancy. Most of these caps are radial so I use a dab of hot glue to hold them to the PCB and bend the leads so they are against the PCB.
I would not go blanket replacing caps in the TT this is something that has been advocated by people on forums with no formal electronic qualifications. NO professional electronics tech would advise this course of action. I would replace all of the electro caps in the PS except maybe the large chassis mount, I've only replaced this large cap once when someone else replaced it and didn't do a good job which subsequently caused the SP10 to fail.
My SP10 still has all of the original caps in the TT including the motor drive C2,C4 & C6. Although I do replace these for people who bring me an SP10 for service. Visually inspect everything and replace parts that have signs of failure. The caps in the TT fail because the PS was never serviced which can apply significant ripple to the voltage rails in the TT which these small caps were not designed to take. Tel tail signs are bulging tops and/or signs of leaking.
Hope this helps..
Thank you for your comments, @warrjon. My normal practice with gear I've repaired and restored has been to use 105C radial caps with the proper characteristics that may or may not include the highest life expectancy. Reading datasheets and doing testing using my good 5-digit 20-200kHz LCR meter (TH2832) have shown me that high quality radial caps are often better performing than axial caps. However, where high quality axial caps are available and where a circuit is as old as this is, my thought was to replace the axial electrolytic caps in-kind, unless performance of radials far outstrips the axials.
What I've also found by LCR testing, is that even when caps are not leaking or bulging, after 40 years there is a high percentage that simply don't perform well anymore, which isn't surprising in my view. I've worked on a number of large amplifiers with 35-year old main filter caps that still measured OK, and in some cases, didn't replace them, but in others, found that new caps measured significantly better. Smaller caps are much more likely to be faulty in all of the gear that I've worked on, so given the age of the turntable, it doesn't cause me concern to replace all of the electrolytics even in the turntable boards.
I've got 35-40 year test instruments with what were once top-quality large can capacitors that have required replacement to bring the performance if the instrument back within specifications, and some that are still satisfactory. However, I've just run across too many small value and lower voltage caps that are clearly at the end of their service life.
I've yet to open up the turntable base, but the PS caps that were replaced are not satisfactory to me, and the radial cap that was used instead of the factory axial was installed with a lead extension with no insulation, so I'd prefer to start with high-quality caps with the best characteristics than leave them. Once I open the turntable, I'll do a close visual inspection, but given the age of the turntable, will almost certainly replace the electrolytics, though I will test the ones I remove to add to my measured results of decades-old caps, but again, thank you for your comments.
The setting of the table speeds is next—and that's much more complex IMO since you need a way to run the table level and get under it at the same time
it is enough to build a kind of stool like this....
Nice, @Pitrus. I made something similar to work on our Micro Seiki BL-91, and two more elaborate, heavy-duty ones to build a couple of tube mono blocks, as well as one for building tube guitar amps. These cradles really make these jobs easier.
Beautiful finish on the chassis!
Beautiful finish on the chassis!
Beautiful finish on the chassis!
Many thanks,
")
I completed some over time in different colors which I then sold, this was the one I enjoyed customizing the most (even the Technics speakers were painted the same color and with a super glossy finish).
The search for the green micro LEDs to insert them into the button panel and the stroboscope was a challenge (found on the other side of the world), as was the study of a method to personalize the original badge....but when the work turns out perfectly there is enormous satisfaction; if you then add a micro seiki CU 180 or Tenuto mat top plate and a plinth in shape and curvature very similar to the original SH-10B3 plinth in solid wood Padouk (as seen on the Artisan Fidelity website for sp-10R) the chromatic spectacle is guaranteed.
the silver in the background of the badge is similar to the color of the groove on this turntable which on the original SP 10 is black.
Last edited:
- Home
- Source & Line
- Analogue Source
- The Incredible Technics SP-10 Thread