

Print A3-sized schematics from A4 printer (Windows/OSX/Linux)
Posted 8th April 2016 at 02:10 PM by autopoiesis
The situation
1. You have a schematic in PDF format, but it's hard to read when printed on A4
2. Only A4 printer available
3. Printer drivers can't solve the problem
4. A3 size wanted (ie two sheets A4, with some overlap for taping together)
5. Following (free/OSS) programs are available:
GIMP
PosteRazor
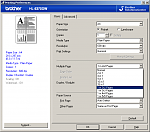
To illustrate point 3: my printer will print multiple pages per sheet ("2 in 1" - ie reduce), or print an A4 page on (n x n) sheets (A2 - four times the area), but there's no option to double the size to A3. A4 too small; A2 too big
About GIMP - https://www.gimp.org/
Open source image manipulation program - sort of free Photoshop, plenty of info around.
About PosteRazor - PosteRazor - Make your own poster!
PosteRazor is designed to split image files into [n by m] individual pages in a single PDF file, on whatever page size your printer can handle. These can be taped to form a poster (hence the name) up to 5m(!) wide.
Sounds great, and I'm not aware of any other free software that does this.
Input file formats are documented at PosteRazor - Make your own poster!, but they're basically limited to raster image formats.
The problem
Unfortunately, PDF (which is more of a container, than an image format) is not included, and many schematics are exported/published in this format.
Also, I've just come across an odd situation, where a multi-page schematic in PDF actually comprised vector data - much like plotter data - which presumably was directly embedded when the PDF was created. The file dates from 2001, and the (unknown) schematic program may actually have been designed to plot, not print.
Inkscape (also free) is great for vector graphics, and it will happily import a page from the file, convert the vectors to SVG. Unfortunately Inkscape has a bug where exporting to PNG (which PosteRazor can read) is *always* anti-aliased, and pretty nasty when printed.
The following method gets around this by using GIMP as an intermediate step - extracting a single page from a multiple-page PDF, converting any vectors into bitmaps, exporting as a high-resolution, single-page file which can be posterised by PosteRazor.
The solution
PDF -> GIMP -> PosteRazor -> Print up and tape. [Repeat per page]
This method should work (no guarantee) to posterise any sheet from any PDF, and provides pretty readable text, even if the original text was tiny.
Both GIMP and PosteRazor are available for Windows, OSX, and Linux. Tested on Win7 x64, GIMP 2.8.14, PosteRazor 1.5.2 (current versions as of 2016-04-06).
Method detail
A. Open GIMP, no document or image loaded
B. Import single page from PDF into GIMP (drag PDF file onto GIMP from Windows Explorer)
- To preserve resolution (esp when printed on A3), a high resolution (1200dpi) should be chosen, twice the printer's physical limit is probably a waste of time, though.
- To avoid nasty print artefacts, disable Anti-aliasing
- To avoid crashes, import a single page at a time. At 1200dpi, GIMP uses a lot of memory for the images.
- If necessary, trim the image to remove superfluous white space surrounding the image
C. Export from GIMP as GIF (File | Export, or CTRL+SHIFT+E)

Note: To preserve the PDF import settings (dpi, anti-aliasing), leave GIMP open after export - it may revert to defaults if closed completely and reopened.
Close the image in GIMP (File | Close, or CTRL+W)
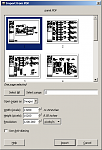
D. Open the GIF file in PosteRazor and follow the five-step wizard:
Step 1: Select source image (ie the GIF) - click the yellow folder icon
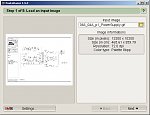
For some reason, GIF is now 72dpi and three feet wide, but this gets correctly scaled, in the end.
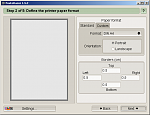
Step 2: Define the printer paper format and orientation (for me, A4, portrait)
Step 3: Set overlap positions (defaults to Bottom Right), and overlap depth (default 5mm)
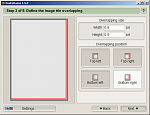
The red lines are where you'll be taping.
Step 4: Define poster size. For A3, this is 2 A4 sheets wide, when in portrait.
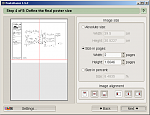
There are scaling options here, too - expermient as required. For my example, the original PDF page size was Letter, not A4, so the aspect ratio is slightly different. Although pages 3 and 4 will be created, I won't print them.
Step 5: Define export filename (export format is PDF)

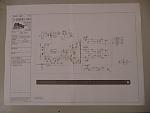
End result:

E. Print, slice off the physical margin from one sheet, and tape. Done!
It looks complicated, but after a few sheets, it takes << 1 min per page. Planning the sheets to extract, and preparing filenames and paths on a spreadsheets enables copy/paste into the various programs. For me, it's faster than manually slicing an image across sheets. PosteRazor does a good job of aligning paper edges and printed images, so it all lines up nicely.
Alternatively, print in duplex on a single sheet, which you can flip, if that works better for you.
Hope this is of use,
AP
1. You have a schematic in PDF format, but it's hard to read when printed on A4
2. Only A4 printer available
3. Printer drivers can't solve the problem
4. A3 size wanted (ie two sheets A4, with some overlap for taping together)
5. Following (free/OSS) programs are available:
GIMP
PosteRazor
To illustrate point 3: my printer will print multiple pages per sheet ("2 in 1" - ie reduce), or print an A4 page on (n x n) sheets (A2 - four times the area), but there's no option to double the size to A3. A4 too small; A2 too big

About GIMP - https://www.gimp.org/
Open source image manipulation program - sort of free Photoshop, plenty of info around.
About PosteRazor - PosteRazor - Make your own poster!
PosteRazor is designed to split image files into [n by m] individual pages in a single PDF file, on whatever page size your printer can handle. These can be taped to form a poster (hence the name) up to 5m(!) wide.
Sounds great, and I'm not aware of any other free software that does this.
Input file formats are documented at PosteRazor - Make your own poster!, but they're basically limited to raster image formats.
The problem
Unfortunately, PDF (which is more of a container, than an image format) is not included, and many schematics are exported/published in this format.
Also, I've just come across an odd situation, where a multi-page schematic in PDF actually comprised vector data - much like plotter data - which presumably was directly embedded when the PDF was created. The file dates from 2001, and the (unknown) schematic program may actually have been designed to plot, not print.
Inkscape (also free) is great for vector graphics, and it will happily import a page from the file, convert the vectors to SVG. Unfortunately Inkscape has a bug where exporting to PNG (which PosteRazor can read) is *always* anti-aliased, and pretty nasty when printed.
The following method gets around this by using GIMP as an intermediate step - extracting a single page from a multiple-page PDF, converting any vectors into bitmaps, exporting as a high-resolution, single-page file which can be posterised by PosteRazor.
The solution
PDF -> GIMP -> PosteRazor -> Print up and tape. [Repeat per page]
This method should work (no guarantee) to posterise any sheet from any PDF, and provides pretty readable text, even if the original text was tiny.
Both GIMP and PosteRazor are available for Windows, OSX, and Linux. Tested on Win7 x64, GIMP 2.8.14, PosteRazor 1.5.2 (current versions as of 2016-04-06).
Method detail
A. Open GIMP, no document or image loaded
B. Import single page from PDF into GIMP (drag PDF file onto GIMP from Windows Explorer)
- To preserve resolution (esp when printed on A3), a high resolution (1200dpi) should be chosen, twice the printer's physical limit is probably a waste of time, though.
- To avoid nasty print artefacts, disable Anti-aliasing
- To avoid crashes, import a single page at a time. At 1200dpi, GIMP uses a lot of memory for the images.
- If necessary, trim the image to remove superfluous white space surrounding the image

C. Export from GIMP as GIF (File | Export, or CTRL+SHIFT+E)

Note: To preserve the PDF import settings (dpi, anti-aliasing), leave GIMP open after export - it may revert to defaults if closed completely and reopened.
Close the image in GIMP (File | Close, or CTRL+W)
D. Open the GIF file in PosteRazor and follow the five-step wizard:
Step 1: Select source image (ie the GIF) - click the yellow folder icon

For some reason, GIF is now 72dpi and three feet wide, but this gets correctly scaled, in the end.
Step 2: Define the printer paper format and orientation (for me, A4, portrait)

Step 3: Set overlap positions (defaults to Bottom Right), and overlap depth (default 5mm)

The red lines are where you'll be taping.
Step 4: Define poster size. For A3, this is 2 A4 sheets wide, when in portrait.

There are scaling options here, too - expermient as required. For my example, the original PDF page size was Letter, not A4, so the aspect ratio is slightly different. Although pages 3 and 4 will be created, I won't print them.
Step 5: Define export filename (export format is PDF)

End result:

E. Print, slice off the physical margin from one sheet, and tape. Done!
It looks complicated, but after a few sheets, it takes << 1 min per page. Planning the sheets to extract, and preparing filenames and paths on a spreadsheets enables copy/paste into the various programs. For me, it's faster than manually slicing an image across sheets. PosteRazor does a good job of aligning paper edges and printed images, so it all lines up nicely.

Alternatively, print in duplex on a single sheet, which you can flip, if that works better for you.
Hope this is of use,
AP
Total Comments 0


