It led to a long conversation because it is a useful technique, specially for DIYers.
Commercial manufacturers prefer cold rolled steel sheets, around 1mm thick (#18) because it is strong, cheap, versatile, it can be spot/resistance soldered to build up complex shapes, etc.
But it needs heavy expensive machinery such as mechanical presses, forget getting those at home.
Also custom made dies for different shaped holes.
Any kind of round holes, rectangular for toggle switches, IEC connectors, slots for slider pots, the works.
Inexpensive per finished unit but machinery setup means minimum production of anything is 50-100 units 😲
Steel also requires surface finishing to avoid instant rusting (oiling surface is fine in machinery but not in home Audio equipment) and platers charge for a "minimum batch size", say 50 kg.
So custom making chassis is out of the question for DIYers.
On the contrary, Aluminum is your friend: softer, relatively easy to work with, you can use hand tools or a home/desktop CNC machine, it does not need surface finishing except for cosmetic reasons, VERY DIY friendly.
But it has its own quirks, one of them being cutting tool galling.
Most of the thread has helped to deal with that 😄
Open your belt guard. There's likely to be multi-step pulleys and the belt/belts are moved to change speed. A sticker inside the cover should diagram settingsI went to the website for the vendor I purchased my drill press from several years ago. All three models offered advertise adjustable speed, so I may be wrong in my initial belief that the speed of my drill press is fixed. I will need to dig deeper on this one.
I think you did everything right except not firmly clamping the piece (ignoring speed and feed - nice and slow I reckon).
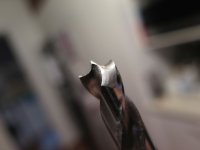
I hand sharpen my drills, so experimented with a different grind for drilling hand held holes in 2mm aluminium and it works quite well - as per photo. But clamped in a drill press is preferred to hand holding for sure. It's interesting reading up on the different grinds for different materials in technical instructions on drill sharpening (although my grind was made up by me based on a wood drill, the thinking being that the outside points would cut the outside of the hole round).
As per Mr Fahey, I'd read that kerosene is a good fluid for alum if you don't have the proper stuff (noting you do...). I've found WD40 is OK.
Attachments
Not yet covered;
When you tighten the drill chuck do it from all three possible chuck key holes. Most only use one hole and are surprised that as tight as they think they got the chuck, when they rotate the chuck 120 degrees to the next hole they can tighten things a bit more.
The traditional lubricant was lard dissolved in kerosene. However there are a number of better commercial products available.
Cutting speeds for different metals are easily found on the WWW https://www.wellsindustrial.ca/Resources/Product specs/DRILL SPEEDS AND FEEDS.PDF
Or
https://www.imperialsupplies.com/pdf/3660-5_F_Drill_Bit_Sheet_Update.pdf
When working sheet metal industrial leather gloves are nice, although the alternative is getting some nice large manly scars. Very rare to loose a finger from a small drill press!
Usually to start drilling a center bit is a good way to start.
These are short, quite stout and will place a pilot hole exactly where you want it.
https://www.amazon.com/Accusize-Ind...MIifX53LTihQMVFUP_AR1s7QRVEAQYByABEgJMBfD_BwE
To position the hole you can use an adjustable square to mark the position.
https://www.amazon.com/Tools-Combin...MImpy9tLXihQMVFFz_AR2m0QE2EAQYAiABEgIHXfD_BwE
You then use a punch to put a precise dent to guide the drill bit. There are both center punches and prick punches. First you use a prick punch that should fit nicely in the scratches from the scribe you used to mark the location. Then the center punch will make a nice large dent the drill can follow.
With a small amount of skill you can drill a hole almost exactly where it is intended.
Usually you start with a small bit around 3mm, then go to 4.5, 7, 10, 15 etc.
The last tip is to put masking tape on the panel before drilling to make sure a burr doesn’t scratch the panel’s finish.
Of course the cautious will count their fingers before and after machining stuff.
Last edited:
Some drill presses have a lid on top that opens to expose the belt drive. There may be multiple sets of pulleys to select a few different speeds....Unless there is some adjustment under the belt guard...
Always use cutting fluid. Supposedly water works for aluminum but it causes your tools to rust, so I avoid it. Denatured alcohol can work too. That's flammable and the fumes eat your brain, so that's not my go-to either. The best is to use actual cutting fluid/oil intended for drilling aluminum. I use Relton A-9: https://www.relton.com/a-9. I bought a small bottle of it some 15 years ago and still use it. You'll find it at hardware stores that cater to industrial folks rather than the home renovators.
Always start with a small drill and drill progressively larger. I often start with 2.0-2.5 mm and work my way up.
I prefer stepped drills even for 10 mm thick panels. Mine starts at 4.5 mm so I drill to that with a regular drill bit. Then work my way up the steps on the stepped drill. The taper between steps is handy as it'll allow you to drill and de-burr in one operation. I then flip the panel over and drill from the back side. I can usually drill through far enough that I get the correct diameter all the way through without much flare on the back side of the panel. If I can't afford any flaring out on the rear of the panel I'll drill as far as possible and remove the last little bit with a file.
Protect the workpiece with some masking tape or similar to prevent scratches on the sides that'll show when the chassis is assembled.
Tom
I just picked up a set of Dewalt Titanium Nitride-coated bits from E-pray. The larger bits have pilot points that can be used with a std center punch mark without chatter - if they are anything like the Black & Decker "Bullet" bits I'm used to, they will excise a nice circle out of a piece of sheet metal with minimal burr cleanup required.
TiN coated bits are definitely worth having. They seem to stay sharp for longer. At least that's been my experience.Titanium Nitride-coated
Tom
For a 10 mm thick plate (it wouldn't be considered sheet anymore), I would rough out the hole with a step bit, or a regular drill bit but with some sort of drill guide/bushing clamped in place, and then use a template with a perfectly round, smooth hole that I can then use a router with a flush trim bit to get dead on.
Hoping to get a nice hole with a drill press in this situation is, well, it's possible but not guaranteed. Milling machines are better for this sort of thing.")
Hoping to get a nice hole with a drill press in this situation is, well, it's possible but not guaranteed. Milling machines are better for this sort of thing.
A few years ago, I tried marvel mystery oil while drilling a bunch of holes in 1/4" plate steel. It worked just fine. I've used it on aluminum without issues too. I didn't know it at the time but apparently it's mainly mineral oil.
A friend who's a machinist swears by neatsfoot oil for aluminum but I've never tried it.
A friend who's a machinist swears by neatsfoot oil for aluminum but I've never tried it.
Some stainless steels can work harden, this makes them "interesting" to drill; the drill has a tendency to harden the steel ahead of itself. The way that works for me is to have a sharp 4 facet point, and go for it. Using a big Harrison lathe probably also helps...Sometimes it's more about what you are drilling rather than what you are using to drill with. Used a cobalt bit once on thick stainless steel. Finally got the depth that I needed but it wasn't done easily.
Don't know how far we want to go with this. I mean there are ways to drill a hardened steel safe with embedded ball bearings or other drill-attacking obstacles (e.g. embedded chunks of silicon carbide). That's not to mention other "traps" to foil drilling attacks. Do we really need to go much further than we already have? For basic drilling, looks like its already been covered pretty well.
Last edited:
- Home
- Design & Build
- Construction Tips
- Drill bit chatters