Very cool threat. I am working on an old Beolab 6000 right now too. I bought them by eBay for 200,- Euro and somebody has changed all 4 woofers before against new ones from B&O. But he forgot all dampers and I think he didn't adjust the voltage for the speakers.
Now I have borrowed a signal generator to do this, but I am a little bit lost of using it. Maybe somebody can help me.
The service manual told me to use a voltage of 100mV and 10kHz for the tweeter and 10kHz for the woofers.
The signal generated can produce 100mVpp (peak to peak) or 100 mVrms. What should I Use?
Last edited:
For the electrolytics in signalpath(and feedback) you use values like on pcb (but film🙂).
What film do you recommend? WIMA MKS2?
I used some Kemet and some Wima, all 5mm leadspacing. Check feedback path for stk, that is easily audible improvement too, 10uF is largest value I recall, Wima, bass might have 22uF now, but I could mix lab4000 with lab6000, you can calculate cutoff frequency and see if it makes sense to use a 10uF on both sides of pcb to get to 20uF, I think I did that in either lab4000 or lab6000 once, not sure if it makes sense 🙂
The glue looks good, nice that it worked out, it is a patience consuming little job, a job from hell if you need to do that all day, for me it would be at least 🙂
thanks for posting this, I friend just gave me a pair that, of course, need woofer surrounds. Bluetooth is the way to go! Not as elegant as your built-in approach, but this little gem works really well: Bluetooth 5.0 Audio Transmitter 3 in 1 USB TV PC Car Receiver Adapter 3.5mm Jack | eBay It's just another cord from the wall, not unsightly and the sound and range are impressive.
Thanks for sharing your work on this. How did the magic eraser turn out as damping material?View attachment 912817
Then glued the surrounds to the housings, I used a liberal amount of glue on the housings as they had a stippled effect moulded into the plastic, I was concerned this would cause air gaps as the glue dried. I fitted 2 of the speakers into one cabinet to test and they actually sound alright, I’m suprised really, they will make ideal bedroom speakers or rear surround speakers.
I've also sourced some materials online which is quite similar to the original, but a little more dense. Not sure how much that'll affect the sound quality.
Also, from this picture, it seems you've damped the entire length of the speaker. I believe the original is roughly just ~60% of the full length, is there any reason why you have done it this way?
I'm new to speaker restorations so don't mind my questions, thanks.
Thanks for sharing your work on this. How did the magic eraser turn out as damping material?
I've also sourced some materials online which is quite similar to the original, but a little more dense. Not sure how much that'll affect the sound quality.
Also, from this picture, it seems you've damped the entire length of the speaker. I believe the original is roughly just ~60% of the full length, is there any reason why you have done it this way?
I'm new to speaker restorations so don't mind my questions, thanks.
You're welcome.
When I found the speakers the surrounds were already perished on all the speakers and as I stripped them down the damping material started to disintegrate so I didn’t/couldn’t test them. The short answer is I don’t have a reference to compare the ones I modified vs standard.
Regarding the damping, yes the speaker only has material damping around 60% of the cabinet. I added damping in all the same places as standard but then also damped the top 3 inches or so. I didn’t damp behind the amplifier section as i don’t think that’s safe, I wanted to leave an air gap. I’m the picture it does look like the whole thing is covered in magic eraser but that’s not the case.
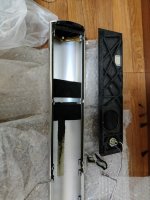
After rebuilding the surrounds I then tested the speakers with 60% damping (as you’ve described it) and something strange happened. I was getting chuffing at the lower section of the speaker and it could be heard coming from the amplifier exhaust (the lower section of the speaker). I then removed all the damping to see if was related to the damping material effecting internal volume but the noise still remained. Air was being squeezed through the white internal foam baffle (there’s a slit in it for the wires to run to the speakers), see image below of white foam section I replaced:
I actually don’t understand why this happened. I had read that changing the surrounds increases the bass so maybe more air is being moved, I’m not convinced this is the case though.
To resolve this chuffing issue I found an old plastic Ikea waste paper bin and used the base section to make a solid plate to replace the foam internal baffle, which I then hot glued into the lower portion of the speaker. I then passed the wires through the plate and hot glued the hole to seal it to prevent any air from escaping to the lower section of the speaker, I also added a foam strip to the top edge (longer straight section) to seal to the front panel once the cabinet is reassembled and screwed together. This actually worked really well and totally eliminated the noise. See images below of part I made:
Thanks, I have the same challenge as you, I don't have the original state to reference against.
I have a few questions hoping you or someone can help opine on:
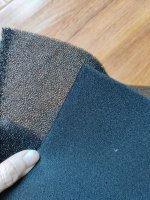
1. I sourced this foam lining material not sure what it was originally for, but I hope it works for my purpose anyway. I got 2 types - you can clearly see that one is more dense than the other, and I think the original black foam lining is somewhere in the middle of these 2. Should I use the lower or higher density one?

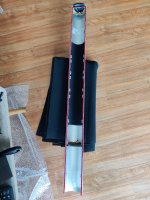
2. I don't know if the area/length of my foam lining is correct here. I also noticed in your pic, you have the white baffle overlapping/sitting on the black foam. I was under the impression that they don't intersect, or should they?

Here's a picture of the original black baffle - maybe it was intersecting some foam lining perhaps had disintegrated and fallen off before I opened it up.

thanks!
I have a few questions hoping you or someone can help opine on:
1. I sourced this foam lining material not sure what it was originally for, but I hope it works for my purpose anyway. I got 2 types - you can clearly see that one is more dense than the other, and I think the original black foam lining is somewhere in the middle of these 2. Should I use the lower or higher density one?

2. I don't know if the area/length of my foam lining is correct here. I also noticed in your pic, you have the white baffle overlapping/sitting on the black foam. I was under the impression that they don't intersect, or should they?

Here's a picture of the original black baffle - maybe it was intersecting some foam lining perhaps had disintegrated and fallen off before I opened it up.

thanks!
Last edited:
- Home
- Loudspeakers
- Multi-Way
- Beolab 6000 - repair, Bluetooth conversion and damping upgrade - Basotect?
