Did a little more digging around and found some of these
as well:
http://www.jensen-transformers.com/datashts/123alcf3.pdf
and:
http://www.jensentransformers.com/datashts/123slcf.pdf
I know I have some Lundahl trannies on some mixer boards
also that I picked up from somebody in England of the X-bay.
I think they were LL1517's?
as well:
http://www.jensen-transformers.com/datashts/123alcf3.pdf
and:
http://www.jensentransformers.com/datashts/123slcf.pdf
I know I have some Lundahl trannies on some mixer boards
also that I picked up from somebody in England of the X-bay.
I think they were LL1517's?
Surface Mount parts LCBPS/LCDPS
Brian, et al.
A friend is soldering up the parts on the power supplies for my Buffalo 32S. When he got to the surface mount devices U1 & U2 and L1 & L2, he felt soldering was not the right thing to do.
He told me : 1) He needs to obtain a special paste for the job; and 2) he needed a "heat embossing" tool to accomplish the job.
My questions are as follows:
1) Is the paste necessary? Any suggestions on sources for the paste, I live in southern California, but I'm told I have to order it from Arizona.
2) Is the heat embossing tool (seemingly a modified hair dryer with a narrow / blade nozzle) necessary/better than simply soldering?
3) might a soldering iron be sufficient/better.
If you can give me simpler instructions without responding to each of the questions, feel free to do that.
Thanks in advance.
Larry
I'm really not good at soldering, but I had no problem with the chokes using a regular soldering iron. Carefully position the choke and solder one corner first, then recheck the position and solder the other three. You need a fine soldering tip to do this, but nothing else.
Kurt
Kurt
I actually do a slight variation on that...
-First melt a small dap of solder on one pad.
-Hold the choke firmly in place with a fingertip or something, and touch the junction of the pad and the terminal to melt the solder. This locks the choke in place.
-It is now easy to go around to the other three pads and solder them with a small amount of solder.
The only key is to have the right temperature for your solder and enough flux to not get a cold joint (dull looking or wrinkled/pointy).
After doing several, it literally takes me about 30-45 seconds per choke. I am your builder can do it with solder.
Chokes and blobs
Russ, Brian and Javin:
Thanks for your support and helpful responses. I'll forward them to my neighbor solder soldier.
My lcbps and lcdps are out of my hands with my neighbor who is taking on the soldering job for me. So I can't look at the board or the part and tell you what I meant to say. I believe the U1 and U2 were intended to point to surface mount chokes, but I don't know. Hope I haven't sent you on a wild goose chase.
Both Javin and Brian's suggestions seem elegantly simple, which makes me and might make Einstein happy, too.
Cheers,
Larry
Russ White said:Ahh the common mode chokes on the power supplies.
I regularly do those with just a soldering iron.
No paste required.
I still can't find U1 and U2.
At first I also did not know how to solder them.
Very easy to solder; just put a very small amount of solder on one of the pads. then hold the choke next to it, reheat the solder with your gun and when it is liquid again, slide the choke into place. now the choke is fixed and you just need to solder the other 3 pads with (again) a very small amount of solder. that's all! no special tools.
Scanspeakman
scanspeakman said:
At first I also did not know how to solder them.
Very easy to solder; just put a very small amount of solder on one of the pads. then hold the choke next to it, reheat the solder with your gun and when it is liquid again, slide the choke into place.
Or you hold the choke in place firmly with a pointy object on top with one hand and take some tin on your iron and solder it.
Chokes and the invisible parts
Thanks for everyone's comments and suggestions. We got the surface mount chokes soldered in and we have continuity.
The parts labeled U1 & U2 are red herrings, sorry, my mistake.
I'm really appreciative of everyone's help. It has made the process, to this point, seam relatively comfortable.
Thanks again,
Larry
Thumpbusters
Brian & Russ:
My boards are almost all done, but we have another small SNAFU. My neighbor may have mixed parts from boards. He has two resistors marked R1 and R2. The Thumpbusters note only R1 on each board. What is the ohmic value for R1 supposed to be?
Also, what is the relay polarity indicator on the thumpbusters board?
Also, we have two green LEDs. Do they belong on the main DAC board.
FWIW, there really is a neighbor here. He's a ham operator who repairs 50s and 60s ham radios and he's been really generous in helping out, though he has been going through a series of surgeries and appears distracted. So, I hope this is the last of my dumb questions. In advance, thanks for letting me ask dumb questions here.
Larry
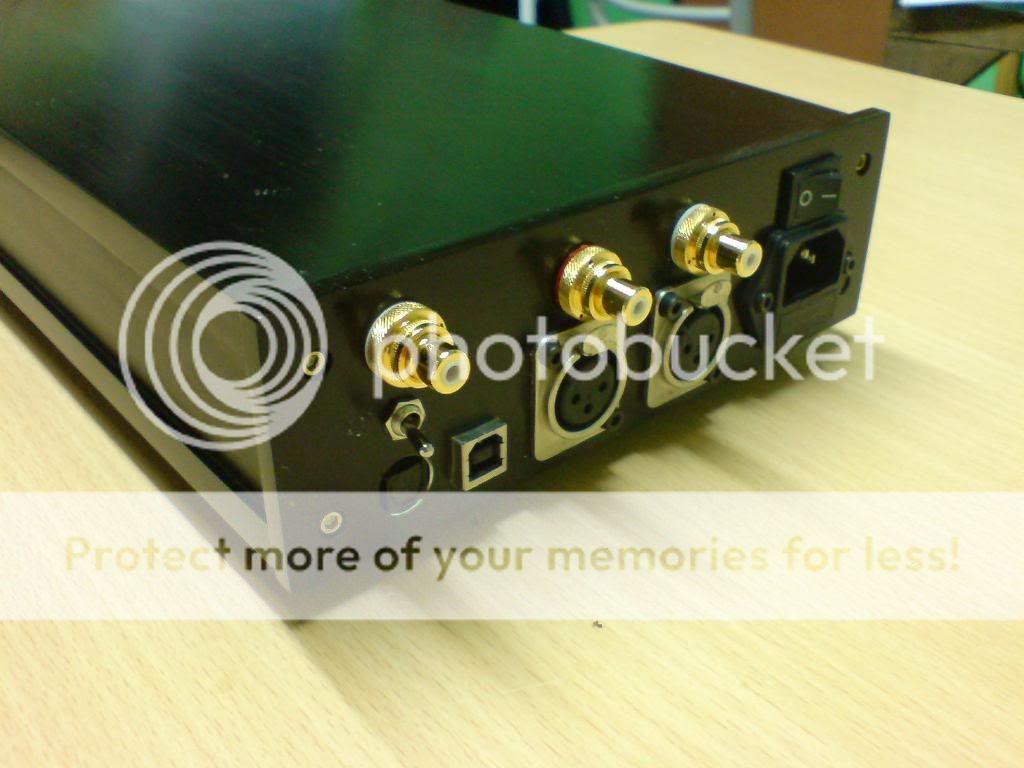
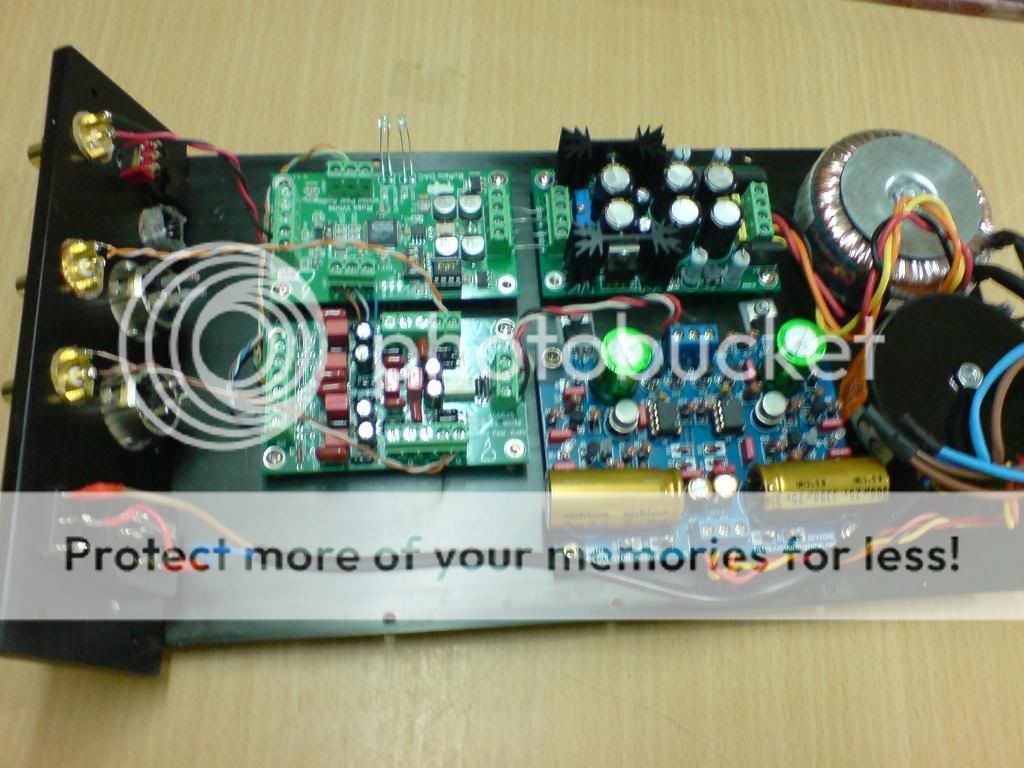
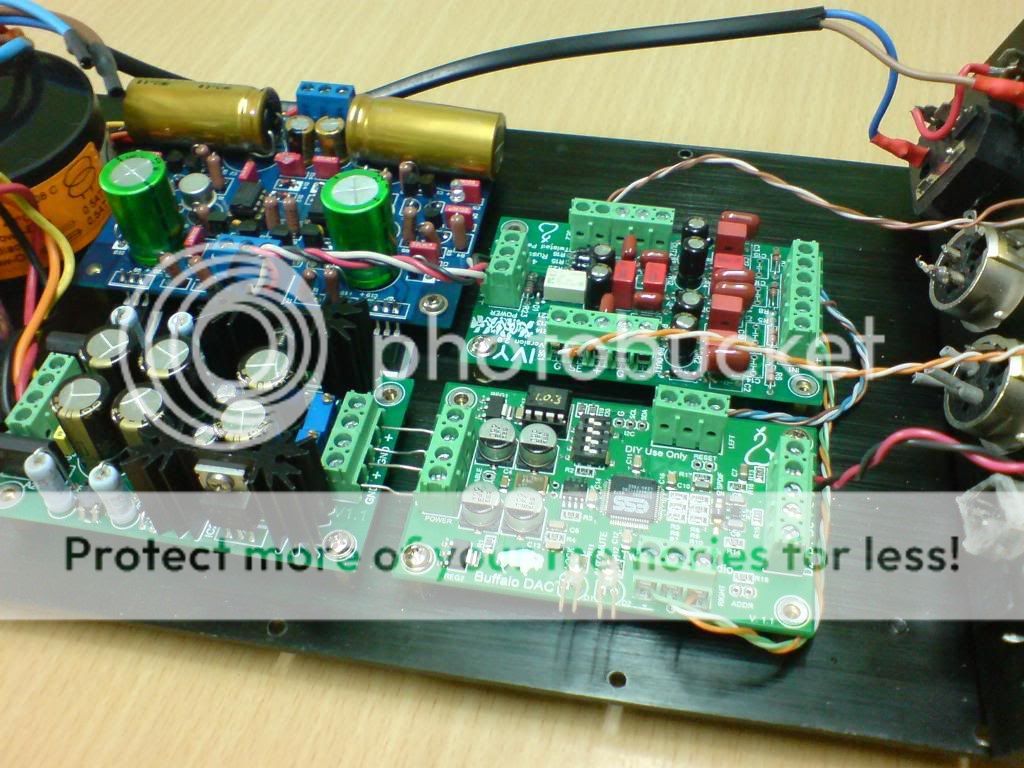
Re: Buffalo24 dac finished
Looks like a Sulzer regulator for the IVY? What was the souce of the pcb?
xaudiox said:Hi Guys,
I just want to share my build.. I bought the buffalo dac last year.. but only finish it today after working on it the whole day..
thanks
Looks like a Sulzer regulator for the IVY? What was the souce of the pcb?
Thanks, i bought the regulator from Audiotek168 of ebay. the seller is no longer registered.
You can check the schematic here: http://www.diyzone.net/images2/MINI0113SCH.pdf
You can check the schematic here: http://www.diyzone.net/images2/MINI0113SCH.pdf
yea i bought a bunch of stuff from him before he went south.
Great deals, i hated to see him go but he ended up stiffing a lot of people for lots of money.
Like to find a good source for reliable and worthy/affordable
Ps boards/kits.
EDIT: hey cool , thanks for the link to the schematic.
Great deals, i hated to see him go but he ended up stiffing a lot of people for lots of money.
Like to find a good source for reliable and worthy/affordable
Ps boards/kits.
EDIT: hey cool , thanks for the link to the schematic.
you can find more info (sch's/bom) of audiotek kits here: http://www.diyaudio.com/forums/showthread.php?threadid=140195
I'm building a six channel TP Buffalo 32 DAC and have been searching for an appropiate R-Core transformer for several weeks. This weekend I found these in Hong Kong.
http://cgi.ebay.com/50W-R-Core-Tran...34.c0.m14.l1262&_trkparms=|301:1|293:1|294:30
I selected the R26-76 which appears perfect for the +5V and +/-15V supplies.
The advantage of an R-Core transformer are very low noise coupling, low mechanical noise, and very low magnetic radiation.
Tom
http://cgi.ebay.com/50W-R-Core-Tran...34.c0.m14.l1262&_trkparms=|301:1|293:1|294:30
I selected the R26-76 which appears perfect for the +5V and +/-15V supplies.
The advantage of an R-Core transformer are very low noise coupling, low mechanical noise, and very low magnetic radiation.
Tom
- Status
- This old topic is closed. If you want to reopen this topic, contact a moderator using the "Report Post" button.
- Home
- More Vendors...
- Twisted Pear
- Buffalo DAC (ESS Sabre 9008)