
Member
Joined 2009
Paid Member
Excellent!
I build micro-towers with only 1 driver per enclosure and it turned out pretty good. I think you are going to enjoy this project.
I build micro-towers with only 1 driver per enclosure and it turned out pretty good. I think you are going to enjoy this project.
How long? The EL70 ran out over a decade ago.procrastination
What kind of kit will you be using them with?
I really like the EL70, one of my keepers has them, and the last 6 EL70eN are awaiting new owners (4 of them in the very first set of Castle microTowers (the other in Compact Floorstander)
dave
Well I bought the microtower package from CSS in 2011(?). Just put two of the drivers in mMarKel-70s a year or so ago.
So say 11 years???
So say 11 years???
Member
Joined 2009
Paid Member


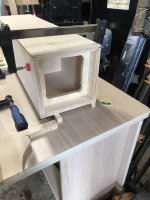
Dry fitting of the cabinet. 10° top. I decided to rabbet the edges to help with alignment. However I did this in two stages and moved the router fence in between. SO not as crisp a result as I wanted and the visible edges won't be tight, but the joint inside is tight. Also, the interior depth is off slightly compared to width by about an eighth inch. Second pic shows the batten to attach the bottom.....in case I get into the stuffing adjustment phase.
Attachments


Time to get back at it. Felt arrived. First obstacle was fitting around the installed braces. Not much room. Using wood glue to attach. Traced speaker cut out onto painters tape and then sliced out the middle. Will do the second speaker tomorrow.


Productive weekend (for me). Got the last sides glued on. Trimmed the overhangs with the plane and routed the openings at the base.
Wow. Feeling a bit like Rip Van Winkle. Virtually no work done until September. Finally got the drivers fitted and wired in series. Added a small round over to all edges instead of a chamfer to hide some of the inaccuracies in the edges. Driving them with an NAD D3020 v2.
I am very impressed with the bass response. Definitely 40Hz available. They are set back about 4 inches from the front edge of the desk. The stereo image with vocals floats about eye level and dead center. Thankyou Dave and Chris for the plans and everything else you have contributed to this site!
I am very impressed with the bass response. Definitely 40Hz available. They are set back about 4 inches from the front edge of the desk. The stereo image with vocals floats about eye level and dead center. Thankyou Dave and Chris for the plans and everything else you have contributed to this site!
Attachments

Very impressed with your castle effort! ...especially the full-monte bracing you did, just like the plans. I tend to skimp and usually only do a front-to-back bracing, but even that takes forever using a drill press with a circle saw...great job!
Thanks Toobhed. Next step is to put some colour to the side panels and then a protective finish.


- Home
- Loudspeakers
- Full Range
- Castle microtower build with EL70