You guys beat me to it...
Mine is playing happy tunes on this its celebratory day ... and it might have to process Monster Mash later. Please ignore streamer. To lazy to put in proper box (for now).

Of course... my back panel.

@chromenuts - just saw the title of your other thread re: health a minute ago. Wishing you all the best.
Mine is playing happy tunes on this its celebratory day ... and it might have to process Monster Mash later. Please ignore streamer. To lazy to put in proper box (for now).
Of course... my back panel.
@chromenuts - just saw the title of your other thread re: health a minute ago. Wishing you all the best.

Too many health issues.
bummer
I'm rootin' for ya, whatever is in case
^ Oh! I got the fancy-schmancy proper knob from our 'talian friend. Just been (again) too lazy to swap out. I'll get to it .... eventually. I know it will make it sound even better and make remote work better. I don't think I've touched the knob since the day I put it in the rack.

I had hoped to have head bobbin' music by Halloween, however had hesitation hurdles.
Two turtle towers posted on a Pumpkin.

My current conundrum is how to connect six primary conductor pairs all up to the AC power entry module. I plan to run these below the bottom plate. What do folks suggest for connecting the plethora of paralleled primaries proceeding to PEM?

Six secondaries surely will be super simple setup.
My layout is gonna be very much like @ItsAllInMyHead

Two turtle towers posted on a Pumpkin.
My current conundrum is how to connect six primary conductor pairs all up to the AC power entry module. I plan to run these below the bottom plate. What do folks suggest for connecting the plethora of paralleled primaries proceeding to PEM?
Six secondaries surely will be super simple setup.
My layout is gonna be very much like @ItsAllInMyHead
Last edited:

My current conundrum
I believe you got a folder with zillion of IPumpkin pictures, in various stages of build/openess
Anyhow, take nice small terminal block ( whatever proper name is), one of those black nice plasticky ones, bolt it to base plate near Donuts, and connect all 3 primaries in parallel
previously shortening them accordingly, of course
then route nice twisted pair ( heatshrinked) from IEC at back, underneath base plate, to said terminal block
Attachments

correction
I see you have dual primary blingies........ so - connect in parallel all 6 primaries
if needed, be creative with soldering iron, translating from 6 pairs of wires to 3 or so, easy to get them under screw heads
hsrnk all what needs isolating
I see you have dual primary blingies........ so - connect in parallel all 6 primaries
if needed, be creative with soldering iron, translating from 6 pairs of wires to 3 or so, easy to get them under screw heads
hsrnk all what needs isolating
This all makes logical sense. I can think of many ways to combine the transformer primaries into one. My poor mind can't decide as I want to do what is "best practice" even if there is really no best. Even that I know isn't really critical with of the many options I choose, I felt the need to solicite input. Thank you for the input.
I'll just get them connected in a safe and secure way and I'll be one step closer to glorious tunes.
I'll just get them connected in a safe and secure way and I'll be one step closer to glorious tunes.

Just for fun I'll share this evening's progress. Lots of measuring, remeasuring, drilling, filing, sanding, remeasuring again, re-drilling, re-sanding, tapping, assembly, disassembly, reassembly....you all get the point. Transformers are now mounted in the chassis with a little "out of the box" thinking. Having the "right tools" is so nice (caliper, bits, tap, Dremel rotary tool), and sure keeps the four letter words (and cortisol levels) to a minimum.
Still pondering how I'll connect all the primaries to the AC PEM now that they are under the perforated plate, but I'll make a decision eventually and just go with it. I think I need to sleep on it.
Feel free to point out all the errors of my ways before I start soldering transformer wires up. Tomorrow evening is gonna be a busy one if all goes to plan.
If anyone is about to start an Iron Pumpkin build, has recently completed a build, or is in the middle of a build, I'd love to chat via PM to share some strategies and learn from one another. Team effort "sort of thing" helps a lot. Hope the pictures help others out.
Attachments
-
 20241112_203853.jpg505.5 KB · Views: 63
 -
 20241112_204051.jpg527.1 KB · Views: 64
 -
 20241112_204126.jpg472 KB · Views: 60
 -
 20241112_204128.jpg424.9 KB · Views: 60
 -
 20241112_204501.jpg398.3 KB · Views: 61
 -
 20241112_204508.jpg576.6 KB · Views: 57
 -
 20241112_203851.jpg333.9 KB · Views: 60
 -
 20241112_203849.jpg362.3 KB · Views: 61
 -
 20241112_200637.jpg597 KB · Views: 61
 -
 20241112_200640.jpg729.9 KB · Views: 63
 -
 20241112_200646.jpg733.2 KB · Views: 56
 -
 20241112_201919.jpg626.2 KB · Views: 63
 -
 20241112_201929.jpg617.2 KB · Views: 61
 -
 20241112_200658.jpg661.6 KB · Views: 63
Last edited:
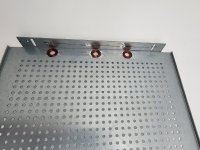
Yes, about as much room as is possible. The top of the turtle is about 5mm from touching top plate (actually 2mm to top of bolts holting turtle in place, see pic). I reversed the chassis sidewalls to use the T-slot rails that are closer to middle of the sidewalls (15mm "higher") by drilling new holes in the L-braket that connects the front panel to the sidewalls.
The primary reason I flipped the sidewalls was so I could mount the transformers up high and use the mount points on the steel Antek transformer cases, but the PEM interfered as the transformers took up most of the depth of the chassis. So I instead tucked them closer up to the front to allow clearance for PEM and tapped M3 holes in perforated plate side lip, where the bolt can mount the transformer securely and protrudes into an open slot on sidewalls. No aluminum was harmed in the making of this mount setup

The primary reason I flipped the sidewalls was so I could mount the transformers up high and use the mount points on the steel Antek transformer cases, but the PEM interfered as the transformers took up most of the depth of the chassis. So I instead tucked them closer up to the front to allow clearance for PEM and tapped M3 holes in perforated plate side lip, where the bolt can mount the transformer securely and protrudes into an open slot on sidewalls. No aluminum was harmed in the making of this mount setup
Attachments

Last edited:
Everything was going so well, but I smelled some "heat" and one of the 15VAC transformers was getting crazy hot. No clue what to do other than tear it all down, unsolder the transformer and look for shorts. Super sad day. I'm giving up for tonight.
All the voltages for setting 20mV were spot on. Seems like some sort of shorted turn. Not sure how that's possible other than I did drill out the center holes to allow the proper bolt size to fit. Guess I need to just start all over and at least unsolder that transformers connections. Oh well, that's how I learn. At least no magic smoke was released.
All the voltages for setting 20mV were spot on. Seems like some sort of shorted turn. Not sure how that's possible other than I did drill out the center holes to allow the proper bolt size to fit. Guess I need to just start all over and at least unsolder that transformers connections. Oh well, that's how I learn. At least no magic smoke was released.
Last edited:
Update: I swapped transformers (took some time) and the new transformer works fine. I'll talk with Antek to see why the transformer they provided had an issue. Worst case I'm out $20.
All the values for initial start up look good. 20mV for bias and 0.01v or less for offset.

All the values for initial start up look good. 20mV for bias and 0.01v or less for offset.

I "proceeded" and figured out what all the fuss was about. This darn preamp is just unbelievable!
It took me some time to get everything all figured out and fully functioning over the past couple of days, but it wasn't all that difficult. I will share more with pics included.
I hooked up the Iron Pumpkin to my dual mono F4 that had been neglected for months as I had nothing that could "swing" it. With the Pumpkin at max volume and 8db gain I got some good sounds out of my Aerial Acoustic Model 9's, but it was still pretty quiet for my liking and I was worried I'd be disappointed since there was no more "umphf" to give. So, instead, I did some swapping and I fired up the Pass Labs X350.5 instead of the F4 to compare and I was blown away. I spent 2 hours listening to my Model 9's before I was asked to "turn it down please". I was full on jammin' in my living room at midnight.
This Preamp simply "rocks"!
"Toe tapping" is a drastic understatement. I was hearing things in my favorite tunes that were simply in the background before. It's like I never knew those sounds even existed in the music as they were previously so subdued. The Pumpkin simply emphasizes all those sounds that were previously hidden by....I don't know what, but there they are now. Toe tapping is truly an understatement....I'm bobbing my head, moving my feat, raising my hands, and shaking my head from side to side. If only I could avoid the dreaded "please turn it down" from others in my home....cause all I want to do is "crank it up!".
Now what? How can I build another preamp at this point having attained audio nirvana. I must now spend some serious time mourning all the years I was without the Iron Pumpkin. I think I need to build another one now just so I can ensure I will not be without.
Thank you Zen Mod for such an amazing design!!!!
Last edited:

- Home
- Amplifiers
- Pass Labs
- Iron Pumpkin(s) and other smaller vegetable animals