Today I had some fun testing the power supplies and protections circuit. All is working fine. Tom's documentation helped a lot. I'm not that experienced so there is some uncertainty every now and then, but that concerns more the case and metal works to come.
I did not popupate the IEC connectors and switches since mains will be connected via Neutrik PowerCon and switched on via rotary switches on the front.
Now I wait for the MiniDissipante, knobs an switches to be delivered. This will be fun.
I did not popupate the IEC connectors and switches since mains will be connected via Neutrik PowerCon and switched on via rotary switches on the front.
Now I wait for the MiniDissipante, knobs an switches to be delivered. This will be fun.


Progress
Today I put my layout to the test. Rather tight around the power supplies, I must say. Al least for my chunky fingers...
Mains power will be led straight from the blue PowerCon connector under the guardian PCB to the front through shielded cable. From there I can keep all the wires as short as possible.
I also made a mockup panel design with an old b/w laser printer and red feltpen. So far I'm satisfied with the outcome.
Attachments


It looks like a tight squeeze for the power on LED outputs on the SMPS-86 boards. You can get a vertical version of the connector if needed. Mouser P/N: 571-284517-2 would be an example. Otherwise nice layout.
Which of the Mini Dissipante chassis is this? 2U x 300 x 330mm?
Tom
Which of the Mini Dissipante chassis is this? 2U x 300 x 330mm?
Tom
The image shows the PowerCon and the speaker protection not in the right position. There will be enough space (at least 2cm) between the parts.
Yes, it's the 330x300. A fine case. The covers did not match but modushop will take care of that. They are very kind people.
Yes, it's the 330x300. A fine case. The covers did not match but modushop will take care of that. They are very kind people.
😀 I got them at audiophonics (France). I was glad I found them but there is light and shadow: Like most of the chinese stuff the real thing doesn't look as neat as in the pictures. And they saved on the grub screws .
.
.Progress
If building teaches me something, it's patience. Finally I got all the parts of the enclosure. Schaeffer did a great job with the panels.
Next weekend a friend can provide assisstance with those threaded holes in the heatsink. From there it'll be only a stone's throw. At least I hope so...
If building teaches me something, it's patience. Finally I got all the parts of the enclosure. Schaeffer did a great job with the panels.
Next weekend a friend can provide assisstance with those threaded holes in the heatsink. From there it'll be only a stone's throw. At least I hope so...
Attachments


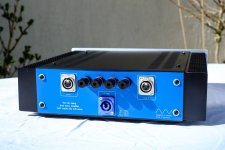
Dat's pretty! The blue rear panel turned out pretty darn nice. I love the attention to detail paid on the front panel as well.
Tom
Tom
Finished
Now that was an emotional moment. Yesterday I finished my build of the dual mono modulus-186. If I had to give a first verdict it would be something like: Beware of large hands!
Sadly I have no time to play with it. I'm away for this weekend and the whole next week. But at least I brought it to life, everything works as expected and I had a short listening test.Very promising!
Attachments

jazzlampe,
Very excellent job! Do tell us what you think after going through some listening sessions!
Regarding the build, as long as you are using well shielded cable from the powercon connector all the way to the SMPS 86 pair you should be okay. Distance helps as well and I see there is a space of ~ 2 cm from the Guardian 686 boards and mains wiring.
Best,
Anand.
jazzlampe,
You managed to fit quite a lot of components within a tight space 🙂 - congratulations on completing the build!
You managed to fit quite a lot of components within a tight space 🙂 - congratulations on completing the build!
I had an extra long weekend to play with my new amplifier.
I learnt that buliding an amp from prefab parts is a very enjoyable activity. Especially for beginners. Trying to substitute parts of a holistic system unnoticed is another. My speakers were developed by two men who summon up about 90 years of experience in loudspeaker design and electronics. I shall not compete with them.
It took me three days of measurement and listening to get the gain and EQ right. My Bullfrogs have changed quite substantially but I can say I'm very happy with it.
A few words on my build:
- Again: Tom's parts are great! So is the documentation. Everything worked flawlessly right from the start.
- I wanted to go with differential inputs but had to give up on the idea. The differntial outputs of the MiniDSP 4x10HD gave me too much noise. I know that according to Tom's measurements, the differential output is to be preferred due to it's better SNR. But in my case 0.9 volts of peak output is more than enough. Concerning horns the absolute amount of noise seems more relevant. It did not match gain-wise either.
- Mains cable is shielded and stuffed neatly under the circuits.
- Signal cable is double shielded.
- Two DPST rotary switches on the front, one for each channel.
- Wires behind the front appear chaotic but are not. In fact it's true dual mono with star grounding and a consistent colour code.
- Enclosure is a 2U Mini Dissipante (WxD)340mmx300mm
- Panels are from Schaeffer AG / Front Panel Express
Sonic impressions:
My main goal is attained. Silence! No noise or hum from this amplifier, what a relief! If there's some noise then it comes through the DSP.
What else? I tested the amp with some conventional 3-way floorstanders by Joachim Gerhard before I plugged in the horns. I heard this wonderful punchy, warm and pronounced bass. And lots of power too. Mighty are these 24 watts, crystal clear, unobtruive and honest. I'm impressed. It's still too early to tell how well it works with my main system but I am absolutely satisfied with the amplifier itself.
Attachments


Last edited:
I absolutely love the attention to detail you put into this project. Nicely done! Thank you for sharing. I'm glad you like the results.
Interesting looking speakers!
Tom
Interesting looking speakers!
Tom
- Status
- Not open for further replies.
- Home
- Amplifiers
- Chip Amps
- Modulus-186 for a highly sensitive speaker