After getting over my expensive mistake, things are progressing well.
I changed the 10uf capacitor at the signal input to the speaker protection to 47uF and I now have about 3.5s delay at turn on.
I tested the Vu meters. They light up nicely with the 10vac secondary from the power transformer. Perhaps more orange the yellow with the lamp on?
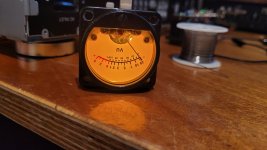
I ran a sine wave from my sig gen through it to see how the calibration was:
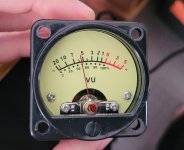
A 9v sine wave gives 55% power.
If I am doing my maths right, that means 100% is 16v which seems a bit low given 50w into 8R is 28.3v . I will test this more once I have the amps up and running and can run a larger signal through the meter.
Not the end of the world if it is as this would mean the meter would move more at lower volumes where the amp is likely to spend most of its life.
However I need to assess the possibly the meter would get damaged the amp was ever driven to full power.
I also got my new proper psus almost all soldered up pending parts from mouser. I discovered that I was 1 capacitor short on my prefered class x2 0.1uf caps for the rectifier C,RC snubbers. Also after testing the speaker protection with a no name 47uF bipolar from our local brick and mortar. Now that it is tested I have some nichicons on order.
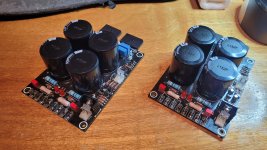
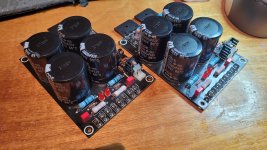
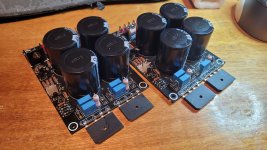
Now that these are (almost) done I can start mounting things properly in the chassis and working out a mounting solution for the transformers.
Once mounted I can work out the proper lead lengths for the transformers and then start termination and dressing them.
I changed the 10uf capacitor at the signal input to the speaker protection to 47uF and I now have about 3.5s delay at turn on.
I tested the Vu meters. They light up nicely with the 10vac secondary from the power transformer. Perhaps more orange the yellow with the lamp on?

I ran a sine wave from my sig gen through it to see how the calibration was:

A 9v sine wave gives 55% power.
If I am doing my maths right, that means 100% is 16v which seems a bit low given 50w into 8R is 28.3v . I will test this more once I have the amps up and running and can run a larger signal through the meter.
Not the end of the world if it is as this would mean the meter would move more at lower volumes where the amp is likely to spend most of its life.
However I need to assess the possibly the meter would get damaged the amp was ever driven to full power.
I also got my new proper psus almost all soldered up pending parts from mouser. I discovered that I was 1 capacitor short on my prefered class x2 0.1uf caps for the rectifier C,RC snubbers. Also after testing the speaker protection with a no name 47uF bipolar from our local brick and mortar. Now that it is tested I have some nichicons on order.


Now that these are (almost) done I can start mounting things properly in the chassis and working out a mounting solution for the transformers.
Once mounted I can work out the proper lead lengths for the transformers and then start termination and dressing them.
It verks! Noise!
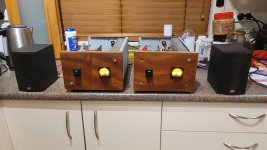
It's been a busy couple of weeks to get some noise out of some test speakers.
I had a bit of extra time time this last week as I did something to my right Achilles tendon so I couldn't train all week.
Output boards all soldered up:
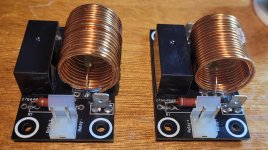
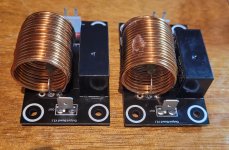
These boards integrate the output Thiel network and protection relay.
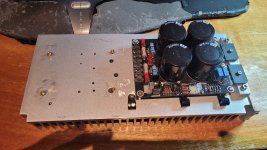
Amp board and PSU mounted up to the heatsink and partially wired up.
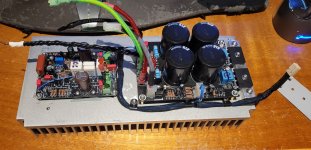
It always amazes me how long it takes to get the wiring all neatly cut, twisted, terminated, braided etc.
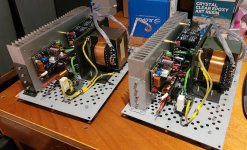
Here's the pair almost ready to go:
Right channel wired up ready for power:
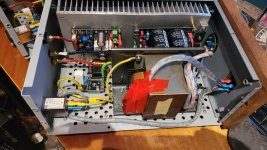
Startup went without a hitch. No magic smoke or blown fuses.
Voltages at key nodes in the circuit were as they should be.
DC offset was 0.2mV on the left channel and 0.6mV on the right channel.
Biasing was nice and smooth. The bias was set to 100mA via 44mV measured from drain to drain. Across all 4 combinations of pairs and the voltages varied up to 2mV so the lowest pair was set at 44mV.
After biasing it was time for test speakers and noise.
Now that I know they work basically as expected, tomorrow night I will get out my scope and sig gen and start torturing them to see if they scream.

It's been a busy couple of weeks to get some noise out of some test speakers.
I had a bit of extra time time this last week as I did something to my right Achilles tendon so I couldn't train all week.
Output boards all soldered up:


These boards integrate the output Thiel network and protection relay.
Amp board and PSU mounted up to the heatsink and partially wired up.

It always amazes me how long it takes to get the wiring all neatly cut, twisted, terminated, braided etc.
Here's the pair almost ready to go:

Right channel wired up ready for power:

Startup went without a hitch. No magic smoke or blown fuses.
Voltages at key nodes in the circuit were as they should be.
DC offset was 0.2mV on the left channel and 0.6mV on the right channel.
Biasing was nice and smooth. The bias was set to 100mA via 44mV measured from drain to drain. Across all 4 combinations of pairs and the voltages varied up to 2mV so the lowest pair was set at 44mV.
After biasing it was time for test speakers and noise.
Now that I know they work basically as expected, tomorrow night I will get out my scope and sig gen and start torturing them to see if they scream.
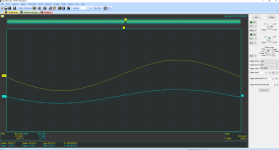
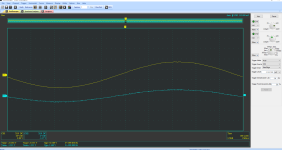
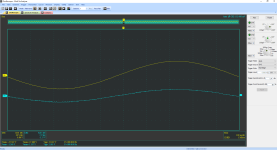
The first round of testing was to find clipping.
Left channel into 8 ohm:
Left channel into 4 ohm:
Right channel into 8ohm:
Right channel into 4ohm:
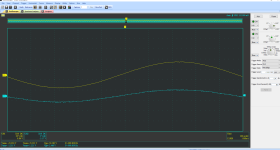
I think the slightly lower measurement into 8ohm on the right channe than the left channel, was me backing off clipping a bit too far before taking the screenshot.
Given that the measurements into 4ohm are almost identical.
Serendipitously, these output numbers correspond very well with the Vu meters.
Left channel into 8 ohm:

Left channel into 4 ohm:

Right channel into 8ohm:

Right channel into 4ohm:

I think the slightly lower measurement into 8ohm on the right channe than the left channel, was me backing off clipping a bit too far before taking the screenshot.
Given that the measurements into 4ohm are almost identical.
Serendipitously, these output numbers correspond very well with the Vu meters.
Well,
I've been living with the pair for the last week. Impressions are this is a damn fine amp.
Definitely the best solid state amp that has been in my system so far. It's been a few years since I have fired up my KT88 monoblocks so I can't compare to a tube power amp.
Excellent all day listening amps. Never fatiguing, harsh or brittle.
Compared to the last amp I build a Rod Elliot P3A. It has a similar character but is much better.
The Mooly (I think we should just call it "The Mooly" from now on) has a bit more warmth or sparkle. It bit more of that special sauce:
The Eagles - Lyin' Eyes. The P3A just didn't quite put the chills up mine spine when the chorus comes in. But the Mooly bloody well does.
The Eagles - King of Hollywood. As the guitars fade in at the beginning, with the Mooly, the guitar harmonies stack up into something special. Not every amp can do the special part in my experience. My P3A has a bit of it. My LM3886 doesn't.
Deadmau5 - I Remember. The synth is rich and luscious. The big synth reverb before the vocals kick in goes on forever. Makes me feel like I'm in the middle of a bush rave seeing pretty colours.
Audiomatic - The Chosen Path. Oh, how I love the synth.
Jeff Buckley - Hallelujah. Got me in the feels. Once again, the hair on the back of the neck.
Compared to the P3A there is a bit more resolution or detail too:
Ben Folds - University A Cappella! - The Luckiest. I can pick out each singer in the chorus just a bit easier than the P3A.
AfroCubism - A la luna yo me voy. The Cacophony behind Company Segundo is made of distinct, un-muddied instruments. I can almost figure out what the hell is going on in that recording studio.
It would be interesting seeing good distortion measurments on this amp. My guess would be quite low distortion but a strong 2nd harmonic.
It sounds fantastic. Anybody wanting something circa 50w and class AB should build one.
My new favourite amp. I was very happy with my P3A. Now it might find a new owner.
After living with them for a couple of weeks I am very happy with their sound.
Time to finish them.
Tonight I made on some extra brackets to secure the tops of the heatsinks to the chassis. A little bit of extra rigidity never hurt nobody.

I will need to drill some some extra holes in the front and back panels. By the time that is done and test fitted that is probably another evening gone.
After that comes:
Painting the chassis.
Finishing the mahogany front panel.
Making moulds for the power transformers and epoxy potting them.
Making some copper plaques for the back of the amps with the power information, fuse etc.
I am also thinking of printing some copies of the schematics as stickers and putting them inside the side panels of the chassis for future reference.
Probably a few weeks work here before I get to button them back up for good looking all nice and purdy!
Time to finish them.
Tonight I made on some extra brackets to secure the tops of the heatsinks to the chassis. A little bit of extra rigidity never hurt nobody.

I will need to drill some some extra holes in the front and back panels. By the time that is done and test fitted that is probably another evening gone.
After that comes:
Painting the chassis.
Finishing the mahogany front panel.
Making moulds for the power transformers and epoxy potting them.
Making some copper plaques for the back of the amps with the power information, fuse etc.
I am also thinking of printing some copies of the schematics as stickers and putting them inside the side panels of the chassis for future reference.
Probably a few weeks work here before I get to button them back up for good looking all nice and purdy!
Well that's the main thingAfter living with them for a couple of weeks I am very happy with their sound.
Good progress this week.
After making the extra brackets and a drilling a few holes to mount them to the chassis I have started on the paint.
I am going with Rustoleum hammered black. I've used Rustoleum hammered paint before but not tried the black before. It is more like a rather light black, almost more like a dark charcoal. Looks nice though. It should pop quite nicely with the mahagoany.
I've cut some back panel plaques out of some copper sheet of unknown thickness I got from a scrapper some time back.
An hour or so with a letter punch set, a quick clear coat and voila!

Spot the booboo.
This is one where I won't let perfect be the enemy of the good. I think they still look pretty cool despite the booboo.
I will rivet these to the back panel during final assembly.
I much prefer a proper stamped plaque over a sticker. Stickers perish and wear off.
I've also started on the moulds for potting the power transformer. I am making these out of scrap acrylic.

First glued joint.

Second step.
I have also finished up some bits on the pcbs:

I put the little covers on the fuses and applied these little mini heatsinks to the drivers.
Mouser part number: 532-575200B00
Probably unnecessary but a little extra insurance and as Papa says "there is no such thing as too much heatsink".
I also undid my modification to the speaker protection. I modified it before to increase the start up delay but it seems to have caused shut down to take longer so I have reverted back to an unmodified Rod Elliot P33.
All going to plan I will have the moulds glued up this evening and then I can pour the epoxy tomorrow night.
Rustoleum hammered paint requires 48 hours to fully set so I will wait till next weekend to paint the other side.
All that remains after that is to work on the mahogany.
I need to do a bit of counter sinking for the M6 bolts holding the wood to the front panel of the chassis. I want a nice flush finish.
After that it is sanding, danish oil and clear coat.
At this rate I should be reassembling in about 2 weeks.
After making the extra brackets and a drilling a few holes to mount them to the chassis I have started on the paint.
I am going with Rustoleum hammered black. I've used Rustoleum hammered paint before but not tried the black before. It is more like a rather light black, almost more like a dark charcoal. Looks nice though. It should pop quite nicely with the mahagoany.
I've cut some back panel plaques out of some copper sheet of unknown thickness I got from a scrapper some time back.
An hour or so with a letter punch set, a quick clear coat and voila!

Spot the booboo.
This is one where I won't let perfect be the enemy of the good. I think they still look pretty cool despite the booboo.
I will rivet these to the back panel during final assembly.
I much prefer a proper stamped plaque over a sticker. Stickers perish and wear off.
I've also started on the moulds for potting the power transformer. I am making these out of scrap acrylic.

First glued joint.

Second step.
I have also finished up some bits on the pcbs:

I put the little covers on the fuses and applied these little mini heatsinks to the drivers.
Mouser part number: 532-575200B00
Probably unnecessary but a little extra insurance and as Papa says "there is no such thing as too much heatsink".
I also undid my modification to the speaker protection. I modified it before to increase the start up delay but it seems to have caused shut down to take longer so I have reverted back to an unmodified Rod Elliot P33.
All going to plan I will have the moulds glued up this evening and then I can pour the epoxy tomorrow night.
Rustoleum hammered paint requires 48 hours to fully set so I will wait till next weekend to paint the other side.
All that remains after that is to work on the mahogany.
I need to do a bit of counter sinking for the M6 bolts holding the wood to the front panel of the chassis. I want a nice flush finish.
After that it is sanding, danish oil and clear coat.
At this rate I should be reassembling in about 2 weeks.
If you really needed any heatsinks in the circuit, they should be on the devices with highest dissipation. T6 and T7 only dissipate around 12 -14mW. The two that have the highest dissipation, as I was informed when laying out my SMD version of the design, are T3 and T5 with around 250mW each. In my SMD version, T3 and T5 are around 20deg C warmer than ambient. With the package you're using they should be half that.and applied these little mini heatsinks to the drivers
Thanks for that.T6 and T7 only dissipate around 12 -14mW. The two that have the highest dissipation, as I was informed when laying out my SMD version of the design, are T3 and T5 with around 250mW each
I was allowed a bit of precious weekend time today to get some good work done.
I did the countersinking for the m6 bolts to mount the mahogany to the chassis front panel.
I used a 12mm spade bit as I have had some issues in the past with large twist drill bits grabbing the wood and chunking through way more material that I would like.
I also attacked the mahogany with a random orbit sander. First 80grit and then 120.

This evening I used a counter sink on the edges of the bolt holes just to round them over a bit and make them look slightly nicer.
A lick with some 240grit by hand. Then comes the Danish oil.
I like to use a keep it wet method with the danish oil. I just slather it on with a rag and as soon as it stops looking wet I slather on some more.
3 applications tonight before I had had enough and called it a night.
I really like Briwax brand danish oil. It smells like beeswax and turpentine.
Tomorrow night I will give it another lick with the 240grit and slather on a bit more.
Then I will switch brands to Cabots Danish oil which is less natural smelling and more chemically. I suspect it has a polyurethane base.
It penetrates quite nicely on top of the Briwax stuff and seems to offer a bit of harder finish that the more natural stuff.
Then comes clear coat of course.
I forgot to take a picture of the glued up moulds but there will be plenty of time for that as they are in the basement with the silicon caulking drying.
Tomorrow night I can give them a clean up then spray on some mould release spray and then silicon the mould to the transformer bracket.
All going to plan I will pour the epoxy on Tuesday night.
Progress progresses....
I've been pouring epoxy for the last couple of days.
I drastically underestimated the volume of epoxy I would need. I purchased 1kg of 1:3 ratio deep pour epoxy.
That disappeared very quickly and I went back and purchased another 4kg. Half of which is gone.
There is something like 1.5kg of epoxy around each transformer.
Not including losses.
Firstly I forgot to plug up the bolt holes to mount the transformer bracket to the chassis....
Then there was the joints between the mould and the bracket that weren't so well caulked....
Sticking wires out the side of the mould and gooing them up with silicon turned out to be a not so good strategy.
I suspected it wouldn't be but did it anyway because I thought it would look cool.....
Suffice to say there is a rather splotchy coating of epoxy all over my rolling work bench. Thankfully nothing on the floor.
Thankfully the leaking seems to have stopped. This evening i chucked an extra 100ml over the pair of transformers to get the level where I want after leaking.
Here is the result:

I've also finished oiling up the mahogany. Here is the result after the first brand of danish oil. Probably 6 applications over 2 nights:

And here is the result after the second brand. 5 applications over 2 nights:

I will give the oil a couple of nights to fully dry and then start layering on the clear coat.
I've been pouring epoxy for the last couple of days.
I drastically underestimated the volume of epoxy I would need. I purchased 1kg of 1:3 ratio deep pour epoxy.
That disappeared very quickly and I went back and purchased another 4kg. Half of which is gone.
There is something like 1.5kg of epoxy around each transformer.
Not including losses.
Firstly I forgot to plug up the bolt holes to mount the transformer bracket to the chassis....
Then there was the joints between the mould and the bracket that weren't so well caulked....
Sticking wires out the side of the mould and gooing them up with silicon turned out to be a not so good strategy.
I suspected it wouldn't be but did it anyway because I thought it would look cool.....
Suffice to say there is a rather splotchy coating of epoxy all over my rolling work bench. Thankfully nothing on the floor.
Thankfully the leaking seems to have stopped. This evening i chucked an extra 100ml over the pair of transformers to get the level where I want after leaking.
Here is the result:

I've also finished oiling up the mahogany. Here is the result after the first brand of danish oil. Probably 6 applications over 2 nights:

And here is the result after the second brand. 5 applications over 2 nights:

I will give the oil a couple of nights to fully dry and then start layering on the clear coat.
- Home
- Amplifiers
- Solid State
- Mooly's MMAMFM Monoblocks - A build log


