Re: PLATTER MATTERS

It’s all about vibration transfer between layers, actually. The first transition path is between the record and platter upper surface. Generally accepted, firm contact is the goal here: all this vacuuming, clamping of all sorts, heavy audiophile records and so on. If you are devoted to single layer solid platter, you should stop here. Any addytional layer decoupled from the previous one does make no sence: vibration transfer is interrupted by air gap. Now you say you don’t care about contact – it means uncontrolled vibration path: partial air gap is unavoidable.
Let’s think in terms of hall acoustic: we are seeking for golden point between the dead unechoed chamber and buzz box full of resonant peaks and standing vawes. One should get rid of uncontrolled deflections first. Solid body – to air transition is similar to concrete wall: most of vibration energy will be reflected back.
According to you theory laminated platter is sensless – not sure majority of high end TT manufacturers agree with you.
Cheers,
Michael
Really strange…fdegrove said:
It does not need to make contct over the full surface area...in fact it better not.
See my split platter remark before.
It’s all about vibration transfer between layers, actually. The first transition path is between the record and platter upper surface. Generally accepted, firm contact is the goal here: all this vacuuming, clamping of all sorts, heavy audiophile records and so on. If you are devoted to single layer solid platter, you should stop here. Any addytional layer decoupled from the previous one does make no sence: vibration transfer is interrupted by air gap. Now you say you don’t care about contact – it means uncontrolled vibration path: partial air gap is unavoidable.
Let’s think in terms of hall acoustic: we are seeking for golden point between the dead unechoed chamber and buzz box full of resonant peaks and standing vawes. One should get rid of uncontrolled deflections first. Solid body – to air transition is similar to concrete wall: most of vibration energy will be reflected back.
According to you theory laminated platter is sensless – not sure majority of high end TT manufacturers agree with you.
Cheers,
Michael
SPLIT PLATTERS.
Hi,
Consider the stylus+record+top platter interface.
Here you want to drain and dissipate the energy generated from the stylus.
Then consider bearing+bottom platter.
Here you want to dissipate energy+ straneous noise generated by the bearing.
Ask yourself: do you want both to mix?
I don't.
No how this can be tackled successfully is another matter...hope you see my point now?
Cheers,
Solid 3" thick PVC platter
Im starting to doubt the ability to machine a successfull platter after all these posts. Seems to me that the best way is just to machine a solid 3" thick of grey(yuck) PVC and be done with it. This will perform better than most other turntables out there in the $1000 to $1800 range since most are just solid acrylic.
Like we stated before, PVC is a closer impedance match to vinyl and its %50 heavier than Acrylic. A 3" thick PVC platter would weight 24 LBS. RedPoint does claim that their drilled and screw Aluminum and PVC platter sounds quieter and more dynamic (i beleive) than just plain PVC. They do screw the layers from the top leaving the bolt holes open.
I think the only reason to have a 1" thick aluminum bottom layer is to add weight. Its the same as loading the main platter with leadshot. I think the aluminum layer adds rigidity. Its obvious that none of you feel that bolting the two layers together is ideal. But how else can you do it? Reading the Kuzmo and VPI websites tell that they screw their platters together with non-magnetic pre-tressed bolts. I'm thinking that if they feel thats good enough for their $5000 and up turntables its got to be good enough for ours.
Talking to me machinist friend the other day and he stated that threading bolts from the bottom of the platter into the top PVC platter isnt a problem. PVC is tougher than we give credit too. If we were to use as many bolts as was commented on before that will reduce stress. My machinist says that screwing bolts in from the bottom of the platter into the top PVC layer will be fine. Sure sounds like that would be alot easier to do than complicating things with inserts.
One last idea. What about instead of drilling and loading the platter with leadshot. Why not just place a 1/4" thick Lead layer between the Aluminum and PVC layer? How would that perform?
bearing noise
Don't think the bearing noise is an issue with such a quiet and well damped bearing, like Teres. Any residual vibrations will be absorbed making they're way to the stylus through well dumped subplatter from the center outwards (considering the bearing connected to subplatter only). Amount of energy finally reaching the stylus is pretty negligible comparing to the stylus induced vibrations, reflected back from the near platter bottom. Ask yourself why use PVC?- because the speed of sound is close/same within the record and platter material, and vibrations go through both of them with no reflection at the layers boundary, considering firm contact. Vibrations reaching the platter bottom, shoud be reflected or absorbed by underlaying layer. Super thick pvc solid platter may have enough of inner dissipation, but this kind of machining work is beyond my skills/ability. So i'd rather stick with my alum/acryl(PVC?) sandwich. You may call me credulous, but I tend to thrust to real life experience of such DIY-based company like Redpoind, rather than pure theoretical arguments.
Good night

Michael
Don't think the bearing noise is an issue with such a quiet and well damped bearing, like Teres. Any residual vibrations will be absorbed making they're way to the stylus through well dumped subplatter from the center outwards (considering the bearing connected to subplatter only). Amount of energy finally reaching the stylus is pretty negligible comparing to the stylus induced vibrations, reflected back from the near platter bottom. Ask yourself why use PVC?- because the speed of sound is close/same within the record and platter material, and vibrations go through both of them with no reflection at the layers boundary, considering firm contact. Vibrations reaching the platter bottom, shoud be reflected or absorbed by underlaying layer. Super thick pvc solid platter may have enough of inner dissipation, but this kind of machining work is beyond my skills/ability. So i'd rather stick with my alum/acryl(PVC?) sandwich. You may call me credulous, but I tend to thrust to real life experience of such DIY-based company like Redpoind, rather than pure theoretical arguments.
Good night
Michael
Carbon Fiber
I found this website that sells Carbon Fiber by the yard. Is this the stuff that is used to make platter matts out of? Or can any of you see any other use for this material. I orginally cmae across this for using to coat my front baffle on my diy speakers.
I still havnt found a company that sells carbon fiber thats 1" thick. any ideas?
LINK
Sorry. I forgot to add the link.
http://www.fibreglast.com/products.php?session=b235b6f9343274fb70e01bea41663dff&area=6
Sorry. I forgot to add the link.
http://www.fibreglast.com/products.php?session=b235b6f9343274fb70e01bea41663dff&area=6
CARBON.
Hi,
I can recall a French TT accessory manufacturer seeling the Kevlar weave mat.
It was received very well with the press.
There is not just bearing noise (even in the best) but also coupling from the motor.
Cheers,
Hi,
I found this website that sells Carbon Fiber by the yard. Is this the stuff that is used to make platter matts out of?
I can recall a French TT accessory manufacturer seeling the Kevlar weave mat.
It was received very well with the press.
Don't think the bearing noise is an issue with such a quiet and well damped bearing, like Teres.
There is not just bearing noise (even in the best) but also coupling from the motor.
Cheers,
INTERESTING LINK
Hi,
Your link is quite interesting as this also provides a source for closed cell vinyl mats.
For those people not wanting to opt for multilayer platters (or not using PVC as a top layer, an excellent mat can be cut out of this material.
VINYL FOAM
Cheers,
Hi,
Your link is quite interesting as this also provides a source for closed cell vinyl mats.
For those people not wanting to opt for multilayer platters (or not using PVC as a top layer, an excellent mat can be cut out of this material.
VINYL FOAM
Cheers,
Fdegroove,
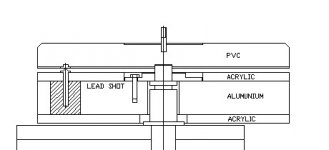
Here is your split platter idea combined with dumped subplatter. The upper PVC main platter with thin dumping layer (like sorbotran) glued underneath, which is rested on 3 small brass cones. The cones are glued into acrylic/PVC layer and submerged in lead shot/oil mixture and thus decoupled from subplatter. No bearing/belt-induced vibrations reach the main platter. Stylus-induced vibrations absorbed by PVC and sorbotran layer, which is also greatly reduces lower surface reflection, without compromising platter stiffness.
What don you say?
Michael
Attachments
Wood plynth
LiveMusic, thats one interesting turntable idea. I'm a little hazy on how the cones are set into the lower part of the platter. You said that the cones are
Well, I've been weighing price vs machinist time with possible materials. Seems to me that I could either have a simple solid PVC platter or beg him to do that layered Alumin/PVC. But the plynth doesn't really need to be an aluminum/acryrlic/aluminum sandwich. I'm sure that would be NICE. But not manditory. So a trade off could be in order. I could beg him to do the platter and I could make the plynth myself. I could simply follow the Teres design. Buy a big block of Cocobolo wood and follow the schematic on the Teres website. But my local wood shop only sells this in 2" thick 3' long x 6" wide. The plans call for the plynth to be at least 2.3" thick for the bearing. Does Cocobolo come in larger sizes than this? I would perfer to make the square plynth shown on the Teres website. Then make a cocobolo circle to raise the tonearm. Or would Aluminum be better? I asked my shop and they said that it doesn't come in sizes larger than that and if I wanted to make a plynth this larg I would have to glue peices together. That doesn't sound like a good idea. My shop wasn't very helpfull at all. I felt they were rushing me out of the store. Any thoughts on this anyone?
LiveMusic, thats one interesting turntable idea. I'm a little hazy on how the cones are set into the lower part of the platter. You said that the cones are
It look as if your cones are one big inverted nail from looking at your diagram. This long spike floating in shot/oil? Could you explain further? Much appreciatedglued into acrylic/PVC layer and submerged in lead shot/oil mixture and thus decoupled from subplatter
Well, I've been weighing price vs machinist time with possible materials. Seems to me that I could either have a simple solid PVC platter or beg him to do that layered Alumin/PVC. But the plynth doesn't really need to be an aluminum/acryrlic/aluminum sandwich. I'm sure that would be NICE. But not manditory. So a trade off could be in order. I could beg him to do the platter and I could make the plynth myself. I could simply follow the Teres design. Buy a big block of Cocobolo wood and follow the schematic on the Teres website. But my local wood shop only sells this in 2" thick 3' long x 6" wide. The plans call for the plynth to be at least 2.3" thick for the bearing. Does Cocobolo come in larger sizes than this? I would perfer to make the square plynth shown on the Teres website. Then make a cocobolo circle to raise the tonearm. Or would Aluminum be better? I asked my shop and they said that it doesn't come in sizes larger than that and if I wanted to make a plynth this larg I would have to glue peices together. That doesn't sound like a good idea. My shop wasn't very helpfull at all. I felt they were rushing me out of the store. Any thoughts on this anyone?
Lead
Here is a link to something very interesting we were discussing about lead sheets. It seems that this guy sells 1" thick 12" diameter lead sheets.
http://db.audioasylum.com/cgi/m.pl?forum=vinyl&n=173778&highlight=Teres&session=
Here is a link to something very interesting we were discussing about lead sheets. It seems that this guy sells 1" thick 12" diameter lead sheets.
http://db.audioasylum.com/cgi/m.pl?forum=vinyl&n=173778&highlight=Teres&session=
Teres all wood plynth and platter
I forgot to add before. Teres all wood plynth and platter. Interesting possiblilities.
http://db.audioasylum.com/cgi/m.pl?forum=vinyl&n=173899&highlight=Teres&session=
I forgot to add before. Teres all wood plynth and platter. Interesting possiblilities.
http://db.audioasylum.com/cgi/m.pl?forum=vinyl&n=173899&highlight=Teres&session=
An externally hosted image should be here but it was not working when we last tested it.
Home brew plinth
Guys, here is my plinth material idea that I wish someone would try out because it would be relatively cheap and only moderately labor intensive.
It will be some time before I build my TT because all my money is going to school right now.
Plinth recipe:
1) Once you've decided on your plinth geometry go to the hardware store and buy a sheet of 1" thick rigid insulation foam. This is the blue stuff and it's pretty cheap.
2) Cut out your plinth shape in the foam and laminate as many layers together as necessary for the correct thickness. Make and mold protrusions and other cavities that you need.
3) Fill the mold cavity with lead shot until it is full and levelled off.
4) Transfer the shot into a five gallon bucket and mark the level with a magic marker around the outside.
5) Add some fine grain and dry sand or crushed and powdered rock that has been washed and dryed. Only add enough sand so that the level stays at approximately the marks. You'll have to mix it up to homogenize the mix.
6) Add a slow curing general purpose epoxy to the mix and throughly mix it up making sure that all of the shot and sand is wetted with the epoxy. The consistency should be that of thick bread dough so that the materials don't settle to the bottom too much.
7) Pour in the mold and let it cure.
8) remove the cured slug from the mold and clean all of the foam off from it with a wire brush or what ever is necessary.
9) laminate several layers of epoxy and fiberglass woven cloth to the out layer forming a very ridgid skin about 1/8 to 1/4 inch thick.
10) Finish with gell couat or however desired.
11) This should be machinable if necessary to put holes and treads in certain places for bearings, etc.
Re: Wood plynth

Yes, the "nails" are threaded into the bronze inserts and locked with the nuts. The inserts are glued into the upper 10 mm acrylic disc holes. Upper mating discs are glued into slightly larger holes of PVC main platter. So the upper discs are self-adjusting in horyzontal plane, when epoxy drying with the main platter rested on spikes, already adjusted in height. I'm just trying to make everything ajustable, because of natural DIY manufacture limitations. Make it ajustable, if you cannot make it precise!StylinLP said:
It look as if your cones are one big inverted nail from looking at your diagram. This long spike floating in shot/oil? Could you explain further?
Attachments

Upper acrylic layer
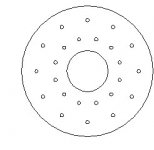
Made of 10 mm acrylic and glued to the aluminium subplatter. Have 24X10 mm holes above lead cavities to fill 21 of them with lead shot/sand/oil mixture and then to be sealed with plug. Platter spikes are glued into the 3 remaining holes.
Made of 10 mm acrylic and glued to the aluminium subplatter. Have 24X10 mm holes above lead cavities to fill 21 of them with lead shot/sand/oil mixture and then to be sealed with plug. Platter spikes are glued into the 3 remaining holes.
Attachments
Lower acrylic layer
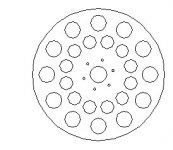
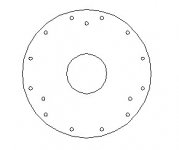
Have 3X10 holes to fill the cavities with spikes from below and to be sealed with plugs. 12X10 holes intended for fine balancing, to access the subplatter for drilling out the aluminium.
Lower layer is also glued to aluminium subplatter.
Comments?
Have 3X10 holes to fill the cavities with spikes from below and to be sealed with plugs. 12X10 holes intended for fine balancing, to access the subplatter for drilling out the aluminium.
Lower layer is also glued to aluminium subplatter.
Comments?
Attachments
Re-Read this entire thread
What a read that was. Had to catch up on a few topics.
LiveMusic it looks like your going to make one heck of a complicated platter! The dual platter seperated by cones concept is entirely new to the turntable comunity. I have no clue as to how it will perform. I sure am curious to find out thou
fdegrove I wanted to follow up on that topic of "gluing"
If...bottom layer is 1" aluminum damped with leadshot from the top.
2nd layer is 1" PVC screwed from the top to the lower aluminum layer. In effect sealing the leadshot cavities.
3rd layer is 1" pvc "glued" or just resting on the 2nd layer. In effect covering the screw holes.
Could I get some more feedback on weither to glue or just rest that top layer on the 2nd. Or should I just forget about that 3rd layer and just figure out a better way to build the platter with 2 layers.
I know we have been discussing this at great lenghts but I feel a need to rehash the entire concept one more time to clarify the best options.
What a read that was. Had to catch up on a few topics.
LiveMusic it looks like your going to make one heck of a complicated platter! The dual platter seperated by cones concept is entirely new to the turntable comunity. I have no clue as to how it will perform. I sure am curious to find out thou
fdegrove I wanted to follow up on that topic of "gluing"
1" to 1.5" would be sufficient.Don't glue or screw it to the bottom layer.
If...bottom layer is 1" aluminum damped with leadshot from the top.
2nd layer is 1" PVC screwed from the top to the lower aluminum layer. In effect sealing the leadshot cavities.
3rd layer is 1" pvc "glued" or just resting on the 2nd layer. In effect covering the screw holes.
Could I get some more feedback on weither to glue or just rest that top layer on the 2nd. Or should I just forget about that 3rd layer and just figure out a better way to build the platter with 2 layers.
I know we have been discussing this at great lenghts but I feel a need to rehash the entire concept one more time to clarify the best options.
AH...IT'S SINKING IN.
Hi,
Done that ten years ago already and so has my friend Tom Fletcher from Nottingham Analogue.
We did push it further still though.
Results were extraordinary....
My advice: don't glue.
Problem with glue is manyfold:
It disperses itself in all directions beyond your control.
It is never really reliable as a joint.
It deteriorates over time.
And so on....
Actually just rest it in a way as Michael does, but rely on the mass of the top layers to keep it firmly seated.
Spike and cup style,for instance.
If you're using cone shaped supports use an odd number,the fewer the better and put one with the point facing upwards,the others point down.
You can use three layers of various materials,just choose these wisely as to not compromise your goal.
Just ask and I'll try to reply the best I can.
Cheers,
Hi,
The dual platter seperated by cones concept is entirely new to the turntable comunity.
Done that ten years ago already and so has my friend Tom Fletcher from Nottingham Analogue.
We did push it further still though.
Results were extraordinary....
fdegrove I wanted to follow up on that topic of "gluing"
My advice: don't glue.
Problem with glue is manyfold:
It disperses itself in all directions beyond your control.
It is never really reliable as a joint.
It deteriorates over time.
And so on....
Actually just rest it in a way as Michael does, but rely on the mass of the top layers to keep it firmly seated.
Spike and cup style,for instance.
If you're using cone shaped supports use an odd number,the fewer the better and put one with the point facing upwards,the others point down.
You can use three layers of various materials,just choose these wisely as to not compromise your goal.
Just ask and I'll try to reply the best I can.
Cheers,
- Status
- This old topic is closed. If you want to reopen this topic, contact a moderator using the "Report Post" button.
- Home
- Source & Line
- Analogue Source
- New Thread. My DIY turntable plan