Vunce, Thanks for your answers.
Jeff, the bridge rectifier can be 800V without any problem, I used the 1000V version because it was available at the time of building.
There are 3 Leds used for the preamplifier.
All of them are not placed on the PCB but in the front panel of the chassis. So you can use what you like.
They are used to indicate that the power is On, that the Output is active and that the Mute is active.
The RLD3 is used for the led that indicates that the mute is active.
It is shown in the wiring diagram of the preamplifier.
George Ntanavaras
I have one last PCB as shown in photo of post #1.
If someone is interested the price is 28 Euros (shipping is included).
If someone is interested the price is 28 Euros (shipping is included).
Just wanted to give an update to my PR3 preamp....
My chassis finally arrived and I cut the holes on the rear panel for the Manley RCA jacks, this was a bit of a project because the panel is very thick and I had to machine a rebate on the backside so the RCA jack threads stuck through the panel enough for the nut.
On the bench, I also powered the board to verify correct voltages and wiring of the relays, LEDs and selector switch. All worked perfectly thanks to George’s nice documentation.
I really like how the switching works with the muting circuit.
Input1..mute..input2..mute..input3
Hopefully sound soon......
Cheers!
Attachments


Nice work Vunce,
I did not know that you could buy a forstner type bit for metal work. Is it a metal bit or the ones made for wood? I have a set of flat bottom mills that work great for this kind of work.
MM
I did not know that you could buy a forstner type bit for metal work. Is it a metal bit or the ones made for wood? I have a set of flat bottom mills that work great for this kind of work.
MM
Good eye Myles!! Thanks.
It is indeed a 3/4” forstner bit for “wood”. You’d be amazed how well some cutting blades and bits work with soft aluminum. Cut very slowly and use plenty of cutting lubricant, WD-40 in this case. The bit is still razor sharp after approximately 30 flush recessed cuts.
It is indeed a 3/4” forstner bit for “wood”. You’d be amazed how well some cutting blades and bits work with soft aluminum. Cut very slowly and use plenty of cutting lubricant, WD-40 in this case. The bit is still razor sharp after approximately 30 flush recessed cuts.
Great news Vunce. Besides my metal mills, I just happen to have an arsenal of various sized forstner bits for wood. Good to go!
MM
MM
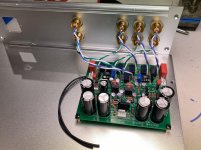
Completed PR3 Line Preamp
I made more progress on this preamp this week and completed it today. There were a few component changes after some listening at the work bench. I had a chat with George and felt these adjustments would benefit my setup.
-C6/C10 were increased to 1nF Wima FKP2 caps to decrease the low pass frequency to about 160KHz
-R8/R16 were increased to 680R in order to lower the gain to 15.4dB.
-C5/C8 were changed from Wima MKS4 to Mundorf EVO oil caps, this move is just pure overkill on my part. I was already desoldering parts and had the EVO’s in my stash already, why not!😀
The finished unit sounds excellent, dead silent background at idle and has onboard switching capability. Having the input switching and necessary psu on a single board really simplified installation. George took great care with the layout to keep noise from compromising the audio circuit.
The OPA627 is pricey, but I’ve been playing around with lots of different opamps with a DAC project and the OPA627 is a special one. I did install sockets in this preamp, so I’m sure curiosity will get the best of me and different opamps will make there way into the PR3 down the road.
Thank You George for sharing this preamp project, it’s a keeper!!🙂
Attachments
-
 361B38FB-2398-4E38-B6FC-FB3A157B7B67.jpg994.1 KB · Views: 322
 -
 4C1456DD-57F2-4CE8-8749-88C637E65A5F.jpg902.7 KB · Views: 318
 -
 5AF49BD9-8FC9-45FC-9404-C4DBCA47DFEB.jpg834.1 KB · Views: 238
 -
 3B7DC36A-896A-4778-B406-CF493ED24023.jpg833.6 KB · Views: 204
 -
 F5D47CDB-B0B0-42D5-98E3-01D0C3730F2C.jpg978.7 KB · Views: 243
Hi George,
This is the link to the enclosure I used. They are on Aliexpress also, just search for WA127 Aluminum enclosure.
WA127 Ful Aluminum Amplifier Chassis Tube Machine Front DAC Chassis AMP Case | eBay
Hi Oracle1,
I had a small pcb designed to hold Talema 7xxxx (60mm x 60mm) transformers with a mains line filter onboard. Very similar to what would be contained inside a filtered Schurter IEC module. As you can see it also will fit a small 10va toroid trafo. This is an Antek AN-0115.
I probably should have thought ahead and included the option for a 220v input, they are only configured for 115v input.
Cheers Fellas!! 🙂
L c r value ?
Vunce could you tell us the L C R value of the EMI filter you have?
Thank you in advance
Vunce could you tell us the L C R value of the EMI filter you have?
Thank you in advance
Here you go Oracle1 🙂
(C2 is not populated)
https://www.mouser.com/ProductDetail/KEMET/SSRH7HS-M10084?qs=r5DSvlrkXmKwKcRybRx7uA==
(C2 is not populated)
https://www.mouser.com/ProductDetail/KEMET/SSRH7HS-M10084?qs=r5DSvlrkXmKwKcRybRx7uA==
Attachments

Last edited:
It’s only 115v mains compatible. I’m thinking about a few tweaks to the layout and would add jumpers for 230v also. If I get to that point and it’s universally usable, I can share the Gerbers here.
Cheers!
Cheers!
Last edited:
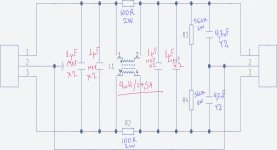
That’s a stout high current capable filter! Nice for power amplifiers.
My little guy is for DAC’s and preamps, very small current draw. 😉
My little guy is for DAC’s and preamps, very small current draw. 😉