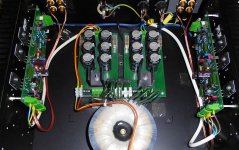
Last edited by a moderator:
Then we're all happy campers.if you're happy, I'm happy too
I get a Threshold NS 10 pre and M1 MC amp next week from the first owner.
Do not know how it ranks with the modern pre's but it complements my old Stasis 3 amp.
Why is it necessary to replace all tantalum's if they're still on the modules?
I've read some threads about it but no explanation why they should be replaced.
The big green ones probably require electrolytics and the mall blue ones maybe a solid cap.
The PSU caps can be replaced of course but the owner has chosen to built a external PSU so maybe the old caps in the unit itself are no longer used.
Have to investigate that of course.
though, don't expect ZM not mocking, even if you line up all Papamps, Papapreamps and Papaspks there ........


Why is it necessary to replace all tantalum's if they're still on the modules?
Tantalums of that time were all the rage, supposedly better than common electrolytics ........ but, as species in general, they didn't pass test of time
plenty of them developed popcorn syndrome (silent or loud, whatever), some gone taking surrounding parts with them, while some gone to effectively being non existent in circuit
I've seen enough pretty much functional, but above mentioned are plenty enough to gain bad rap for species
modern one, mostly smd packs, are certainly better, new technology etc.
anyhow, modern electrolytics are more than proper replacement for old Tantalums, while you also get modern solid caps small enough to put instead, where value is not so big so you can squeeze them in place
example - 1u to 3u3, plenty of positions where you can put smallest form Wima
Thanks for your elaborate response. I will supply some pics if I have the NS 10 and M1 to highlight what already has been done by the WBS technicians (former importer of Threshold)
Case in point…McIntosh MR77 tuner…a single tantalum took out the power supply…there were 10 of those buggers…replaced them all.
It's a work in progress, as all my projects are. It's a stereo car audio amplifier based around the Irs2092. It works great but I'm still figuring out the case situation. Tl494 controller at 65khz. 55v rails, STF25N10F7's for the audio and the venerable irf3205's on switching duty. The board is 70x90mm and is good for about 150 watts into 4 ohms. Has over volt, current, and thermal cut out. Oh, and it's bridgeable
Attachments
Last edited:
There are no free lunches though and, as per my discussions on classA, class AB, class B and class D, each mode has its advantages and drawbacks.
Class A amplifiers draw and dissipate their maximum rated power, whether playing music or just idling. Like a car engine running at the redline, things run hot and wear out faster at full power, there is no avoiding this.🙂
Greetings from far away 🇲🇨

Class A amplifiers draw and dissipate their maximum rated power, whether playing music or just idling. Like a car engine running at the redline, things run hot and wear out faster at full power, there is no avoiding this.🙂
Greetings from far away 🇲🇨
Last edited by a moderator:
G'day Guys,
I finally got my P3A finished.
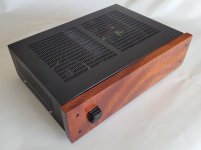
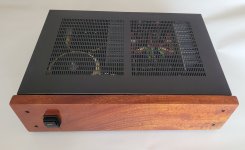
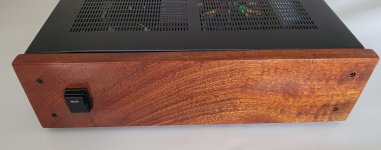
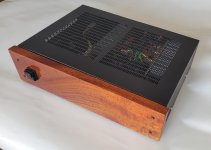
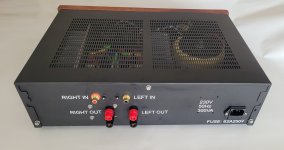
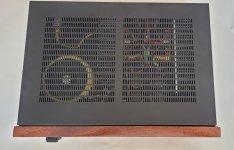
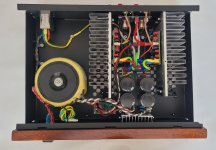
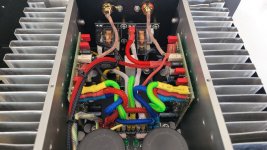
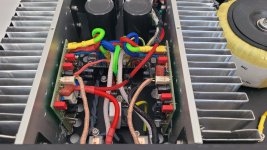
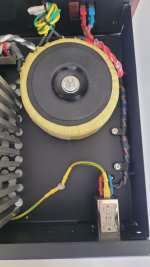
ESP P3A boards and P33A speaker protection boards.
I found a 300VA 24v-0v-24v power transformer cheap second hand and modified the secondaries for 2x 24V so that I could run dual bridge rectifiers as is my preference.
The power supply uses 4x Nippon Chemicon SMH 15000uF 63v caps I got cheap amongst a whole bunch of other caps from what I suspect was an estate sale.
Home brew PSU board
Also home brew speaker jack mounted relay boards for the speaker protection.
The power switch and power supply wiring were salvaged from a Wega Polaris 3 Group coffee machine. Coffee machines are a gold mine of electrical wiring and switches. The wiring is all high temp, 600v rated and very flexible stuff. The switches are usually rated for at least 15A often 20A+.
I love the heavy duty clunk with these push type switches. They usually server as a manual over ride for the group heads on a volumetric type coffee machine.
Me being me, I have to cover everything in PTFE braid.
The chassis is based on a Pioneer VSX-3300 I got for $1.
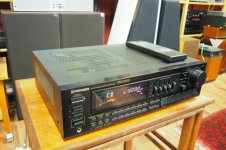
I liked the grill on the lid and it was just the right size. However the base plate and back panel were filled with all sorts of annoying stuff: holes, stamped features etc.
I remade the base and back out of some sheet steel I salvaged from an old dishwasher.
I also added a steel front for shielding and so I could attach the front panel.
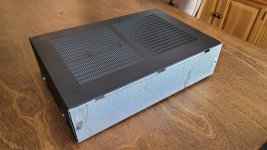
I also added some dimples to the sides so they could be fastened to the base plate using a makeshift dimple die (bolts, nuts, washers, a socket and an impact wrench). Without the plastic front the lid is designed to fit into, everything would just flop around. I never quite got the lid to sit perfectly flush.
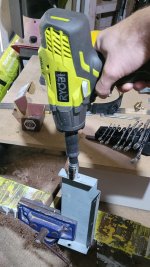
The heatsinks were originally one 430mm long job I salvaged from some faulty receiver or another.
I cut it in half and folded up some brackets out of more dishwasher steel.

Vent holes for the heatsink consisted of some 124 holes with a step drill bit. Step drill bits are freaking amazing. Mine is just a cheapy from our local big box hardware store but it keeps going and going. Well over 1000 holes so far it it still cuts through sheet like butter.
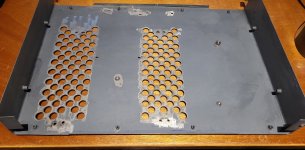
All the fasteners are hex head stainless steel because philips should not exist. Except of course, the 4 bolts holding on the front panel which are black oxide hex head....
You may notice I love rivet nuts. I use the stainless ones from Ali Express. The quality of these can vary. Some are too thick and break my tools, some are thin and feel too easy.
All the steel was stripped and painted with a couple of coats of Rustoleum Flat Black.
The front panel is some salvaged Mahogany I got a decent chunk of for $20. This will feature on a few more amps before it runs out.
Lots of Danish Oil and a few coats of high gloss clear coat.
Back panel labels were made by my wife out of adhesive white vinyl.
How does it sound?
Warm and detailed like a P3A should.
I finally got my P3A finished.


ESP P3A boards and P33A speaker protection boards.
I found a 300VA 24v-0v-24v power transformer cheap second hand and modified the secondaries for 2x 24V so that I could run dual bridge rectifiers as is my preference.
The power supply uses 4x Nippon Chemicon SMH 15000uF 63v caps I got cheap amongst a whole bunch of other caps from what I suspect was an estate sale.
Home brew PSU board
Also home brew speaker jack mounted relay boards for the speaker protection.
The power switch and power supply wiring were salvaged from a Wega Polaris 3 Group coffee machine. Coffee machines are a gold mine of electrical wiring and switches. The wiring is all high temp, 600v rated and very flexible stuff. The switches are usually rated for at least 15A often 20A+.
I love the heavy duty clunk with these push type switches. They usually server as a manual over ride for the group heads on a volumetric type coffee machine.
Me being me, I have to cover everything in PTFE braid.
The chassis is based on a Pioneer VSX-3300 I got for $1.

I liked the grill on the lid and it was just the right size. However the base plate and back panel were filled with all sorts of annoying stuff: holes, stamped features etc.
I remade the base and back out of some sheet steel I salvaged from an old dishwasher.
I also added a steel front for shielding and so I could attach the front panel.

I also added some dimples to the sides so they could be fastened to the base plate using a makeshift dimple die (bolts, nuts, washers, a socket and an impact wrench). Without the plastic front the lid is designed to fit into, everything would just flop around. I never quite got the lid to sit perfectly flush.

The heatsinks were originally one 430mm long job I salvaged from some faulty receiver or another.
I cut it in half and folded up some brackets out of more dishwasher steel.

Vent holes for the heatsink consisted of some 124 holes with a step drill bit. Step drill bits are freaking amazing. Mine is just a cheapy from our local big box hardware store but it keeps going and going. Well over 1000 holes so far it it still cuts through sheet like butter.

All the fasteners are hex head stainless steel because philips should not exist. Except of course, the 4 bolts holding on the front panel which are black oxide hex head....
You may notice I love rivet nuts. I use the stainless ones from Ali Express. The quality of these can vary. Some are too thick and break my tools, some are thin and feel too easy.
All the steel was stripped and painted with a couple of coats of Rustoleum Flat Black.
The front panel is some salvaged Mahogany I got a decent chunk of for $20. This will feature on a few more amps before it runs out.
Lots of Danish Oil and a few coats of high gloss clear coat.
Back panel labels were made by my wife out of adhesive white vinyl.
How does it sound?
Warm and detailed like a P3A should.
Last edited:
- Home
- Amplifiers
- Solid State
- Post your Solid State pics here
