My Nutube pre amp was made redundant when I bought Naim Atom Headphone Edition amp which is a streamer and DAC with XLR that I use to drive my ACA a couple of months ago. I'd love to hook the Nutube up to ACA Mini and drive the Decware Tiny Radials I built. I built two pairs and gave a pair away last xmas with a Chinese made 1969 Linsley Hood Amp. The spare pair have been sitting around waiting for a modestly priced amp ever since. To the store guys can you do Black PCB with Gold trace?

One pragmatic option is mentioned in posts 182 & 184 of this thread. In case you don't receive any affirmative replies to your request for special custom made PCBs, built in your preferred color and surface finish.
Hey Mark, I was thinking of playing around with your suggestion. I would have to turn that into a Gerber and then send the gerber file to a PCB manufacturer correct? I remember a PCB company being suggested. Was that PCBway?
I recommend you choose one of the PCB fabs who participate in the wonderful price-quote service, found at this website
http://www.pcbshopper.com
The three fabs I used most recently, for my own projects, were: JLCPCB, Elecrow, and Seeed Studio. I found all three of them through pcbshopper dot com, and I was delighted with the end product each of them delivered. The others are probably great too; these are merely the ones I happened to select.
If you haven't ever made a PCB yourself, the basic steps are: (1) obtain or purchase PCB layout software. Eagle, ProTel, KiCad, EasyEDA, ExpressPCB, ORCAD are some of the leading names. (2) obtain or create "footprints" of the components used in your / Nelson's ACA Mini design. (3) Draw Nelson's circuit schematic within the software package. This allows the software to perform continuous, real-time connectivity checking, to let you know whether the PCB layout is connected together perfectly. I.e. whether your layout exactly matches the schematic. (4) Using Nelson's layout as a guideline, place the components on your board. (5) Using Nelson's layout as a guideline, connect the components together using the PCB's two copper layers. (6) Activate all of the correctness checks your software offers: Electrical Rules Check, Design Rules Check, Layout vs Schematics check, etc. Fix any mistakes these checks uncover. (7) Export your design to Gerber File Format.
Then send the Gerber File Format archive (in .zip archive format) to your chosen PCB fab. Receive boards in 10-20 days depending on which fab and which express shipping company you choose.
Is there a quicker way? I don't know of one, but maybe other members might have recommendations or at least optimistic ideas.

Looks great! Any listening impressions? Jumpers in or out? I see you used insulators on you output mosfets. I m using a smidge of thermal grease to ease the heat transfer. The heatsinks seems to be hot plugged by soldering the studs anyways.Thanks for Papa's generosity, I was able to build one yesterday.
I also made a small wood base and added some binding posts.
I look forward to playing around with the jumpers over the holidays.
This is going to be fun.
I don't want to jinx it but I have used the amp everyday without intermittent turn buzz I was having before. Only thing I am doing diffferet: not cycling the PS. It's always plugged in.
I ran out of goop but had some silpads around so that's what I used.
Sadly I haven't had the opportunity to play around the ACA mini since building it..🙁 Hopefully soon...
Cheers,
Dennis
Sadly I haven't had the opportunity to play around the ACA mini since building it..🙁 Hopefully soon...
Cheers,
Dennis
I'm gathering parts for one of Mark's "almost clone" boards. I'm having a hard time finding the IRFP 9240/240 by Harris. Anyone know a reputable source?
plz double check but I believe the part is harris 9250/250 the '40' part number is the bigger to3p
It's done and playing music! This is the third idea for a base. First was an aluminum box and then Nelson made the PCB bigger. Second was a cigar box, but the sliding instead of hinging top presented difficulties. Third time the charm. Inspired by Dennis Hui's base I found some ends from redwood 2x2's left over from a fence project to make the base.
Jumpers in or out? Since I lost the jumpers, it's jumpers out!
Thanks Nelson. Pennie says "It sounds like you just bought $10,000 speakers!"
-Tom-
Jumpers in or out? Since I lost the jumpers, it's jumpers out!
Thanks Nelson. Pennie says "It sounds like you just bought $10,000 speakers!"
-Tom-
Attachments


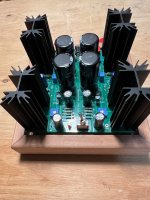


sweet!It's done and playing music! This is the third idea for a base. First was an aluminum box and then Nelson made the PCB bigger. Second was a cigar box, but the sliding instead of hinging top presented difficulties. Third time the charm. Inspired by Dennis Hui's base I found some ends from redwood 2x2's left over from a fence project to make the base.
Jumpers in or out? Since I lost the jumpers, it's jumpers out!
Thanks Nelson. Pennie says "It sounds like you just bought $10,000 speakers!"
-Tom-
I knew what you meant…check the BOMirf9520/ irf520 ooops!
I had to order from two different vendors on eBay.
- Home
- Amplifiers
- Pass Labs
- DIY ACA mini