Re: Re: Re: Re: A 'how to' for solving MDF Expansion
Yep I did point that fact out in my post.
Hmm, if I didn't know any better the only reason for the paragraph was to get in the words 'modern' and 'hack'.
Doesn't my original reply imply that I concede to the idea of varying degree's of expansion between products:
BTW Any liquid you apply to MDF causes some expansion, so its not just the waterbased finishes
I've got to scratch my head. I feel I've been very thorough in exploring the problem and the solutions. I guess the quality of my finish shows this much more or I have higher standards") because the joints don't stay 'invisible'.
because the joints don't stay 'invisible'.
That probably sounded a bit condescending, well good because telling me that doing this correctly to start with implies I and others and don't even know the problem and saying you can keep the MDF butt joints invisible forever without 'magical cures' insults the entire purpose of this thread and doesn't help anyone.
Now your just arguing for the sake of it. MDF losing moisture causes it to expand? Hot, cold. Dry, wet. They're all part of the problem and its the cycle thats important. It expands with the moisture, drys out with the heat then soaks up some more and expands again. This is still happening long after any effects of moisture contributed by the glue have disappeared.
Really I don't why I bother with this stuff.
Originally posted by MJL21193 The loose fibres you refer to will congeal with any primer.
Yep I did point that fact out in my post.
The fact is, the water in the "homebrew" makes these fibres even more plentiful. Water will "raise the grain" on solid wood and plywood, it does the same with MDF. Professional furniture finishers(old school, not modern hacks) use water(a wipe with a wet cloth) to raise the grain before a final fine sanding. The trick is to let it dry completely. A quality finish takes time. A way to save time is to use a product that does not raise the moisture content of the wood (or wood product) that your working with.
Hmm, if I didn't know any better the only reason for the paragraph was to get in the words 'modern' and 'hack'.
BTW, not all liquids are equal in thier swelling ability. Water is the swelling champion. If you don't believe this, try this experiment:
Take two identical pieces of MDF and soak one in water and the other in mineral spirits( paint thinner). Leave them for about a hour, then check the results. You will see that the MDF soaked in water is considerably thicker than the other. The one soaking in paint thinner will be saturated with the solvent, but will be no bigger.
Doesn't my original reply imply that I concede to the idea of varying degree's of expansion between products:
BTW Any liquid you apply to MDF causes some expansion, so its not just the waterbased finishes
I use mitred joints with great results, and I use butt joints with great results. The commercial manufactures are looking for the fastest finish possible, with the the fewest problems. If you have the time, knowledge and most of all patience, and using no magical cures, your joints will remain invisible forever.
I've got to scratch my head. I feel I've been very thorough in exploring the problem and the solutions. I guess the quality of my finish shows this much more or I have higher standards
because the joints don't stay 'invisible'.That probably sounded a bit condescending, well good because telling me that doing this correctly to start with implies I and others and don't even know the problem and saying you can keep the MDF butt joints invisible forever without 'magical cures' insults the entire purpose of this thread and doesn't help anyone.
If the joint is properly glued (with the proper glue), it will not move. You say it's moisture causing the MDF to swell that creates the crack. I say it's the MDF losing excess moisture that's causing the problem. If the glue has water in it, it's adding to this problem. Therefore, it's a solid idea you use a non waterbased glue for MDF.
The MDF needs to be at equalibrium moisture content before finishing, therefore using anything that introduces more water, is counterproductive.
Now your just arguing for the sake of it. MDF losing moisture causes it to expand? Hot, cold. Dry, wet. They're all part of the problem and its the cycle thats important. It expands with the moisture, drys out with the heat then soaks up some more and expands again. This is still happening long after any effects of moisture contributed by the glue have disappeared.
Really I don't why I bother with this stuff.
Re: Re: Re: Re: Re: A 'how to' for solving MDF Expansion
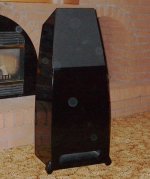
It does sound condescending. It implies that I don't know what I'm talking about and that I have low standards. I have seen some of your work, have you seen any of mine? Check out the pic below for an example (yeah, my camera is a POS). All butt joints, 10 sprayed coats urethane based gloss paint, colour sanded wet with 2000 grit paper and polished with Meguiar's automotive wax. Finished 2 years ago and to this day no visable joints. Does that sound like the work of a person with low standards?
I didn't come here to argue for the sake of argueing, I was trying to point out what has worked for me (and works in general).
If you don't want to hear anything constructive, I won't bother.
ShinOBIWAN said:
I've got to scratch my head. I feel I've been very thorough in exploring the problem and the solutions. I guess the quality of my finish shows this much more or I have higher standards
That probably sounded a bit condescending, well good because telling me that doing this correctly to start with implies I and others and don't even know the problem and saying you can keep the MDF butt joints invisible forever without 'magical cures' insults the entire purpose of this thread and doesn't help anyone.
It does sound condescending. It implies that I don't know what I'm talking about and that I have low standards. I have seen some of your work, have you seen any of mine? Check out the pic below for an example (yeah, my camera is a POS). All butt joints, 10 sprayed coats urethane based gloss paint, colour sanded wet with 2000 grit paper and polished with Meguiar's automotive wax. Finished 2 years ago and to this day no visable joints. Does that sound like the work of a person with low standards?
I didn't come here to argue for the sake of argueing, I was trying to point out what has worked for me (and works in general).
If you don't want to hear anything constructive, I won't bother.
Attachments
Re: Re: Re: Re: Re: Re: Re: A 'how to' for solving MDF Expansion
My camera....
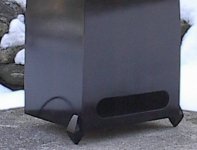
Here's a cropped closeup of it before polishing. Although of poor quality, you can see that there are no joints showing, as it would be seen in the reflection.
454Casull said:To be honest, I'm not sure why you attached that picture, since no details can be discerned.
My camera....
Here's a cropped closeup of it before polishing. Although of poor quality, you can see that there are no joints showing, as it would be seen in the reflection.
Attachments
There may be local conditions one of you is experiencing that the other doesn't. If one "successful" method works locally that is all well and good. I think Shin may be experiencing the worst conditions based on location. If a solution is developed for the "worst case", we all will benefit and be able to proceed with confidence.
MDF expansion, now theres something I hadn't even considered . Not to sound really dumb but can I veneer a cabinet (iron on veneer) without having applied any primer? All butt joints, all glued (resin based I believe, evo stick). Will it all start to go out of line over time or (as I hope) will the veneer just stop it absorbing any moisture?
. Not to sound really dumb but can I veneer a cabinet (iron on veneer) without having applied any primer? All butt joints, all glued (resin based I believe, evo stick). Will it all start to go out of line over time or (as I hope) will the veneer just stop it absorbing any moisture?MJL21193,
Having followed a few of his threads, I know that Ant (ShinOBIWAN) has done a lot of work trying to get round this MDF problem, and I'm in the same boat - using the same sort of products, and seeing the same problems.
It could be that the MDF sold in the UK is slightly different, or maybe it could be a climate issue, but I doubt it.
One very useful thing that Ant has done is to provide detailed explanations of what he's tried, and the techniques he's used.
It's great that you appear to have found a decent solution - could you post a list of the products you're using and a step-by-step guide of your technique?
I'm currently experimenting with a few different products, and marine epoxy is beginning to look quite promising. Needs to stand the test of time before I give it the thumbs up though.
BTW Ant, I hear you on the International MDF primer problems. I used it a few years back for a speaker project. Damn it sucked!
PS Dr Em: Not speaking from personal experience, but I've never heard anyone saying they've had those kinds of problems with a veneering job, so I suspect you'll be OK. I wouldn't use primer underneath a veneer - MDF is a good substrate on its own, and I'd worry about some glues potentially reacting with the primer.
sploo said:MJL21193,
It's great that you appear to have found a decent solution - could you post a list of the products you're using and a step-by-step guide of your technique?
BTW Ant, I hear you on the International MDF primer problems. I used it a few years back for a speaker project. Damn it sucked!
Step by step. First step is to understand what the cause of the problem is. It is not, for the most part, the result of MDF absorbing moisture. It is the MDF drying out and losing moisture, thereby shrinking, that causes the problem. Raw MDF absorbs moisure, especially in damp conditions. Introducing more moisture via glue and waterbased finishs, only compounds the problem. It is crucial to limit the amount of water that comes in contact with MDF. Water (and only water) makes it swell.
So, step # 2 is to make sure it is as dry as possible before finishing. After the boxes are put together, exercise some patience, and earn the wrath of the wife/girlfriend by storing it inside (preferably in the room it will end up) for a few days. Unless you have a grow-op up nd running in your house, it will be dryer than anywhere else. This will give it a chance to give up the moisture it's holding easily, as there is no finish to slow down the moisture loss. The longer you can leave them before the next step, the better. I usually leave new boxes inside for a week or two.
PS: This International MDF primer is waterbased. That alone is enough to tell you it's not suitable.
MJL21193 said:
Step by step. First step is to understand what the cause of the problem is. It is not, for the most part, the result of MDF absorbing moisture. It is the MDF drying out and losing moisture, thereby shrinking, that causes the problem. Raw MDF absorbs moisure, especially in damp conditions. Introducing more moisture via glue and waterbased finishs, only compounds the problem. It is crucial to limit the amount of water that comes in contact with MDF. Water (and only water) makes it swell.
So, step # 2 is to make sure it is as dry as possible before finishing. After the boxes are put together, exercise some patience, and earn the wrath of the wife/girlfriend by storing it inside (preferably in the room it will end up) for a few days. Unless you have a grow-op up nd running in your house, it will be dryer than anywhere else. This will give it a chance to give up the moisture it's holding easily, as there is no finish to slow down the moisture loss. The longer you can leave them before the next step, the better. I usually leave new boxes inside for a week or two.
I mentioned this above but water isn't the only thing that makes the MDF swell. As an example I can show an 50mm x 18mm MDF length that I use to stir my cellulose and 2k primers. Its more like 25mm thick MDF at the end used for stirring.
BTW I store all my MDF/work in the house over a period of months, doesn't make any difference for me. And I've never seen MDF shrink, ever. The end grain of a butt joint telegraphing to reveal the joint just scream expansion to me, rather than anything to do with joint movement or shrinking. But we all have our theories, its just the first time I've seen the one your suggesting. I don't really think its important eitherway, what matters is solving it or finding solutions when it does happen.
I've tried all that your suggesting here. So I guess your in the right part of the world with some higher grade MDF. Folks should try out your method first since its easier and less work. If they get good results then great, time and effort saved. If not then they need to look at the methods that folks like me, sploo and others are exploring.
Dr.EM said:All butt joints, all glued (resin based I believe, evo stick).
A word on box construction: Use the correct glue such as PVA wood glue or polyurethane glue specifically made for use with wood. Use of another type of glue can cause joints to move or fail.
Step 3: Sanding. Spend the time to sand the box as smooth and even as possible. Start with 100 grit then a final sanding with 400 grit, paying particular attention to the edge grain. I use a 5" random orbit sander for this, but hand sanding will work also.
DO NOT fill any cracks or holes, or attempt to level two misalligned surfaces yet. The box is now ready for primer.
ShinOBIWAN said:
I've tried all that your suggesting here.
I'm not done yet.
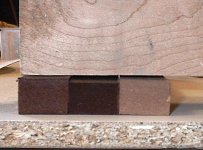
Regarding your stir stick, perhaps the lacquer you are using is waterbased. I will attach a picture below of MDF soaked for one hour in water and another in mineral spirits (as I mentioned in a previous post). It can be seen that the on soaked in solvent did not swell at all.
Step 4: Priming. The only thing special about the primer is that it NOT be waterbased. I generally use urethane based paints (yes, strong fumes, not good to breathe) for speakers, and for the primer I just thin this as usual for spraying. I lay on 6 to 8 coats, letting it "flash" between coats. This process takes about 2 to 3 hours depending on temperature. Spraying this way ensures a homogenous film build.
I then let it dry for several days. As it cures, it gets harder.
The picture shows three pieces of MDF, left is one soaked in water, middle is soaked in paint thinner, and right is a dry piece.
Attachments
Lacquer thinners and alcohol and to some extent other similar solvents all absorb moisture from the air, unlike mineral spirits.
If you don't mind, try your test on a humid day and use lacquer thinner. I'm genuinely curious to see what happens. I think, if it's ~>60% RH, you'll see some expansion. Somewhat between dry and water soaked.
As strange as it may seem, all the auto primers except epoxy and specific rust preventative coatings are slightly to moderately hydrophylic (they like to absorb water and moisture from the air).
Shin lives in a rather humid climate. His stir sticks (and speaker enclosures) are constantly exposed to that humidity. Primer won't stop it absorbing moisture.
MJL21193 said:
... I will attach a picture below of MDF soaked for one hour in water and another in mineral spirits (as I mentioned in a previous post). It can be seen that the on soaked in solvent did not swell at all.
...
The picture shows three pieces of MDF, left is one soaked in water, middle is soaked in paint thinner, and right is a dry piece.
Mineral spirits cause MDF to shrink?MJL21193 said:
The picture shows three pieces of MDF, left is one soaked in water, middle is soaked in paint thinner, and right is a dry piece.
454Casull said:
Mineral spirits cause MDF to shrink?
It looks like that in the pic, but they are the same thickness. The one soaked in water swelled from 5/8" thick to 3/4" thick in one hour.
Bob Barkto said:
Primer won't stop it absorbing moisture.
A water resistant finish such as urethane based paint will slow down absorpsion of moisture to the point where it's as good as saying it's stopped.
Bob Barkto said:
Shin lives in a rather humid climate.
All the more reason to avoid excess moisture.
Step 5: Now's the time to fill any cracks or nail holes or uneven areas. Once again, avoid the waterbased fillers such as drywall joint compound. I use automotive body filler on bigger fixes, and automotive spot putty on small fixes, such as cracks at joints, nail holes.
Next is more sanding. If you have let the primer dry long enough, this will be easy. Primer that is ready for sanding will produce fine dust that will not clog the sandpaper. If this is not the case, it's not dry enough.
Using a rubber block and 400 grit paper, sand the entire box, being carefull not to "burn through" the primer. You may be tempted to use a machine, don't - it cuts too fast. The objective is to get a smooth surface for paint. Unfortunately, if there were large repairs with the body filler, these should be primed. I use a compatible primer in a spray can that dries fast for this. Small repairs will usually not need to be primed.
MJL21193 said:I'm not done yet.
Regarding your stir stick, perhaps the lacquer you are using is waterbased. I will attach a picture below of MDF soaked for one hour in water and another in mineral spirits (as I mentioned in a previous post). It can be seen that the on soaked in solvent did not swell at all.
The lacquer I use is either acrylic or 2k but when I was talking about the stirring sticks I referred to the primer on them causing the sticks to swell. These are obviously not waterbased but cellulose and 2k.
Its good that it works for you but I just ended up stripping it back because it looked a mess when I did it the way your describing. Trust me, if I could get away doing it with just sanding, careful MDF storage and then priming I would. Its far less hassle but as it stands I've got something that works in what seems to be a worst case scenario.
MJL21193 said:All the more reason to avoid excess moisture.
Yeah I was going to seal them up in stasis but then realised I wanted to listen to them at some point.
Step 6: Painting is pretty much a repeat of priming, except I usually do 10 coats. In this stage, it's vital to let each coat "flash" (that is, reach a point between wet and dry where an additional coat will not make the one underneath sag. It will be "tacky"). The 10 coats of paint have to be as one homogenous film layer for sucessful colour sanding. This process can take a while, depending on temperature and humidity. It makes sense to have both boxes ready to be painted at the same time.
For the process I am outlining, it will not be a problem if small specks of dust land on the paint, and you should make no attempt to remove it. I have painted over small flies, that have gotten stuck.
Given the thickness of the final paint layer, a considerable amount of time is needed for drying. A longer curing time is best. I wait a couple of weeks or more, letting the paint harden.
Below is a pic of a close-up of a corner on a box that I primed today. Taken will my POS camera.
Attachments

- Status
- This old topic is closed. If you want to reopen this topic, contact a moderator using the "Report Post" button.
- Home
- Loudspeakers
- Multi-Way
- A 'how to' for solving MDF Expansion