
 Time to bring Papa components kit now..stay in tune
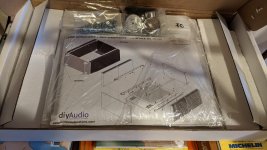
+1 to that!In contrast to my previous builds, there was no scrounging used sinks at the local flea market, no cutting, drilling, sanding, and polishing wooden panels to make the rest of the chassis, no stopping to measure part way through realizing I forgot to account for something, no carry things to the garage to cut metal (then back out into the garage to cut again), no metal drilling, no aluminum corkscrews flying everywhere, no tapping threads into the holes, no left over oily mess, no realizing that one hole is just a pinch off because the drill bit wandered despite using a punch, etc...
None of that this time around!
Hate those annoying aluminum corkscrews.
I am left with 2 extra 100 ohm resistor from the power stage bag. I attributed that to R6? being already installed. Has anyone found that as well or am I missing something?
Yeah, I also had two extra 100 Ohm resistors in the OS bag. I was also afraid I was missing something, but reading your post reassured me. It always helps to be in the same boat. Now, back to soldering
")
Small update from me! Chassis 86 is at home!!!
Really happy with the number, if that matters at all!
Don't forget some classic albums came out in 1986. Some of my faves from that year:
Metallica - Master of Puppets
Iron Maiden - Somewhere in Time
Slayer - Reign in Blood
Crimson Glory - s/t
R.E.M. - Life's Rich Pageant
Siouxsie & The Banshees - Tinderbox
Beastie Boys - Licensed to Ill
Maybe your favorite 1986 track will be the first song you play on the completed amp!
Mein Bruder Generg deserved not just one to be built for him
Let's hope that his Tikataka is going to be in better shape , so we can have him around for few decades more
(not to forget a fact that he built them all, in last decade or so)
I understand, I am simply jealous,
I am flying blind when soldering relying on 20yo muscle memory. I have not come to terms with my vanishing eyesight for anything within 25-40cm range.

I understand, I am simply jealous,
I am flying blind when soldering relying on 20yo muscle memory. I have not come to terms with my vanishing eyesight for anything within 25-40cm range.
Hi grataku,
you got the irony behind the irony in my posting.....
:--))
I made a joke about the missing soldering points and say this is true diy.....
at the same time I let my friend Andreas build the amp....
Ha, ha, thank you for opening my eyes.....

and do not forget I have a big brother that cares for me when I get in trouble...
Someone else is building it for you? It's diy...you-do-it -audio
Lol. Generg has ushered in a new era at diyaudio: The DIHaudio movement, Do-It-Himself (or Herself).
Just teasing.
I get that thing about the eyesight going bad. Over the past couple of years I've found that I need to take off my glasses to see things up close. Never had to do that before.
I guess bifocals are right around the corner.
I have some lighter/skinnier ones, doing 2x
even took them with me to Pa's, few years ago
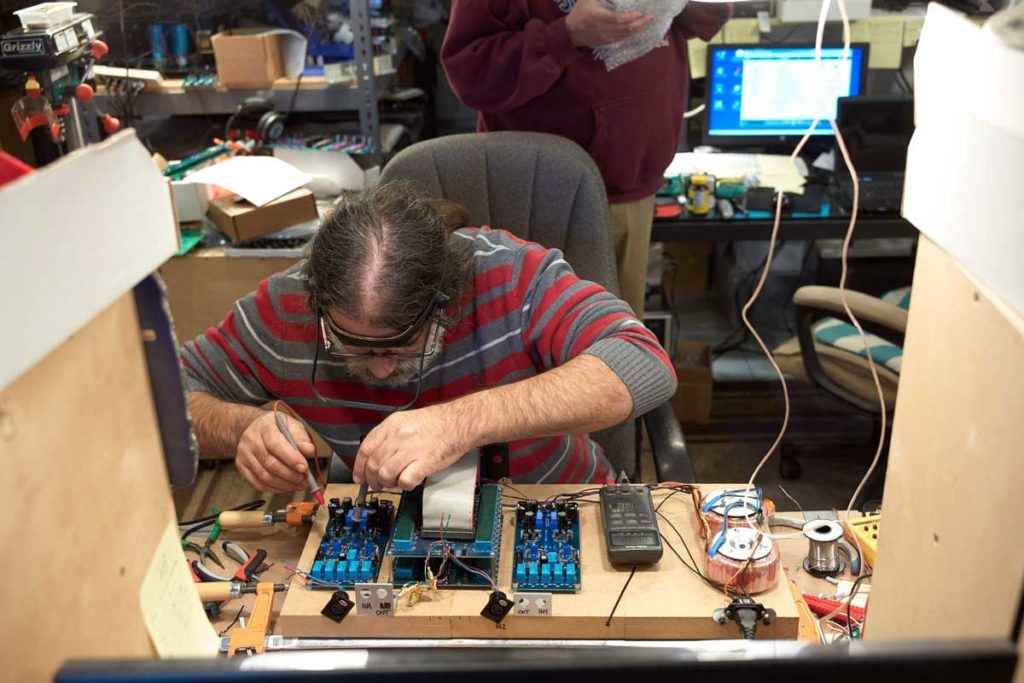
thoough, almost didn't need them - everything he gave me was huuuuuge - wires, plank, Donuts, soldering thingies
Great pic.
I would have been out of DIY long ago if not for those magnifiers. I'm legally blind as they say.
I use two pairs of glasses a lot. I have my everyday pair of single vision prescription lenses. I then add some 3.5 for close up or 2.5 for just general work on small stuff. I do not get along well with the bi-focal type so i have two pair that I wear; reading and distance.
Folks:
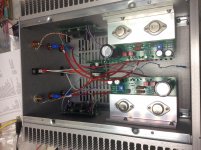
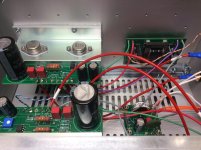
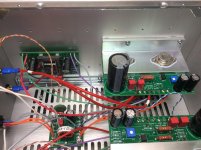
As embarrassing as it is to admit this, I need help with my VFET build. Assembly was certainly easy enough, but it isn't working and I'm getting weird voltage readings.
With the switch Off, voltage between the chassis and the live pin on the switch is in the 32.5 to 32.8 VDC range (the voltage is not steady; it bounces around). The LED on the Meanwell brick is a steady, bright blue.
With the switch On, voltage between the chassis and the live pin on the switch is in the 0.5 to 3.3 VDC range (the voltage is not steady; it bounces around very quickly). The LED on the Meanwell brick flashes on and off quickly but is very dim. Not surprisingly, I get the same 0.5 to 3.3 VDC voltage readings between ground and V+ on the two OS boards when the amp is turned on.
My two FE boards differ. One has a via labeled "R7" and the other does not. On the FE board with R7, the via labeled "D-" is next to "D+". On the FE board lacking R7, the via next to "D-" is labeled "G" (and that via is connected as directed in the schematic to a ground via on its OS board). R7 was not installed on either FE board.
Soldering is pretty neat. There are no frayed strands of wire, the wires are all properly run and I am bewildered. I'm frustrated at apparently being the one outlier who's having a problem with his VFET build.
I'm not sure what to look for, so I thought it best to ask before taking the amp apart. Please weigh in.
Regards,
Scott
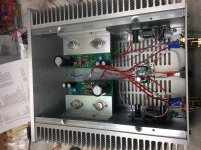
Attachments
- Home
- Amplifiers
- Pass Labs
- DIY Sony VFET Builders thread