Well done thimios. It seems to be making a big sound for little effort. It must be running cool to have the heatsink sitting horizontal like that! 😎
Fantastic A/B amplifier. Engineers and technicians that know amplifier circuits realize what a great design this is. A retail amplifier based on this circuit would be in the thousands.
Hello, i have audio physic tempo 25 speakers, 4 ohm.
Can i use lower voltage on Honey Badger ( 45-50V dc) without changig resistor or capacitor? How HB work on 4 phm speakers. Thanks
Can i use lower voltage on Honey Badger ( 45-50V dc) without changig resistor or capacitor? How HB work on 4 phm speakers. Thanks
I finished building my Honey Badger (REV 2.1) recently, set idle current and DC and used it to drive a pair of 15"- woofers (Visaton PAW 38 in 6th order vented cabinets). Wow, great punch and perfectly clean bass - just what I needed.
After a couple of days of listening I loaded the whole set up into my car and drove 400 miles to a meeting of audio-fanatics (Frickelfest Essentials) and put it all together again. When powering it up, the resistor in the Boucherot-circuit of one channel (R50, 10R / 3W) went up in smoke immediately and the amp went into protection!
Now after checking all semicondutors (all good) and replacing the resistor the Badger works fine again. Is there any experience regarding oszillation tendency as it might happen again?
Attachments

Funny - I just noticed, that somebody had the same issue two years back and I even commented on it 🙄. I use the original PCB-layout and metal-film resistors though ...
Hello, i have audio physic tempo 25 speakers, 4 ohm.
Can i use lower voltage on Honey Badger ( 45-50V dc) without changig resistor or capacitor? How HB work on 4 phm speakers. Thanks
You should have no issues with using the standard circuit diagram with 50V. That’s what I’m using on my current builds, although I’ve also tried 60V with no issues. The only change would be the R18/R19 ratio to maintain 15V if you use the resistive option. If you use a Zener then make sure it have enough current through R19 to keep above the knee current for your device (some have had issues).
As for 4 ohms, I can’t comment on the sound but you should be able to select your combination of output devices and transformer to suit. Ostripper designed it to be able to manage 4 ohms comfortably.
Thank You ! I think i will use mjl4302/4281 and 400w transformer for one chanel. DC voltage 50V, and 4 ohm speakers. About sound i will tell You when i built amplifier. 😉😁
Finally finished. Sort of...
I began planning this build and collecting parts back in 2016. From the start I wanted something that would put 200W into nominally 6 ohm speakers happily. I chose Semelab devices to achieve this, though I'm wishing I bought a few more at the time because they've long since disappeared. I also wanted to put a dual monoblock build into a 300mm 400U chassis, because somebody said it can't be done. So I made sure to use big 500VA custom wound toroids, and I also crammed in one of VZaudio's fantastic 21st C amp control boards, with all the kit, just to be sure I waking it hard for myself. I needed custom PSU boards because it had to fit snugly, although as it turned out there was a bit more margin on this than expected.
It's seen some extensive stability testing, but it would be nice to get some THD figures from it. But that needs a bit of kit and time I don't really have any more, so after all the upheaval that 5 years of life brings, I've completed it enough to now put it into service. I say enough, knowing that once we start using it, I'll be unlikely to pull it back out and tinker.
My only real hesitation is that the case fits pretty poorly at the back, and it's tricky to fix because of the order in which I need to screw it all together. Even now the heatsinks are only held by one screw at the bottom because the chassis baseplate occludes the remaining two holes. If there's one thing I've learnt from this, design for manufacture is a thing. The internal chassis idea seemed a good idea at the time but it's been tricky working around it!
In all it works and sounds great. It's a pleasing feeling, listening to something that was once only a bag of parts.
Attachments
-
 DSC_5526_sm.jpg212.9 KB · Views: 459
 -
 DSC_5280_sm.jpg87.3 KB · Views: 385
 -
 DSC_5278_sm.jpg339.4 KB · Views: 402
 -
 DSC_5277_sm.jpg353.5 KB · Views: 470
 -
 DSC_5262_sm.jpg456.5 KB · Views: 442
 -
 DSC_5220_sm.jpg298 KB · Views: 464
 -
 DSC_4888_sm.jpg364.9 KB · Views: 505
 -
 DSC_3016_sm.jpg315.5 KB · Views: 531
Hi all,
I've started populating my rev2.4 boards and ran into some "trouble". In the BOM resistors R2, R5, R22 and R24 are 820 ohm, but the digikey part number is for 825 ohms.
I have of course ordered 825 ohms and I don't have any 820 ohms at hand. Can I use the 825 ohm resistors? My guess is that there should be no problem, but I'd like to be sure. That's why I'm asking. I did search, but I didn't find anything. 🙂
Seriously? Are you asking about the 0.6% difference ?! the accuracy of the resistors that you ordered is probably 5% or at best -1%
Yes, seriously. Forgive me, but I just want to be sure. Well now I know that it is okay, thank you for your answer.
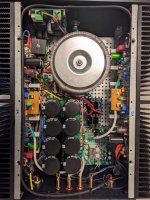
Hi all. I just want to share my interpretation of this awesome amp. I want once more to warmly acknowledge the friend Stuart who, despite the distance which divides us, never made me lack his kind, patient and helpful support. Without him this build would have never been realized.
Gaetano.
Gaetano.
Attachments
-
 PXL_20211216_110244376.jpg589.1 KB · Views: 360
 -
 PXL_20211216_110720390~4.jpg203.4 KB · Views: 342
 -
 PXL_20211216_110658313~2.jpg327.2 KB · Views: 370
 -
 PXL_20211216_110158190.jpg438.6 KB · Views: 372
 -
 PXL_20211216_110332427~3.jpg468.7 KB · Views: 368
 -
 PXL_20211216_110711633~2.jpg406.7 KB · Views: 368

Great job, good looking amp. May I ask which power switch you used?Finally finished. Sort of...
I began planning this build and collecting parts back in 2016. From the start I wanted something that would put 200W into nominally 6 ohm speakers happily. I chose Semelab devices to achieve this, though I'm wishing I bought a few more at the time because they've long since disappeared. I also wanted to put a dual monoblock build into a 300mm 400U chassis, because somebody said it can't be done. So I made sure to use big 500VA custom wound toroids, and I also crammed in one of VZaudio's fantastic 21st C amp control boards, with all the kit, just to be sure I waking it hard for myself. I needed custom PSU boards because it had to fit snugly, although as it turned out there was a bit more margin on this than expected.
It's seen some extensive stability testing, but it would be nice to get some THD figures from it. But that needs a bit of kit and time I don't really have any more, so after all the upheaval that 5 years of life brings, I've completed it enough to now put it into service. I say enough, knowing that once we start using it, I'll be unlikely to pull it back out and tinker.
My only real hesitation is that the case fits pretty poorly at the back, and it's tricky to fix because of the order in which I need to screw it all together. Even now the heatsinks are only held by one screw at the bottom because the chassis baseplate occludes the remaining two holes. If there's one thing I've learnt from this, design for manufacture is a thing. The internal chassis idea seemed a good idea at the time but it's been tricky working around it!
In all it works and sounds great. It's a pleasing feeling, listening to something that was once only a bag of parts.
Recently I came across a pair of power transformers which allow for 50-0-50 Vac secondary voltage. May I use them to feed a pair of Honey Badgers? Which precautions, besides using the most powerful output devices, do I have to do?
Best regards!
Best regards!
Sure! It's an E-Switch PV6H24011-311. Choices are limited if you want a black anodized switch, but they do also make an RGB LED version which I thought might make error-state display easy. I was tempted to back order one because nobody carries stock but had no idea how long it would be before I saw it.Great job, good looking amp. May I ask which power switch you used?
- Home
- Amplifiers
- Solid State
- diyAB Amp The "Honey Badger" build thread