Mine went from 100 to 115 (about 30 tested) using a DCA75 pro.All those voltages seem normal to me, I am though suspicious of the 177 hfe measurement though. I have measured lots of mje340s and they are between 80 and 130.
hi,
what transistor tester would be good enough for matching transistor pairs?
i have GM328A tester and it works. a drawback is that it has low test current (~1mA)
do you think that there can be significant improvement with other testers? like DCA75 pro (it has higher test current 12mA)?
i have also found something like this - DUOYI DY294. have anyone used this device? it has pretty wide testing range of tests, but origin of this device is unknown")
what transistor tester would be good enough for matching transistor pairs?
i have GM328A tester and it works. a drawback is that it has low test current (~1mA)
do you think that there can be significant improvement with other testers? like DCA75 pro (it has higher test current 12mA)?
i have also found something like this - DUOYI DY294. have anyone used this device? it has pretty wide testing range of tests, but origin of this device is unknown
mhuth1776 - I learned something from your measurements. Checking the schematics, I see that the Wolverine is thermally overcompensated. This is okay provided that the bias does not collapse under load. The bias has to be set high enough.
I use thermal undercompensation which means that the bias is optimal when idle, and heads towards the maximum under load. This requires sufficient margin to avoid runaway (I rely on simulation). The distortion is lowest at idle.
Ed
I use thermal undercompensation which means that the bias is optimal when idle, and heads towards the maximum under load. This requires sufficient margin to avoid runaway (I rely on simulation). The distortion is lowest at idle.
Ed
DY294 is a pretty good tester, does a number of tests, the highest hfe current is 10mA but you can build external tester board for higher currents such as 100mA at least. However, I found that 10mA hfe results are not much different than those taken at 100mA. If you get DY294 use regulated external 6V power supply. My PS can deliver up to 3A. Batteries do not last long if you do other tests than hfe.hi,
what transistor tester would be good enough for matching transistor pairs?
i have GM328A tester and it works. a drawback is that it has low test current (~1mA)
do you think that there can be significant improvement with other testers? like DCA75 pro (it has higher test current 12mA)?
i have also found something like this - DUOYI DY294. have anyone used this device? it has pretty wide testing range of tests, but origin of this device is unknown
cheers,
The Wolverine is pretty forgiving to bias change. See attached, there is very little change. So nothing to worry about!mhuth1776 - I learned something from your measurements. Checking the schematics, I see that the Wolverine is thermally overcompensated. This is okay provided that the bias does not collapse under load. The bias has to be set high enough.
I use thermal undercompensation which means that the bias is optimal when idle, and heads towards the maximum under load. This requires sufficient margin to avoid runaway (I rely on simulation). The distortion is lowest at idle.
Ed
Your graph does not show the effects of temperature.The Wolverine is pretty forgiving to bias change. See attached, there is very little change. So nothing to worry about!
mhuth1776 saw the bias go from 43mV at 35C to 23mV at 45C. What happens at 55C? 65C? The bias needs to be checked under worst-case dissipation because it is heading towards zero.
Ed
I understand the bias drops the hotter it gets. My graph all measurements were taken at idle temp to see what effect the bias change has on distortion. So what I am saying is as the sinks heat up and the bias drops, the overall distortion profile does not change and remains consistent with bias changes over temperature. I have pounded this amp and it does not matter if the heatsinks are 30 40 or 60 deg C the distortion stays very close to idle temp.
Okay, that implies the bias is sufficient.I have pounded this amp and it does not matter if the heatsinks are 30 40 or 60 deg C the distortion stays very close to idle temp.
Ed
Nice!Some progress on the boards. Going into the right direction. I'm using Isopropanol for cleaning but right after cleaning a sort of sticky residu remains on the board. Is that a comon problem or do I just need to use more Isopropanol?
View attachment 1158723
View attachment 1158724
View attachment 1158725
Use isopropanol next a brush next some toilet paper or cotton before isopropanol dry.Use more isopropanol.
Repeat this many times.
These Kimwipes work well for the Iso/flux cleanup task. Less lint left behind.
Kimberly-Clark 34155 Kimwipes 1-Ply Delicate Task Wipes, 4.4" x 8.4", Tissue (Pack of 286) https://a.co/d/73ehNrm
Kimberly-Clark 34155 Kimwipes 1-Ply Delicate Task Wipes, 4.4" x 8.4", Tissue (Pack of 286) https://a.co/d/73ehNrm
I have found that most fluxes are not terribly soluble in isopropanol. It takes a good bit of scrubbing and wiping to get rid of all the flux. I get the board as clean as possible and then give it a spray with MG flux remover. That does actually dissolve the flux and most of the flux will then run off the board. At most a fine white residue left behind that is easily removed by using a KIM wipe or one of those blue paper towels. Be aware the the flux remover is more toxic than the isopropanol, so good ventilation or outside is recommended. Don't get the MG heavy duty flux remover as it has acetone in it and is distinctly unpleasant.
Finally bit the bullet and picked up an Agilent E3612A off eBay for $250. I've managed to get this far in my DIY Audio journey without a DC PSU, but this project convinced me it's time to invest in one.
Hopefully, $250 is a fair price for one of these little guys.

Hopefully, $250 is a fair price for one of these little guys.
@wkloppen
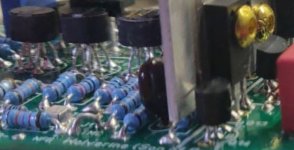
Nice work so far, you might want to lighten up on the solder a bit, especially where those transistors are concerned. The topside there has some heavy looking flow. More is not always better. It's a little hard to see, so I may be wrong, but it looks like a possible cold solder and then I pointed out a few, "I consider," a bit heavy. Please don't take this wrong, I have some brutal friends who tell me when they think something could be better and it helps me to improve. If anyone thinks, I'm wrong please chime in and tell me/him too.
JT
Nice work so far, you might want to lighten up on the solder a bit, especially where those transistors are concerned. The topside there has some heavy looking flow. More is not always better.
It's a little hard to see, so I may be wrong, but it looks like a possible cold solder and then I pointed out a few, "I consider," a bit heavy. Please don't take this wrong, I have some brutal friends who tell me when they think something could be better and it helps me to improve. If anyone thinks, I'm wrong please chime in and tell me/him too.JT
Attachments
Last edited:
thx JT for noticing...will have a close look. I solder resistors topside first then bottom. Transistors first bottom then topside. I might have overdone it a bit on the topside. Soldering iron is 370 degrees and I ttry to hold it and see the through-hole flow happening. Will check on the ones you mention
You might want to bring that temp up. People get hung up on a hot iron doing damage to components. It's true that can happen for sure, but it's more likely to happen from a iron which is to big/and, or on the component too long. The correct way, is hot, and get on, and off in a hurry. With the right temp, solder and flux, there is rarely a need to heat from both sides. An exception is, if you have a board with very small pad holes. This is not the case with the Wolverine, the team left you with more than enough hole diameter.
They did this, so you have choices of parts with larger leads, but this also makes it easier to flow smaller lead components, and to prevent the possibility to overheat, even if flowed from the bottom. Higher heat, for less time, is better than low heat, for a much longer time.
You got this, your work looks great, have a look at what Fireanimal did on his boards... the guy is a machine.
JT
- Home
- Amplifiers
- Solid State
- DIY Class A/B Amp The "Wolverine" build thread