@Plott,
When mounting the BTSB Buffer in your beautiful chassis, did you use Neutrik A-Screw-1-8 fasteners, or did you use self-tapping M3 x 8mm pan head screw fasteners? Just wondering how critical is it to use Neutrik specific screws. It would save me the hassle of placing a small order with another vendor for unique fasteners. Thanks
When mounting the BTSB Buffer in your beautiful chassis, did you use Neutrik A-Screw-1-8 fasteners, or did you use self-tapping M3 x 8mm pan head screw fasteners? Just wondering how critical is it to use Neutrik specific screws. It would save me the hassle of placing a small order with another vendor for unique fasteners. Thanks
I have used M3 self tapping pan head or bevel head screws and they work fine.
I used M3x10mm screws, they give a tight and strong fit.@Plott,
When mounting the BTSB Buffer in your beautiful chassis, did you use Neutrik A-Screw-1-8 fasteners, or did you use self-tapping M3 x 8mm pan head screw fasteners? Just wondering how critical is it to use Neutrik specific screws. It would save me the hassle of placing a small order with another vendor for unique fasteners. Thanks
Edit: as X already wrote 😛
For those wishing to bypass the on board buck converter (due to failure) or if you cannot find one then it is not populated. You can solder the external 15v supply like this:

On the supply, add a 2200uF rail cap for the 15v, this ensures that the opamp supply stays up longer than the amp bleed down to prevent turn off thump from opamp rail collapse.
On the supply, add a 2200uF rail cap for the 15v, this ensures that the opamp supply stays up longer than the amp bleed down to prevent turn off thump from opamp rail collapse.
I'm almost across the finish line on this amplifier project. The only last assembly is connecting the fault/error LEDs on the front panel.

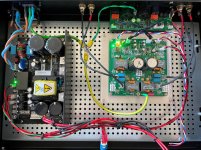
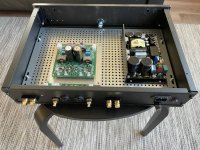
Between traveling on business and splitting my time between two residences, I was able to get a lot done with wiring the MicroAudio SMPS630-SO, the XRK971 BTSB SE/balanced buffer module and the amplifier itself. For whatever reason, my power supply did not come with the insulating sheet that is inserted between the power supply module and the SMPS heatsink, so I found some FEP (Teflon) sheet, trimmed it down and fashioned some hole so that it fit like the insulating sheet that was supposed to come with the power supply.
I had another hiccup when I tried using some M3x10mm screws for mounting the Neutrik XLR connectors onto the rear panel. I bought these through Amazon, and they broke in half as I was applying torque to them. There was no way to extract them from the mounting bosses on the Neutrik XLR connectors, so I had to buy replacement connectors, desolder the stock connectors, and install the new connectors. This time, I bought genuine Neutrik A-Screw-1-8 fasteners and they worked fine.
After getting everything wired up (except the fault/error LEDs). it was time to test the SMPS, and everything was fine with measuring the various output voltages required to power the amplifier: +12VDC, +15VD and +51VDC. I did note that the orange error light was lit. I hadn't connected the +51VDC voltage, since I don't have any 8 ohm dummy load resistors to insert across the speaker binding posts.
I also couldn't get the front panel latching power switch to work with the Standby mode on the SMPS, but I think that might be a wiring error. When I switch the rear panel AC mains rocker switch, the power supply is completely on, and not in Standby mode. That said, is the amp safe to trying playing some music?

Good job!
Re switch, it must be a wiring issue, you almost surely use the opening contacts of the switch, instead of the closing one. In this case, the amp should go in standby when you push the button.
You can connect the 51v (I did it too) without dummy load, and try the amp. The smps and the amp have built-in protection.
I did it the same way without issues.
Well Plott, I took a deep breath and connected the amp to my system. Voila! I have music--good, clean, detailed and nice sounding music!


I'll need to figure out the latching switch wiring. I want the LED to turn on when I push the button in to switch from Standby mode into full power mode, and then turn off, when I push the button again to switch it into Standby mode.
https://a.co/d/49jJIBl
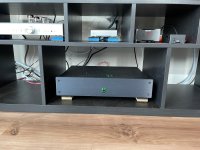
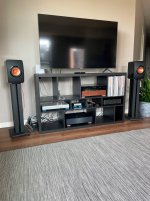
I built this amp to be my warm weather amp as I usually have a Pass DIY Aleph J Class A amplifier handling power amp duties in this system.
This amp has a relaxed presentation driving my KEF LS50's with ease. This amp must have a high damping factor--definitely higher than my Aleph J--as I had to stuff the optional cloth inserts into rear-firing ports on the LS50's to tame the bass as it was much too boomy. With the port stuffers, the frequency reponse is more balanced.
I will need to listen more extensively to really offer any qualitative assessment, but I can say that this is a very nice sounding amp.
No more orange error LED on either.
Last edited:
You are very close Rhing. I think the standby switch is similar to this (just ignore the SSR and pretend that wire is a jumper)

Basically, the standby wire provides the current drive the LED too. You need to connect the N/O and N/C wires correctly.
Basically, the standby wire provides the current drive the LED too. You need to connect the N/O and N/C wires correctly.
Thanks X. I will go back through the latching switch wiring again. I’m playing some reference tracks and this amp sounds great. I wonder how long it takes for the amp to sound its best. If it stays where it is now, I’ll be a happy camper.
There’s really no “break in” required on this amp. There are some Elna Silmic II silk caps on the amp that couple the sound into the front and those may improve with some play time. But all the other stuff are solid state and film caps and copper inductors.
Glad you like the sound out of the box. It’s a great sounding amp.
Glad you like the sound out of the box. It’s a great sounding amp.
Hi X, it really seems to work well from the start. I haven’t noticed any changes over the last several hours. It really does perform as many of the LSA Discovery Warp-1 reviewers have stated. It does not sound like most Class D amps, and it really has a rich tonality. I really like it.
I wish I had more time for listening, but I have to travel today on business. I get back later this week, so I’ll work on rewiring the front panel-mounted power switch for standby/on modes, and wire up the error/fault LEDs.
Earlier this year, I had a chance to evaluate a significantly more expensive GAN FET dual mono amp. Even though it was powerful, detailed and free of grain and mid-high frequency harshness, I would take this amp over that in terms of musicality. The presentation of XRK971’s TPA3255 is just more palpable as a natural, realistic presentation of the musical performance. Another technology, I have been interested in are the Purifi Eignetakt Class D amplifiers, but they are considerably more expensive and I haven’t read reviews where they really outshine TI-based PurePath Class D amps. XRK971’s amp with the MicroAudio SMPS640-SO is the first Class D amp that sounds like it has some bass punch.
I might ship this amp to some audio friends I am visiting later this month. One friend has a pair of Klipsch Forte II’s, and another has a pair of Altec Model 19’s and a pair if Quad ESL-57’s.
After 3 months... this amp is still my favorite (together with the M2x, but it's a different animal).
Intense listening caused - as expected - a further refinement of the sound, it's silky smooth, wonderful.
So, no more time to write, I have to listen 😍
Intense listening caused - as expected - a further refinement of the sound, it's silky smooth, wonderful.
So, no more time to write, I have to listen 😍
Where can I find J5 and J6? Do I have to connect w141, w151 and w161, w131?Here is a diagram showing how to setup the DIP switches in case you want a different mode of operation. Note that Cstart can work in either position for stereo BTL. For 4 Ch SE output you need to install DC blocking caps where the Faston output tabs are located.
View attachment 1137464
The solder bridges need to connect like this:

I am not sure what you mean by J5 and J6. There are no “J” designators on the PCB. Only X for connectors and W for solder jumpers. For quad SE output, you install qnty 4 x 1500uF 63v coupling caps where the Faston output tabs are. Faston tabs need to be removed (where X is):

I am not sure what you mean by J5 and J6. There are no “J” designators on the PCB. Only X for connectors and W for solder jumpers. For quad SE output, you install qnty 4 x 1500uF 63v coupling caps where the Faston output tabs are. Faston tabs need to be removed (where X is):
Thank you so much for the quick reply. I'm using se mode, installed the 4 caps, I've put the bridges, but i was referring to table 7 of your post. I connected all w1** solder bridges.
Oh, that table was taken from the TI TPA3255 EVM schematic, so their designators are different than mine.
J4 is M1 selector, J5 is SE/DIFF and J6 is M2 selector.
Those J selectors in EVM are implemented by hard wired solder bridges on my PCB.
J4 is M1 selector, J5 is SE/DIFF and J6 is M2 selector.
Those J selectors in EVM are implemented by hard wired solder bridges on my PCB.
Last edited: