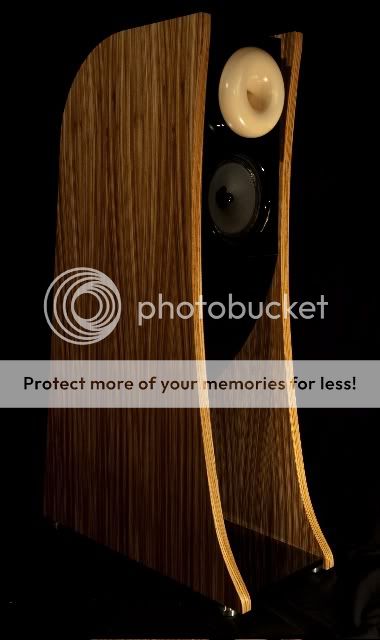
Cessaro is adopting the LeCleac'h hornprofile in their new 2-way horn speaker.
Cessaro Horn Acoustics - Audio Voice Acoustics
Cessaro Horn Acoustics - Audio Voice Acoustics
It seems to me that putting a tweeter "inside" the horn mouth (let's forget about the issue of reflections, etc for the moment) places the tweeter at the wrong time WRT the horn's output. The tweeter needs to be back approximately where the diaphragm of the compression driver sits...
_-_-bear
_-_-bear
It seems to me that putting a tweeter "inside" the horn mouth (let's forget about the issue of reflections, etc for the moment) places the tweeter at the wrong time WRT the horn's output. The tweeter needs to be back approximately where the diaphragm of the compression driver sits...
_-_-bear
Yes, all the voice coils need to be in the same plane.
Considering the additional depth of the tweeter's horn, I suspect the compression driver is aligned well with the mid-bass cone just below it. The "horn" exit underneath the two is the exit of the rear-loaded horn for the mid-bass cone driver (..and with it's phase reversal and the line length the time delay will be significant no matter what).
400Hz paper horn photo
Here is a photo of my 400Hz paper horn and Radian475 driver. Now I just have to make a mount and epoxy it on so I can hear them. Thanks Jean-Michel, the templates from your program are perfect. I'm sure a nice glass horn would be even better but at least now I can experiment for the first time with compression drivers.
Here is a photo of my 400Hz paper horn and Radian475 driver. Now I just have to make a mount and epoxy it on so I can hear them. Thanks Jean-Michel, the templates from your program are perfect. I'm sure a nice glass horn would be even better but at least now I can experiment for the first time with compression drivers.
Attachments
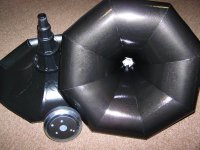
Poster board
They are one layer of heavy poster board. Cut to the template and rolled over steam to start the bend without wrinkling. The act of taping the petals together forces them into the perfect shape automatically and the 45 degree angle of the joints makes them amazingly strong. Rubberized chip coat on the back gives them some weight and the insides are finished with Hammered Metal spray paint. The entry is forced into round by wrapping the petals over a chrome socket that measures 1.05 inches with cotton twine covered in super glue.
.
Very nice! Looks like Hammer-right paint, or similar.
How did you build up the paper?
I did similar, smaller paper maché horns, but they did not look as good. Sounded very nice, tho.
Attachments

Last edited:
Cardboard horn
Holy CRAP!
This is exactly what I've been planning for a 100 Hz horn!! Very nice.
Best
Kris
Holy CRAP!
This is exactly what I've been planning for a 100 Hz horn!! Very nice.
Best
Kris
They are one layer of heavy poster board. Cut to the template and rolled over steam to start the bend without wrinkling. The act of taping the petals together forces them into the perfect shape automatically and the 45 degree angle of the joints makes them amazingly strong. Rubberized chip coat on the back gives them some weight and the insides are finished with Hammered Metal spray paint. The entry is forced into round by wrapping the petals over a chrome socket that measures 1.05 inches with cotton twine covered in super glue.
.
BTW, I would have used 7 or 9 petals instead of 8.
7 petals
I thought about that after they were done. An odd number of petals would make no parallel surfaces in the throat for the sound to bounce back and forth on.BTW, I would have used 7 or 9 petals instead of 8.
Cheap yes
Cheap yes. Easy? Maybe the second set. I had some head scratching to figure out more than a few times while building these. It is certainly good for proto typing. Those are T=.8. If I really like the horn sound I can see trying a set at .7 to compare and also adjusting the cutoff frequency to be as small as possible while still performing well at the lowest crossover frequency that the 1 inch drivers are capable of which is reportedly around 700Hz at living room SPLs for the Radian on a big horn.
I thought about that after I did my horns, too. But they sure didn't sound bad.
This is a great technique that ought to be further developed, or at least documented, here on the forum. It's a cheap, easy way to make a nice horn.
Cheap yes. Easy? Maybe the second set. I had some head scratching to figure out more than a few times while building these. It is certainly good for proto typing. Those are T=.8. If I really like the horn sound I can see trying a set at .7 to compare and also adjusting the cutoff frequency to be as small as possible while still performing well at the lowest crossover frequency that the 1 inch drivers are capable of which is reportedly around 700Hz at living room SPLs for the Radian on a big horn.
Considering the additional depth of the tweeter's horn, I suspect the compression driver is aligned well with the mid-bass cone just below it. The "horn" exit underneath the two is the exit of the rear-loaded horn for the mid-bass cone driver (..and with it's phase reversal and the line length the time delay will be significant no matter what).
for which speaker??
I was remarking on the general case...
_-_-bear
Cheap yes. Easy? Maybe the second set.
Ha! OK - you got me there.
 I put an extraordinary amount of time into mine and they were smaller.
But maybe we can help. With a guide we might be able to help others get there faster. That's what the forum is all about.
Let's see if we can come up with a guide. It can be improved as we move along.
Template
I have about 15 hours into this first pair. Maybe with a guide a first time builder could do it more quickly. The cost so far is less than $20. I can post the template which can be loaded onto a usb drive and printed and laminated at your local print shop since the petals are too big to print at home. I would post the one I used but I think I can improve on it and I'm sure I would be in the minority in choosing to work with a 1 inch driver so I would be happy to upload 3 designs for 1, 1.4 and 2 inch drivers. It only takes a few minutes to develop a new design with Jean-Michel's wonderful program. The only quirky aspect is that the resulting template design is generated with the X and Y axis not to the same scale so I must then crop and resize the file with Irfanview. I will also want to play with the program in order to determine what entry value to specify in order to get a perimeter that equals the desired circumference as the program will tend to fit the octagon around the the specified value but I found it very easy to force the entry to become round which will obviously make for a better transition.
Ha! OK - you got me there.
But maybe we can help. With a guide we might be able to help others get there faster. That's what the forum is all about.
Let's see if we can come up with a guide. It can be improved as we move along.
I have about 15 hours into this first pair. Maybe with a guide a first time builder could do it more quickly. The cost so far is less than $20. I can post the template which can be loaded onto a usb drive and printed and laminated at your local print shop since the petals are too big to print at home. I would post the one I used but I think I can improve on it and I'm sure I would be in the minority in choosing to work with a 1 inch driver so I would be happy to upload 3 designs for 1, 1.4 and 2 inch drivers. It only takes a few minutes to develop a new design with Jean-Michel's wonderful program. The only quirky aspect is that the resulting template design is generated with the X and Y axis not to the same scale so I must then crop and resize the file with Irfanview. I will also want to play with the program in order to determine what entry value to specify in order to get a perimeter that equals the desired circumference as the program will tend to fit the octagon around the the specified value but I found it very easy to force the entry to become round which will obviously make for a better transition.
Template and instuctions for paper LeCleac'h horn
Here is the template for 1 inch, 400Hz, T.8, 9 petals. Print a few at a large format print shop and have the prints laminated. Experiment with cutting it out so that the paper petals you trace and cut measure .35 inches, 8.89 mm across the small end so that the perimeter of the finished nonagon will be just greater than the perimeter of a 1 inch circle. You may have to cut out the template so that just the jagged edges of the printed line remain on the template. .020 inch paper poster board works perfectly for the petals. The template is drawn to give a 1/2 flare back as shown in my photo because it is too hard to tape the edges of a full, round and round flare back. You may add a radius in addition to the flat edge to create round lips on each petal for additional spiraling past the end of the seam as the leCleac'h formula calls for. Mine are shown as 8 petals but using 9 may have a technical advantage of reducing reflections and HOMs in the throat by eliminating the parallel surfaces. Roll the big end of your paper petals over steam with 2 inch pipe and then 1.5 inch pipe to form the approximate curve. Start to tape each piece together at the small end with small pieces of masking tape every 5 inches or so to tack the two petals together. Then go over that with a full length piece of masking tape. The perfect shape magically appears. Then add a full length piece of 1 inch cloth hockey tape for strength. Do one petal at a time and then close the circle as the last step. Insert a chrome socket or pipe into the entry, the closest size greater than 1 inch o.d.. Mine was 1.05 inches. Wrap the first 3mm or so of the entry with cotton twine to force it round and soak it with super glue. Apply the super glue outdoors as the drying reaction over the twine can be quite abrupt and will emit a puff of noxious gas. The glue soaked twine is amazingly hard and strong and will hold the exact shape of the pipe. Apply super glue over all of the tape as well, as paint will tend to lift the glue if you don't. Wrap additional circles of twine at regular intervals down the length of the first half of the horn to strengthen it and super glue. The second half of the horn where the curve becomes greater is amazingly strong with no reinforcement. Another option would be to wrap the entire first half with yarn and soak this with wood glue. Paint as desired inside and out to strengthen the seams. File the entry flat and level. Make a mount for your driver out of 3/4 mdf by boring a 1 1/4 inch hole in the center and drilling the mounting holes. Making the mounting holes a little too big should give room to perfectly align the final installation of the driver as you tighten it down. Lay out a piece of wax paper on a flat, level table. Lay the mount on it and glue the horn into the center of the hole with 4 hour epoxy such as the excellent JBWeld so that the entry and the mount stay flat against the table. A final shot of paint and you are done.
Here is the template for 1 inch, 400Hz, T.8, 9 petals. Print a few at a large format print shop and have the prints laminated. Experiment with cutting it out so that the paper petals you trace and cut measure .35 inches, 8.89 mm across the small end so that the perimeter of the finished nonagon will be just greater than the perimeter of a 1 inch circle. You may have to cut out the template so that just the jagged edges of the printed line remain on the template. .020 inch paper poster board works perfectly for the petals. The template is drawn to give a 1/2 flare back as shown in my photo because it is too hard to tape the edges of a full, round and round flare back. You may add a radius in addition to the flat edge to create round lips on each petal for additional spiraling past the end of the seam as the leCleac'h formula calls for. Mine are shown as 8 petals but using 9 may have a technical advantage of reducing reflections and HOMs in the throat by eliminating the parallel surfaces. Roll the big end of your paper petals over steam with 2 inch pipe and then 1.5 inch pipe to form the approximate curve. Start to tape each piece together at the small end with small pieces of masking tape every 5 inches or so to tack the two petals together. Then go over that with a full length piece of masking tape. The perfect shape magically appears. Then add a full length piece of 1 inch cloth hockey tape for strength. Do one petal at a time and then close the circle as the last step. Insert a chrome socket or pipe into the entry, the closest size greater than 1 inch o.d.. Mine was 1.05 inches. Wrap the first 3mm or so of the entry with cotton twine to force it round and soak it with super glue. Apply the super glue outdoors as the drying reaction over the twine can be quite abrupt and will emit a puff of noxious gas. The glue soaked twine is amazingly hard and strong and will hold the exact shape of the pipe. Apply super glue over all of the tape as well, as paint will tend to lift the glue if you don't. Wrap additional circles of twine at regular intervals down the length of the first half of the horn to strengthen it and super glue. The second half of the horn where the curve becomes greater is amazingly strong with no reinforcement. Another option would be to wrap the entire first half with yarn and soak this with wood glue. Paint as desired inside and out to strengthen the seams. File the entry flat and level. Make a mount for your driver out of 3/4 mdf by boring a 1 1/4 inch hole in the center and drilling the mounting holes. Making the mounting holes a little too big should give room to perfectly align the final installation of the driver as you tighten it down. Lay out a piece of wax paper on a flat, level table. Lay the mount on it and glue the horn into the center of the hole with 4 hour epoxy such as the excellent JBWeld so that the entry and the mount stay flat against the table. A final shot of paint and you are done.
Attachments

Last edited:
JBL EOS? Elliptical Oblate Spheriodal - its not a diffraction horn. Hrdly anybody uses diffraction these days - even the big guys.
I dont see a single JBL horn speaker without a diffraction slot, same with Klipsch speakers...
Klipsch even has rappid flare changes in the horns of their top line speakers, the Palladium series, which I thought was a bad ting in horns?
- Home
- Loudspeakers
- Multi-Way
- Jean Michel on LeCleac'h horns